 By
By PDFs in Anvil
In Anvil, generating a PDF document is easy and we only need to use Python. Any Anvil Form can be made into a PDF with just a single function call! We can render an Anvil Form as a PDF by turning it into a Media Object. This means we can easily download our PDF, attach it to an email or store it in a Data Table.
In this tutorial, we’ll see how easy it is to generate, download and email PDF documents using Python in Anvil. We’ll build a simple web app where users can register for an event and download their ticket as a PDF.

The finished app
Step 1 - Design your PDF
First, let’s design the Form that we want to convert into a PDF ticket. Add a new Blank Panel Form to the app and rename it ‘Ticket’. I am using the Rally light colour scheme.
You can design your Form however you like. To make the Form look like a ticket, I added a Card and a Text component with a secondary-coloured background for the event name ‘SUMMER MUSIC FESTIVAL’. Inside the Card, I placed a Column Panel with some static ticket details and an Image for the QR code. I also added two Text components to display the user’s name (name_label) and the date of the event (date_label):
Add Text labels for user name and event date
Change the __init__ of the Ticket Form so that it takes strings called name and date as arguments and displays them on the labels you just created. Switch to Code View in the Form Editor and change the __init__ function of the Ticket class so it looks something like this:
class Ticket(TicketTemplate):
  def __init__(self, name, date, **properties):
    # Set Form properties and Data Bindings.
    super().__init__(**properties)
    self.name_label.text = name
    self.date_label.text = date
Step 2 - Create the user interface
Let’s now build a UI so that users can generate and download the ticket as a PDF. We’ll design a simple registration page for users to put in their name and email address and choose the date of the event they will attend.
Switch to Form1 in the App Browser. We need two TextBoxes so that users can enter their name and email address, and two Text components to label these fields. We’ll name the TextBoxes name_box and email_box. We’ll also add a DropDown named date_dropdown, so that users can choose the date of the event.
Add input fields to registration form
Populate the items property of the DropDown with a few dates. Each item in the DropDown should be on a separate line. You can also include a placeholder that says ‘choose date’.
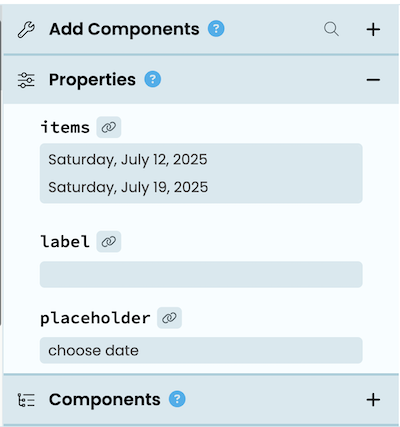
Add date options to the DropDown menu
Finally, add a Button called register_button, so users can register and download their PDF ticket. Let’s add a click event for this Button that just displays the Ticket Form, so we can see what it will look like when it’s downloaded.
  @handle("register_button", "click")
  def register_button_click(self, **event_args):
    """This method is called when the button is clicked"""
    name = self.name_box.text
    date = self.date_dropdown.selected_value
    open_form('Ticket', name, date)
Now, run the app! Fill in a name, select a date and click REGISTER to see what the ticket looks like.
Viewing the ticket with user details
Step 3 - Render and download the PDF
Our ticket is looking good! Now let’s turn it into a PDF. Rather than displaying the Ticket form in the browser, we’ll define a server function to render it as a PDF document.
We can only generate a PDF from Server code, so we’ll first need to add a Server Module to our app. We define a function which calls anvil.pdf.render_form(). This method returns a Media object, which means we can pass it back to the browser, download it or send it as an email attachment. We also need to decorate our function with @anvil.server.callable so we can call the function from client code.
Here’s what our server code looks like:
import anvil.pdf

@anvil.server.callable
def create_pdf(name, date):
    pdf = anvil.pdf.render_form('Ticket', name, date)
    return pdf
Let’s call this function from the registration form then download the generated PDF. We use anvil.server.call() to call our server function and generate the PDF, and anvil.media.download() to save it. The click event should now look like this:
  @handle("register_button", "click")
  def register_button_click(self, **event_args):
    """This method is called when the button is clicked"""
    name = self.name_box.text
    date = self.date_dropdown.selected_value

    pdf = anvil.server.call('create_pdf', name, date)
    anvil.media.download(pdf)
That’s all we need to do to render a Form as a PDF. And we can download it with just one line of code!
Let’s test it out. Run the app again, fill in the form and click REGISTER. This time, the ticket will download.
Downloading the PDF ticket
Step 4 - Send your PDF as an email attachment
Once we’ve rendered our Form as a PDF, it’s easy to send an email with the document attached.
We first need to add the Email Service to our app. In the Sidebar Menu, click the blue plus button  and click on Email.
Add the Email Service
We can then write a function in the Server Module which calls create_pdf and then sends the rendered PDF as an email attachment:
@anvil.server.callable
def send_pdf_email(email, name, date):
  pdf = create_pdf(name, date)
  anvil.email.send(
    from_address='no-reply',
    from_name='Events',
    to=email,
    subject='Your Ticket',
    text='Thanks for registering! Your ticket is attached to this email.',
    attachments=pdf
  )
  return pdf
anvil.email.send() is available to all Anvil users, but on the Free Plan, emails will be redirected to the app owner. Email service is available on the Hobby Plan and above, or by setting a custom SMTP server in the Email service.Now let’s modify the register_button_click method in Form1 so that it calls the send_pdf_email function we just wrote. Since send_pdf_email returns the rendered PDF, we just need to swap it with create_pdf and pass in email:
  @handle("register_button", "click")
  def register_button_click(self, **event_args):
    """This method is called when the button is clicked"""
    name = self.name_box.text
    date = self.date_dropdown.selected_value
    email = self.email_box.text

    pdf = anvil.server.call('send_pdf_email', email, name, date)
    anvil.media.download(pdf)
We can now run the app again and our PDF ticket will be emailed to us. As long as we are in Test Mode, the ticket will always be emailed us no matter what email address we type in.
Step 5 - Check the input
We want to make sure that the user has actually filled in the registration form, so let’s add in a check before we generate the PDF ticket. We’ll alert the user if they haven’t filled the form, but if they have, we’ll tell them that their ticket will be downloaded and emailed to them:
  @handle("register_button", "click")
  def register_button_click(self, **event_args):
    """This method is called when the button is clicked"""
    name = self.name_box.text
    email = self.email_box.text
    date = self.date_dropdown.selected_value

    if name and email and date:
      alert(f'Thanks for registering! Your ticket is downloading and will be sent to {email}.')

      pdf = anvil.server.call('send_pdf_email', email, name, date)
      anvil.media.download(pdf)

    else:
        alert('You have not completed all required fields')
Try running the app again, but this time, leave at least one of the TextBoxes blank.
Validating the user input
Step 6 - Optional: Set the PDF filename
Our app now generates, downloads and emails a PDF attachment when a user registers for our event. However, the PDF is called ‘print.pdf’ when we download it, which isn’t very descriptive. If we want to specify settings for our PDF document, we can use PDFRender(). Let’s modify our create_pdf function and specify a filename using PDFRenderer().
First add from anvil.pdf import PDFRenderer to the top of the Server code, then modify the create_pdf function:
import anvil.pdf
from anvil.pdf import PDFRenderer

@anvil.server.callable
def create_pdf(name, date):
    pdf = PDFRenderer(filename=f'{name} Ticket.pdf').render_form('Ticket', name, date)
    return pdf
Now when our ticket is downloaded, it will have a more useful name.
Step 7 - Run the finished app
We’ve now created a simple app which converts an Anvil form to a downloadable PDF and sends it as an email attachment. Let’s test out the finished app.
Run the finished app
That’s it!
Your app is ready to go live on the internet. Click the ‘Publish’ button at the top right of the editor, then select ‘Publish this app’ and use the public URL provided or enter your own.
Publish your app
You can check out the finished app here:
What’s Next?
Head to the Anvil Learning Centre for more tutorials, or head to our examples page to see how to build some complex apps in Anvil.
Build Database-Backed Apps
In this tutorial, you’ll learn how to do all of those things and more in Anvil.
Deploy data science to the web with Deepnote