Deploying Data Science, Made Easy
Cloud Notebooks and Python Web Apps
Watch this tutorial on YouTube
Deepnote is a seriously slick Python notebook, hosted in the cloud, with incredible real-time collaboration. It’s great for working with other data scientists. But what happens when you want to share your project with non-programmers? They need an easy-to-use interface – so you need to deploy what you’ve built.
We’ve got just the ticket. Follow along as we use Deepnote and Anvil to deploy a machine learning model as a web app – a web app anyone can use!
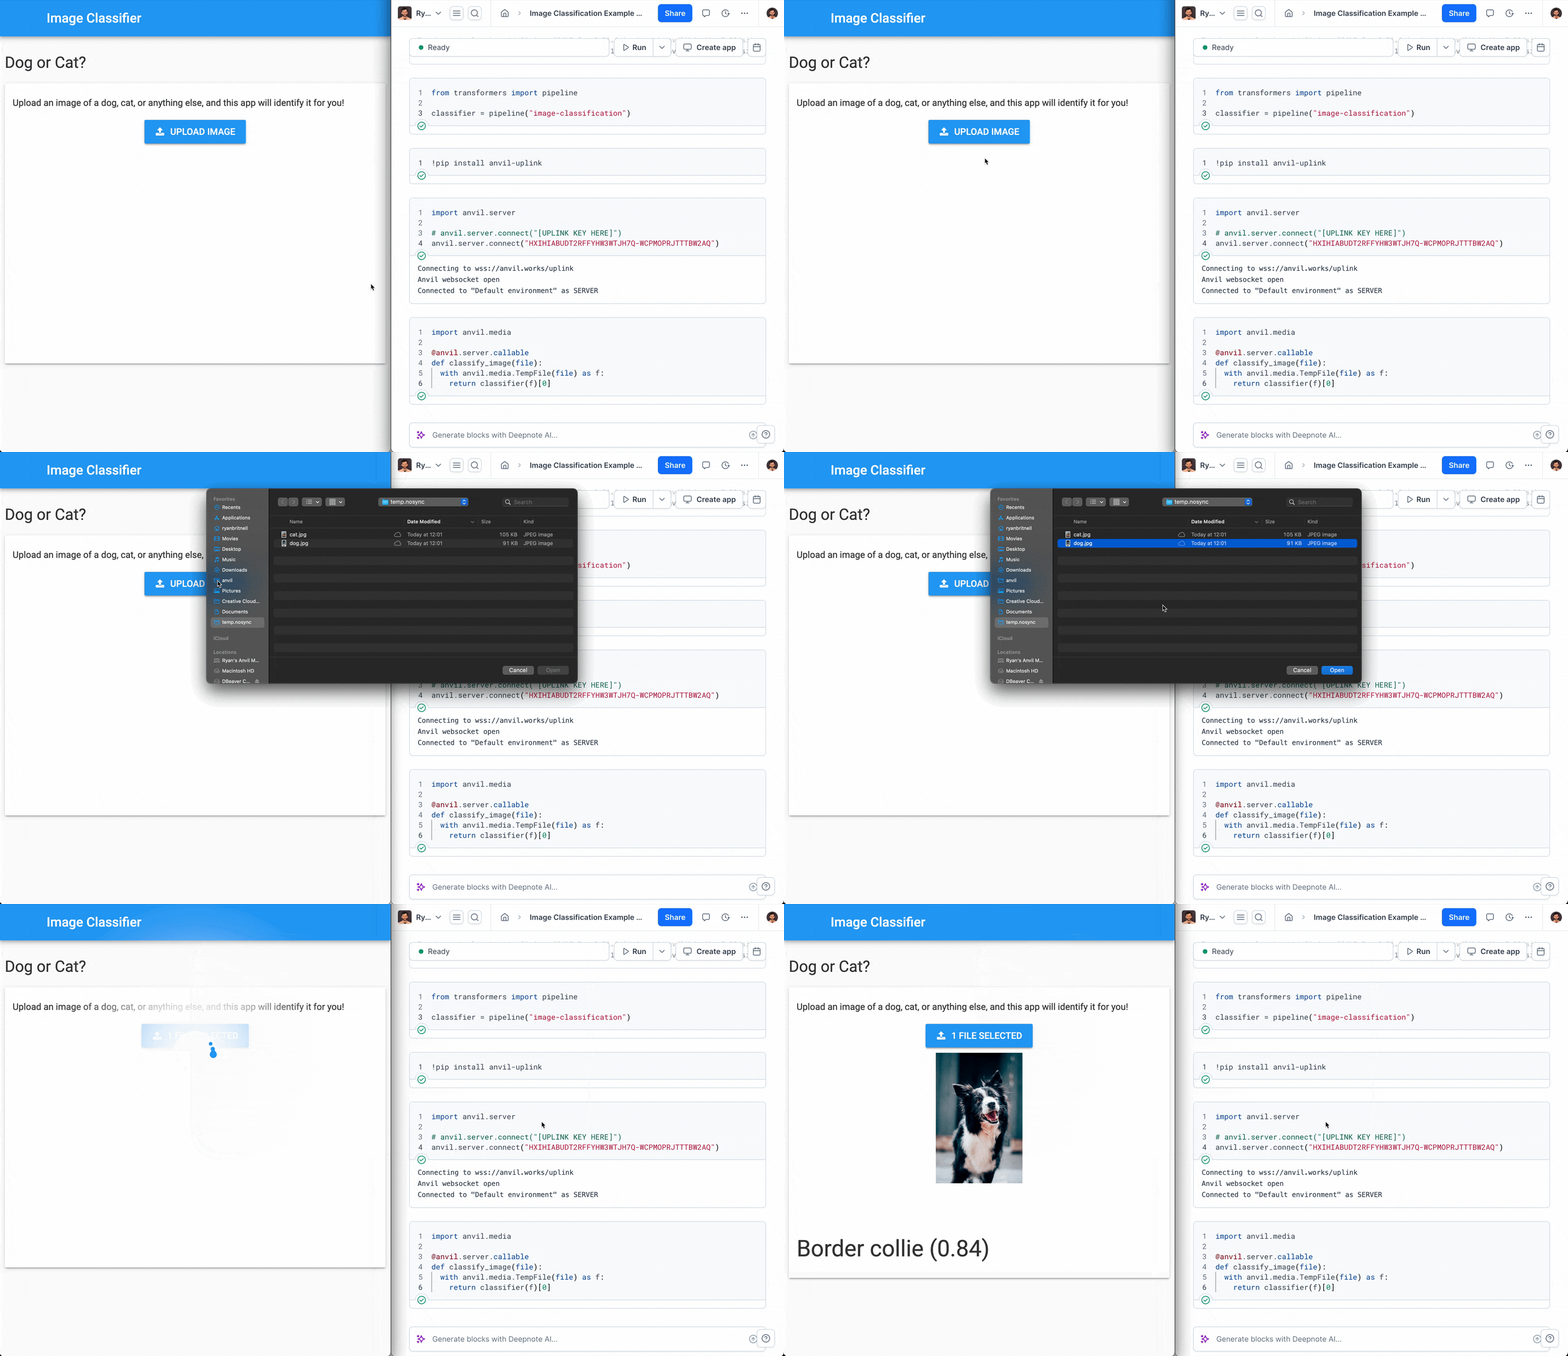
We’re going to build this app – and it’s going to be easy!
Step 0 - Get the notebook
In this example, we’re going to start with an image classifier that can classify an image. Believe it or not, getting this notebook running in the cloud is the easy part! Just open the notebook in Deepnote and click Duplicate:

Click “Duplicate” to make a copy of this notebook in your own (free) Deepnote account.
All right, we have a notebook. Let’s deploy it as a web app!
Step 1 - Create your Anvil app
Creating web apps with Anvil is simple. No need to wrestle with HTML, CSS, JavaScript or PHP – we can do everything in Python, even front-end code!
Log in to Anvil and click ‘New Blank App’. Choose the Material Design theme.

First, name the app. Click on the name at the top of the screen and give it a name.
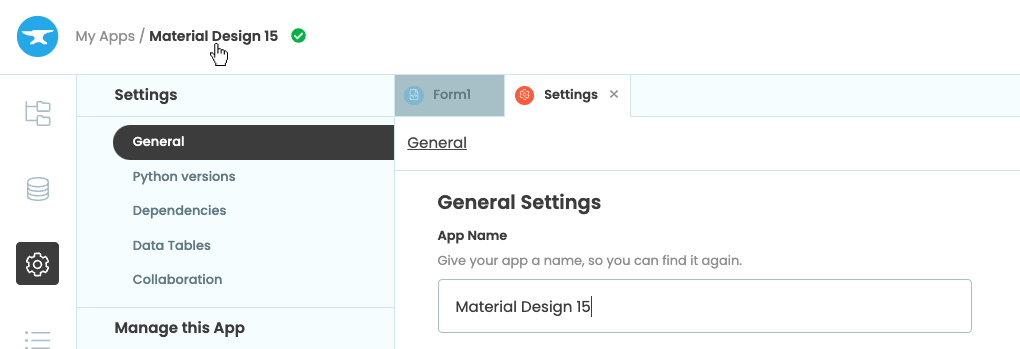
Step 2 - Add your components
We construct the UI by dragging-and-dropping components from the Toolbox. Drop a Card  and a FileLoader
 ![]() . The FileLoader will let users upload the image they want classified.
. The FileLoader will let users upload the image they want classified.
Next, add an Image ![]() component, which will display the input image, and a Label
component, which will display the input image, and a Label ![]() to display the returned classification.
to display the returned classification.
Note: This guide includes screenshots of the Classic Editor. Since we created this guide, we've released the new Anvil Editor, which is more powerful and easier to use.
All the code in this guide will work, but the Anvil Editor will look a little different to the screenshots you see here!
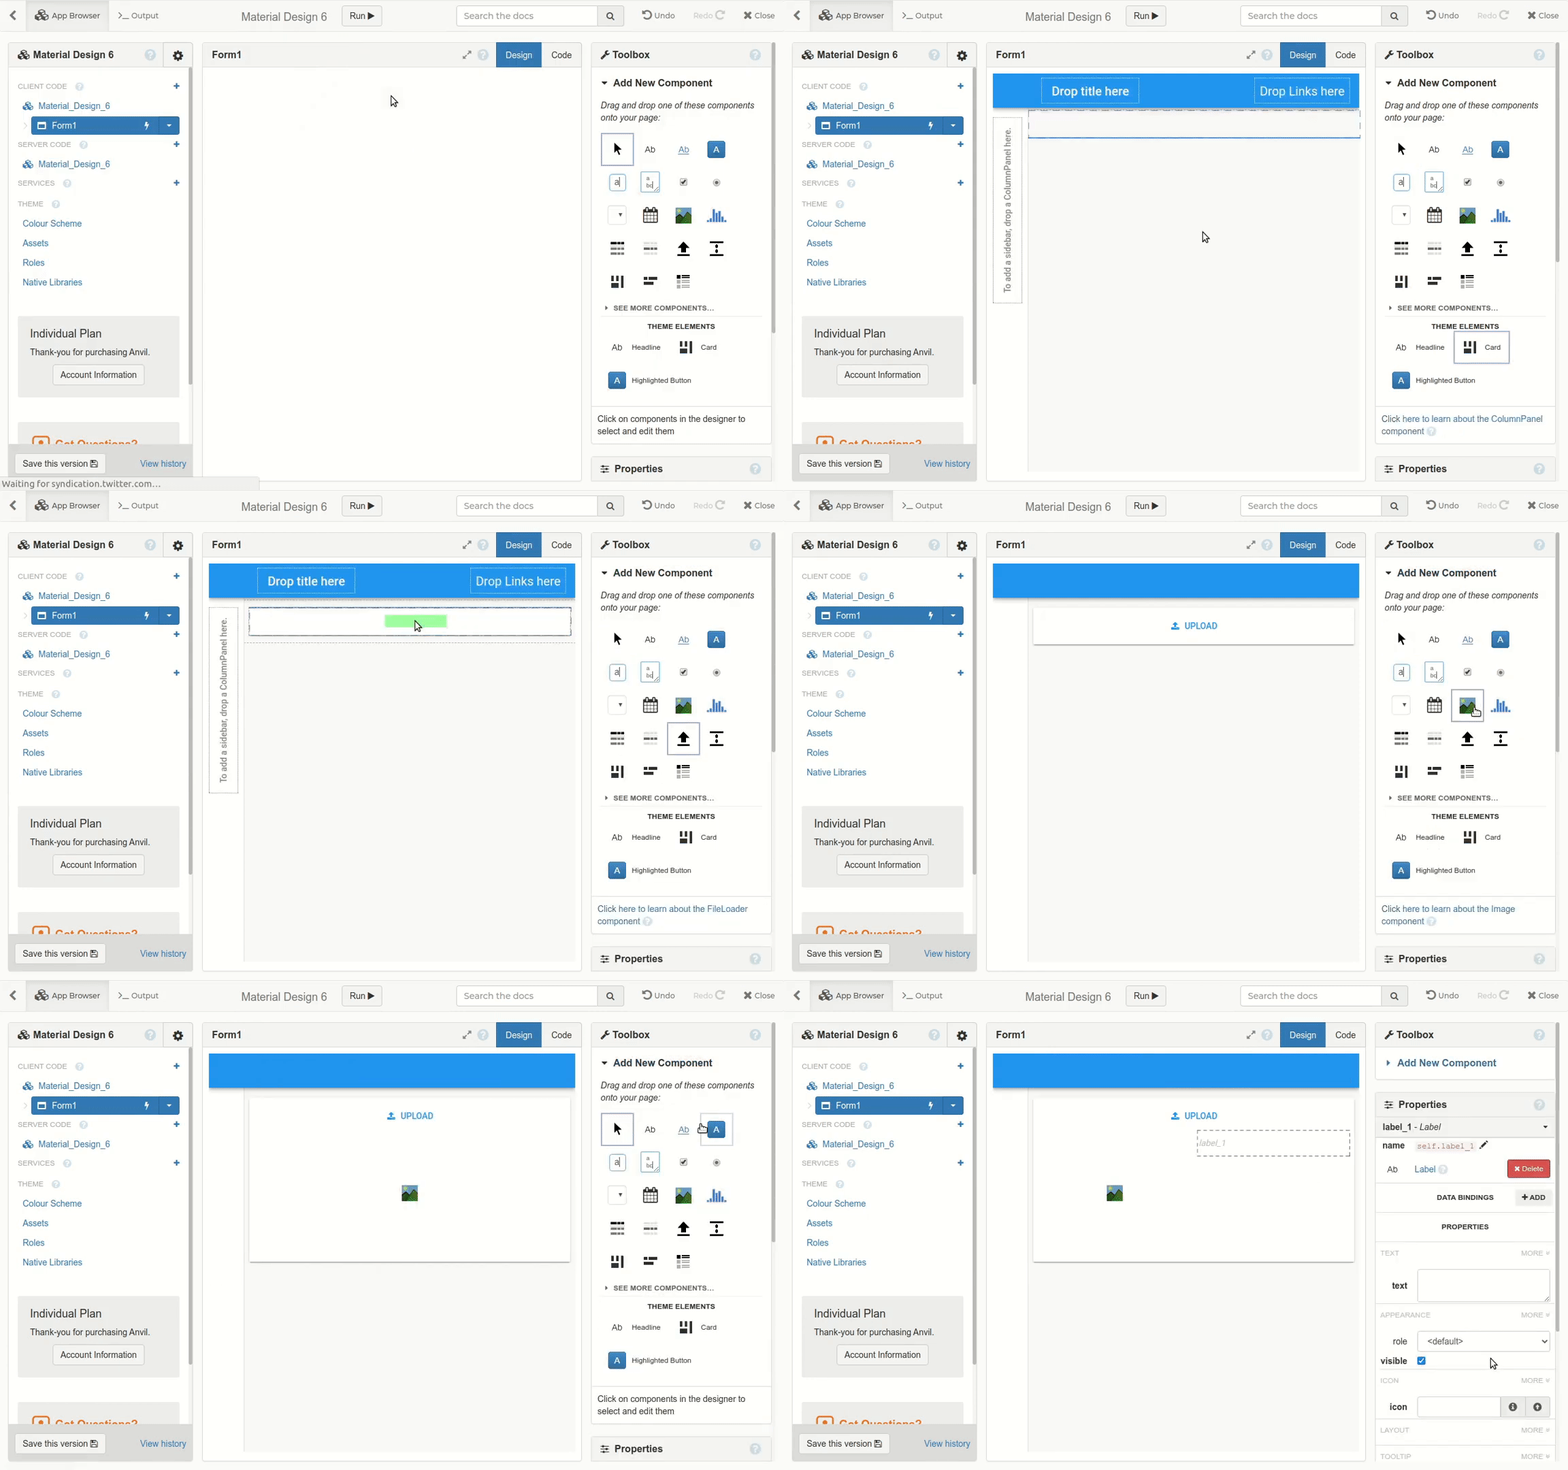
Select the Label we just added and, in the components properties, change the name to ‘result_lbl’. Then add a spacer component above the label to centre the label against the image.
Now we have a user interface, let’s connect our app to the code in our Deepnote notebook.
Step 3 - Enable the Uplink
From the IDE, let’s enable the Uplink. Open the Gear menu ![]() in the top left of the IDE, then select
in the top left of the IDE, then select Uplink and then Enable the Anvil Server Uplink.
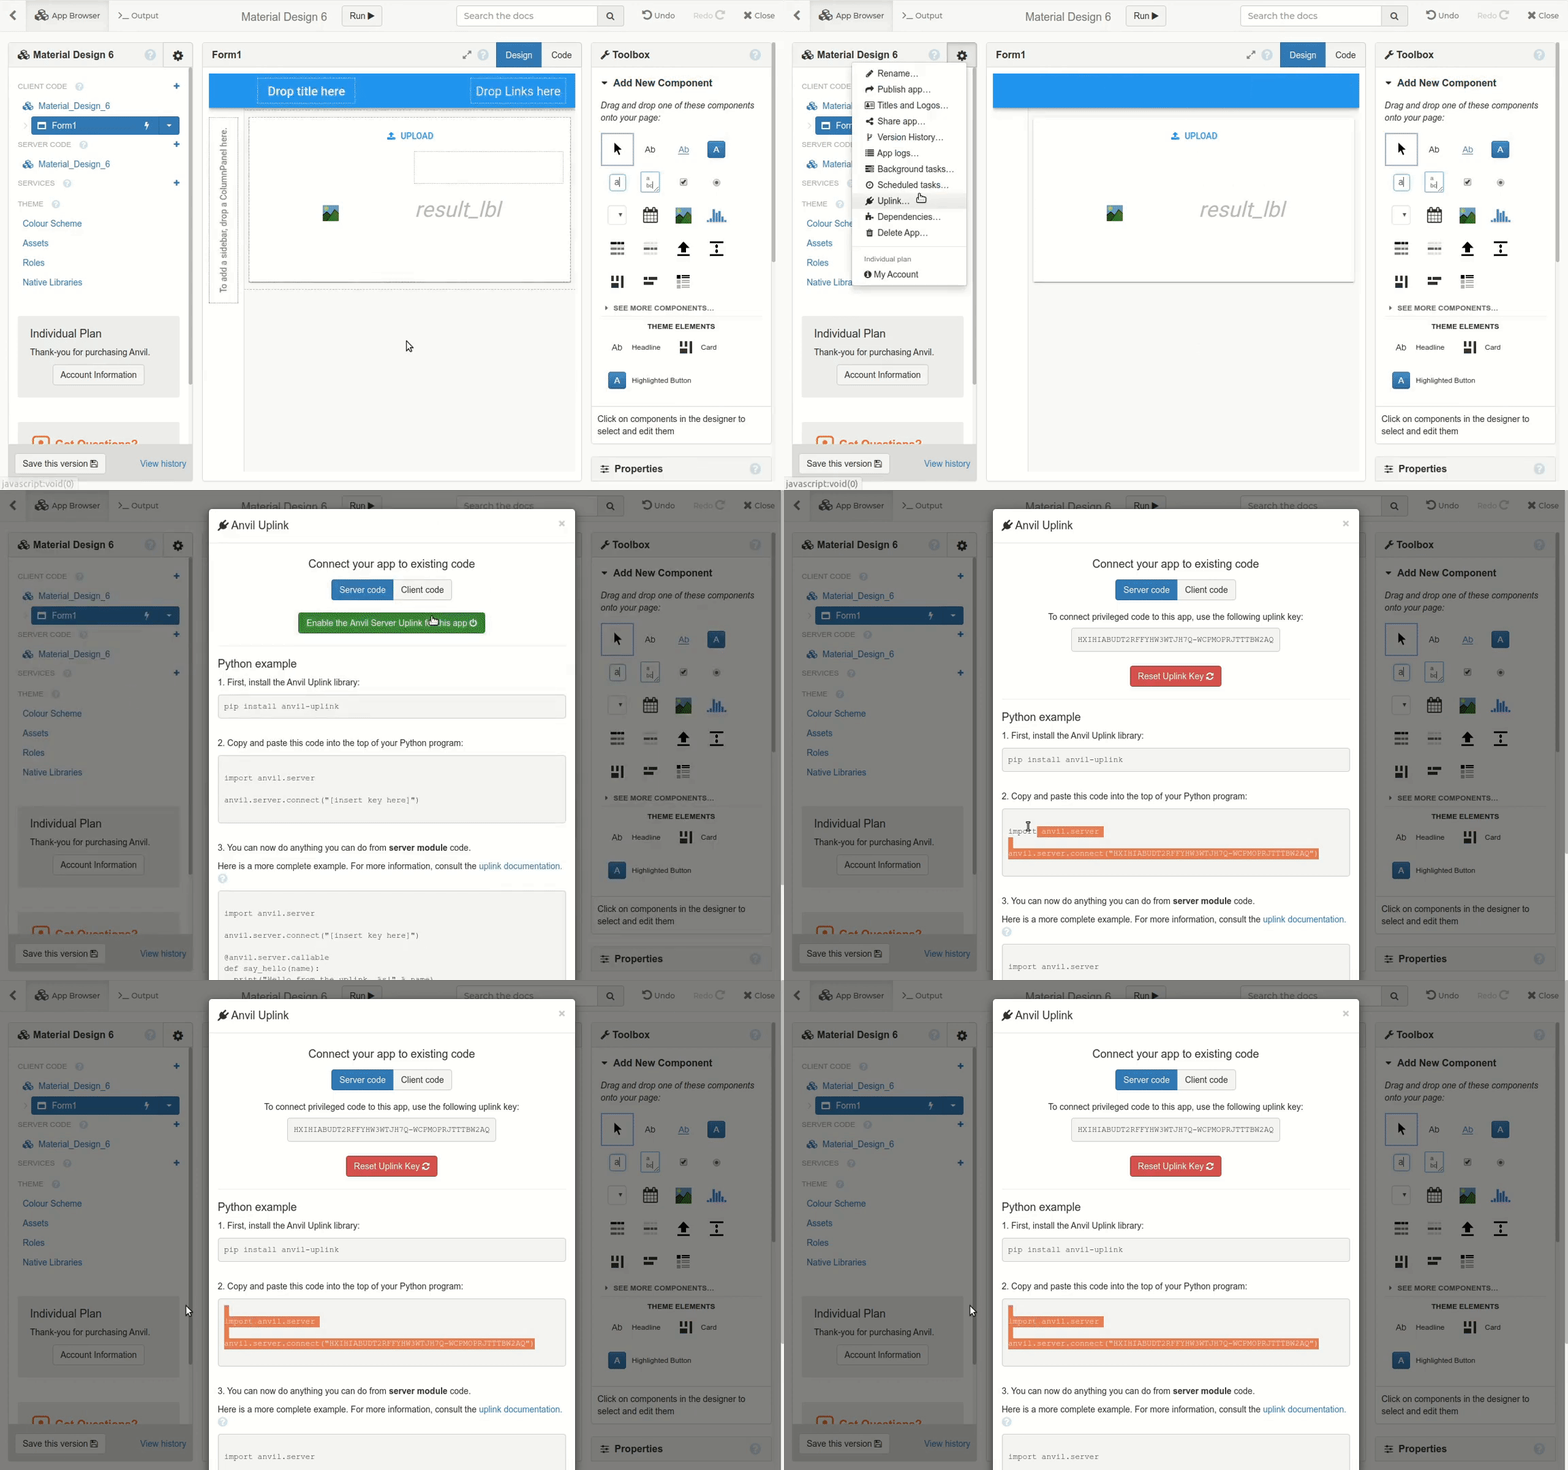
This will then give us an Uplink key we can use in our Deepnote notebook.
Now let’s install the Uplink in our Deepnote environment, and connect our script using the key we just created.
Step 4 - Install the Uplink Library in our Deepnote notebook
It’s time to connect our notebook to Anvil!
The first thing we need to do is install the anvil-uplink library. The example notebook already contains a cell which does this. Let’s add !pip install anvil-uplink to our notebook:
!pip install anvil-uplinkThe ! operator tells our notebook that this line is a command line script and not Python code.
Step 5 - Connecting our Script
Now that the Uplink library will be installed when we start our notebook, we can connect our notebook in the same way as any other Uplink script.
Start by importing the anvil.server module:
import anvil.serverThen connect to the Uplink:
anvil.server.connect("your-uplink-key")Replace “your-uplink-key” with the Uplink key from your app.
Run the cell. You should see output like this:
Connecting to wss://anvil.works/uplink
Anvil websocket open
Authenticated OK
That’s it! When we run our notebook, it will now connect to our web app via the Uplink. Next, let’s create a function we can call from our Anvil app.
Step 6 - Creating a callable function
In a new cell, let’s define a function we can call from our app to classify an image. We’ll call it classify_image, and decorate it with @anvil.server.callable so we can call it from the web.
The image will be passed to our classify_image function as an Anvil media object. We’ll save it as a temporary file and feed it into our classifier model. The model will return results ranked by confidence, allowing us to use the first result as the most likely classification.
Here is how our finished cell should look:
import anvil.media

@anvil.server.callable
def classify_image(file):
  with anvil.media.TempFile(file) as f:
    return classifier(f)[0]
Our notebook is now ready to classify images! Run the entire notebook and make sure there are no errors.
Let’s go back into our Anvil app and call that classify_image function when someone uploads an image.
Step 7 - Calling notebook functions from the web
In the design view of our Anvil app, double click the FileLoader component we added earlier. It will take us to the code view and add a function that runs whenever a file is uploaded.
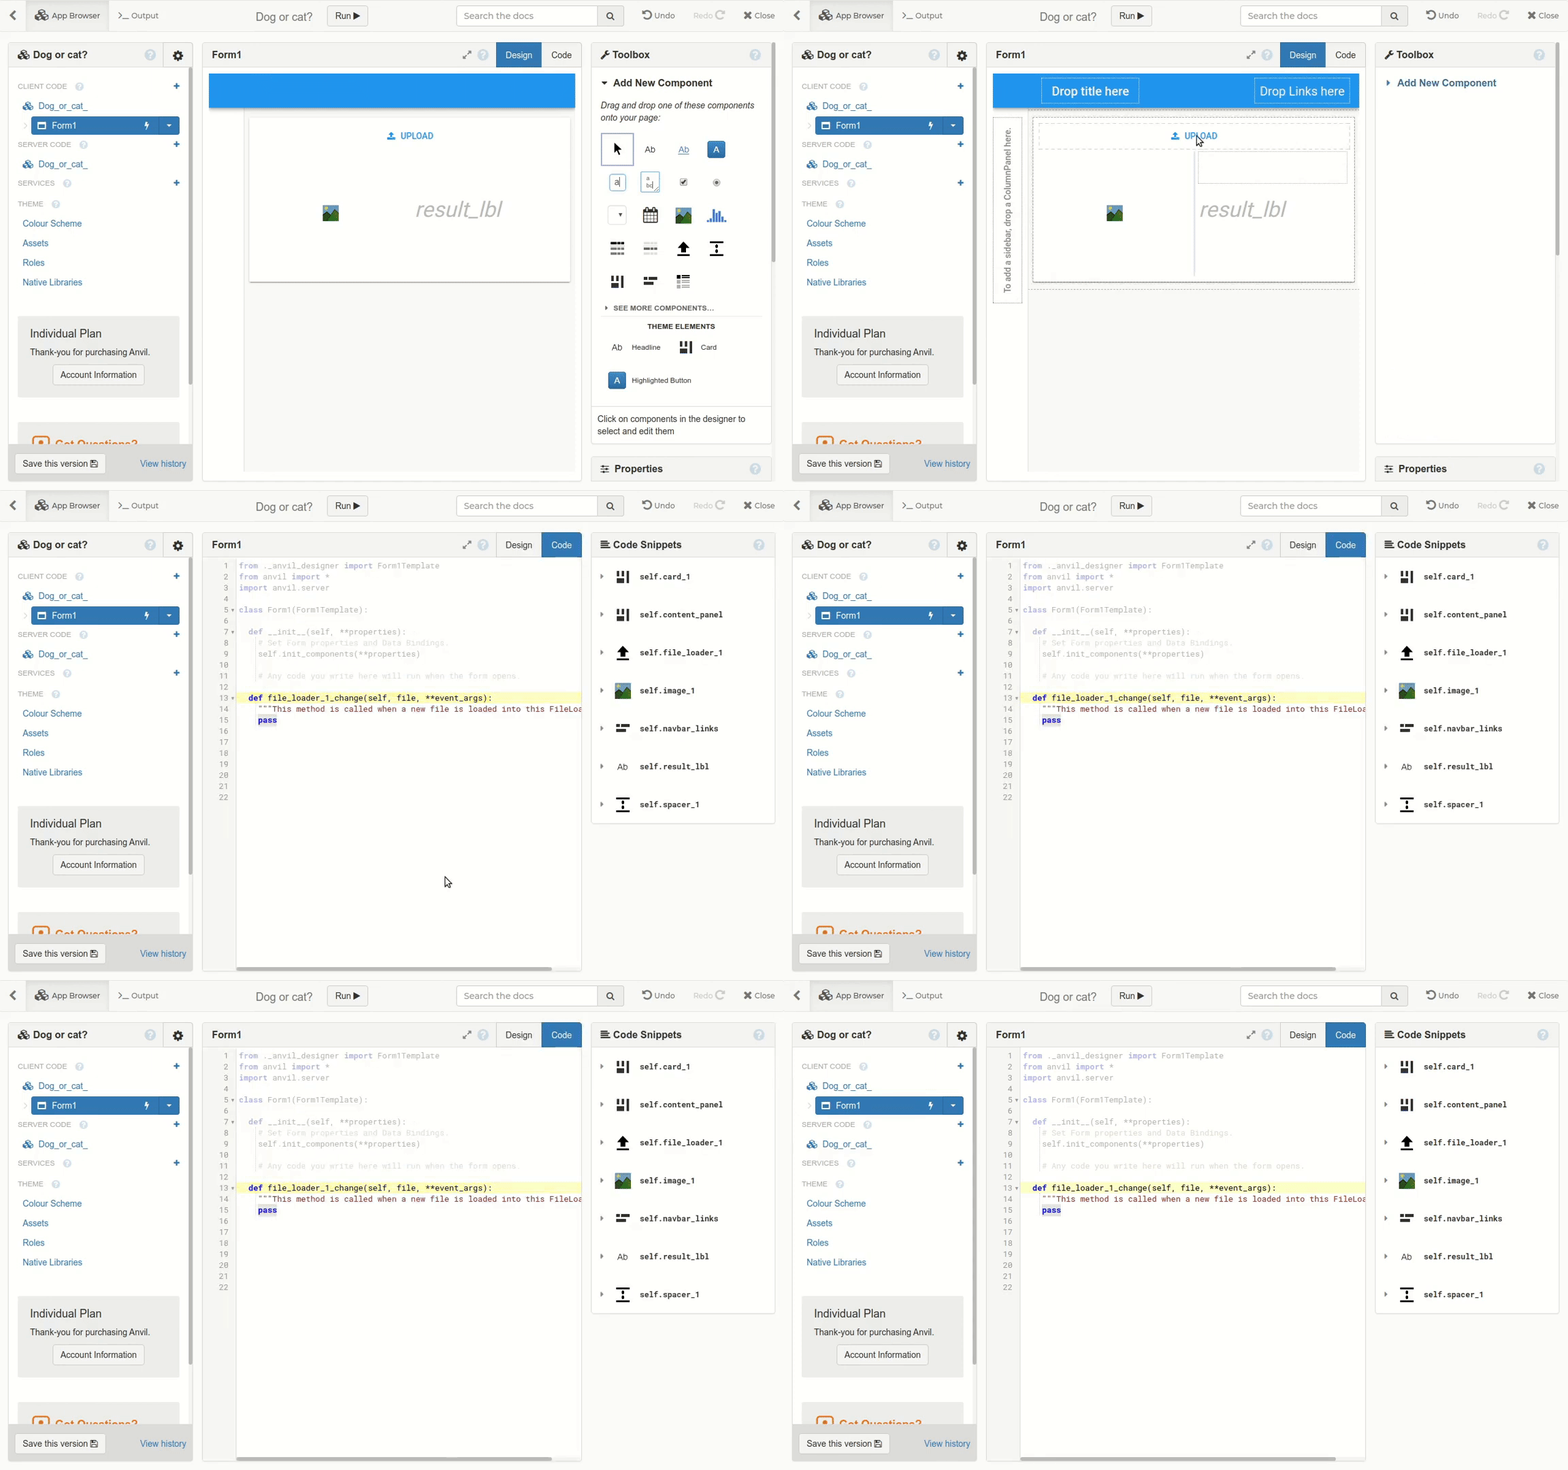
In the function, type anvil.server.callable() and pass it the name of our notebook function 'classify_image'. Then pass it the uploaded file as the argument to our notebook function. (Anvil will take care of transmitting the data.)
def file_loader_1_change(self, file, **event_args):
    """This method is called when a new file is loaded into this FileLoader"""
    classification = anvil.server.call('classify_image', file)
Step 8 - Displaying our classification
We’ve got the results – it’s time to show them on the screen!
Still in our file_loader_1_change function, let’s display the classification and score with our Label, and display the uploaded image on the Image component.
We’ll set the text of result_lbl to display both the classification’s label and the rounded score returned by our model. Then we can set image_1’s source to the uploaded file. The finished function will look like this:
def file_loader_1_change(self, file, **event_args):
    """This method is called when a new file is loaded into this FileLoader"""
    classification = anvil.server.call('classify_image', file)

    self.result_lbl.text = f"{classification['label']} ({round(classification['score'], 2)})"
    self.image_1.source = file
We now have an app that takes an image, sends it to our Deepnote notebook, classifies it and returns the results to our app. It’s all in the cloud, and all in Python!
All we need to do now is deploy our app to the internet for everyone to use.
Step 9 - Publishing our app
From the IDE, open the Gear menu ![]() in the top left of the IDE, then select
in the top left of the IDE, then select Publish app and then Share via public link. Choose a URL and click “Apply”:
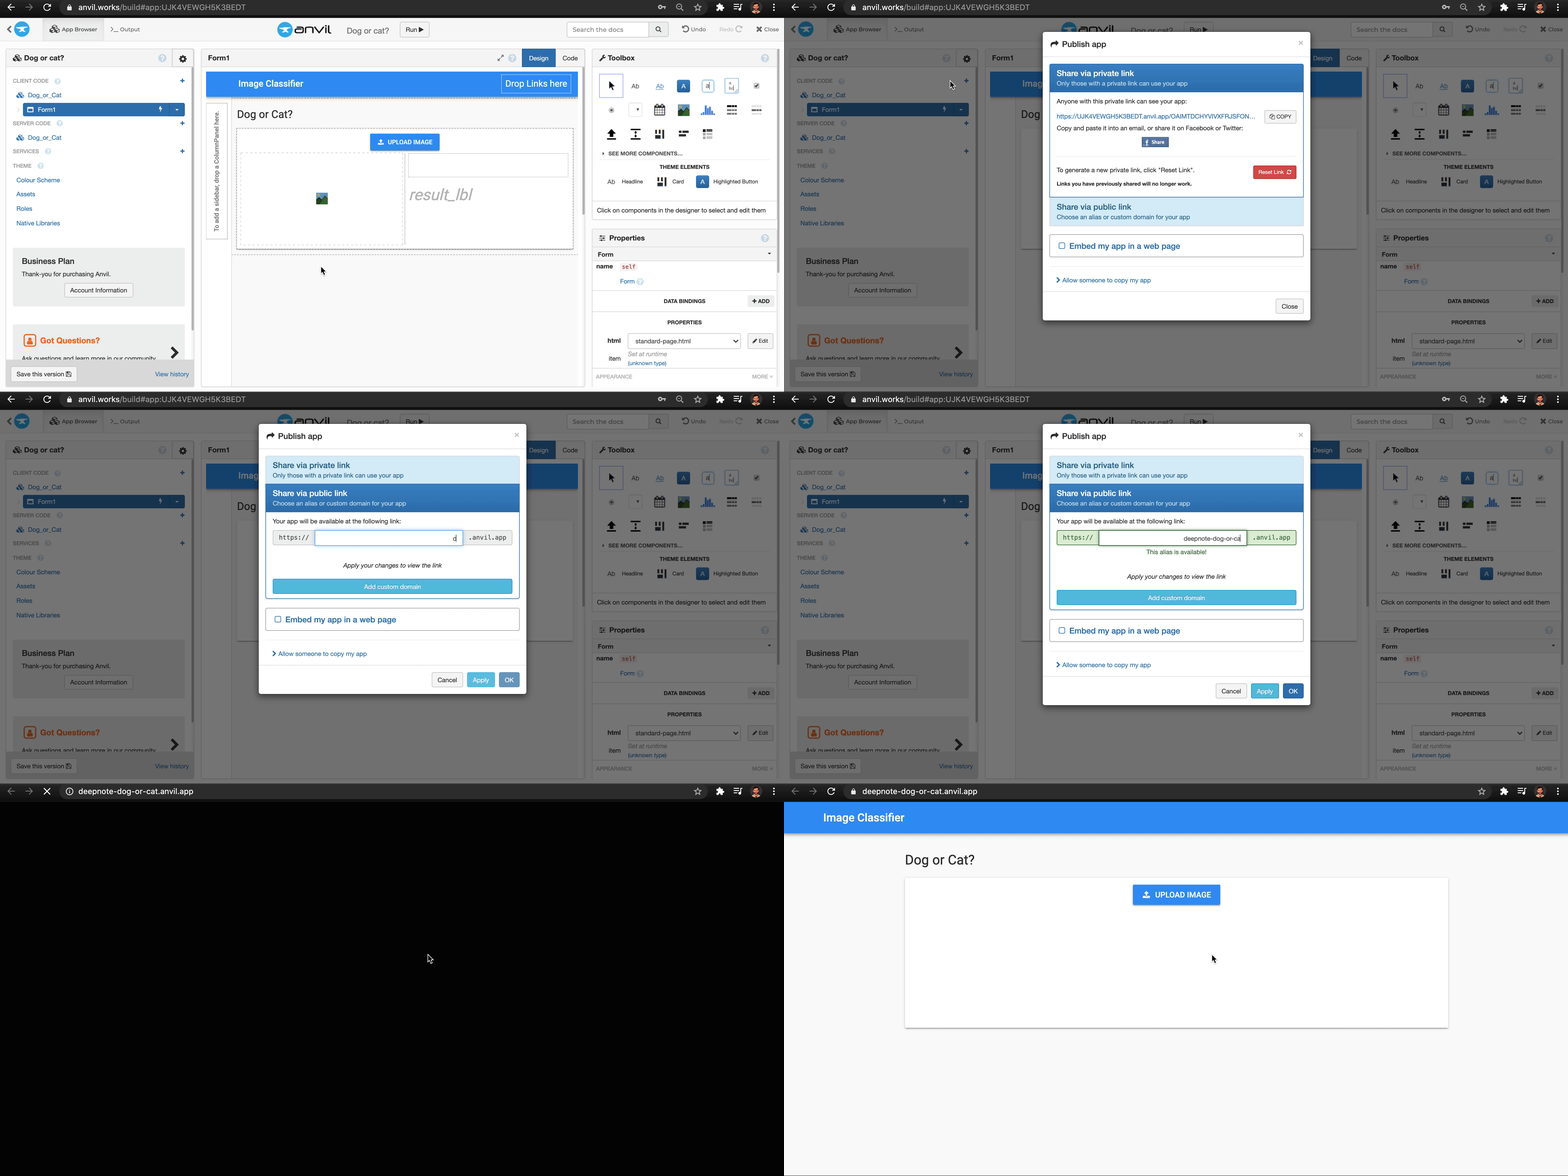
That’s it – we’ve deployed a machine learning model as a web app, with Deepnote hosting the notebook and Anvil hosting the web app. Best of all, we didn’t need anything but Python!
Clone the App
You can open the source code for the finished Anvil app here:
And you can duplicate our Deepnote notebook from the link below:
New to Anvil?
If you’re new here, welcome! Anvil is a platform for building full-stack web apps with nothing but Python. No need to wrestle with JS, HTML, CSS, Python, SQL and all their frameworks – just build it all in Python.
Yes – Python that runs in the browser. Python that runs on the server. Python that builds your UI. A drag-and-drop UI editor. We even have a built-in Python database, in case you don’t have your own.
Why not have a play with the app builder? It’s free! Click here to get started:

 By
By