 By
By Learn how to build a full-stack app with Anvil
In this tutorial, we’ll take a tour of Anvil and build a simple feedback form. We’ll start from a blank page, and build up to a web app with database storage, email functionality and deployed on the web - all in nothing but Python.
The final app will look something like this:
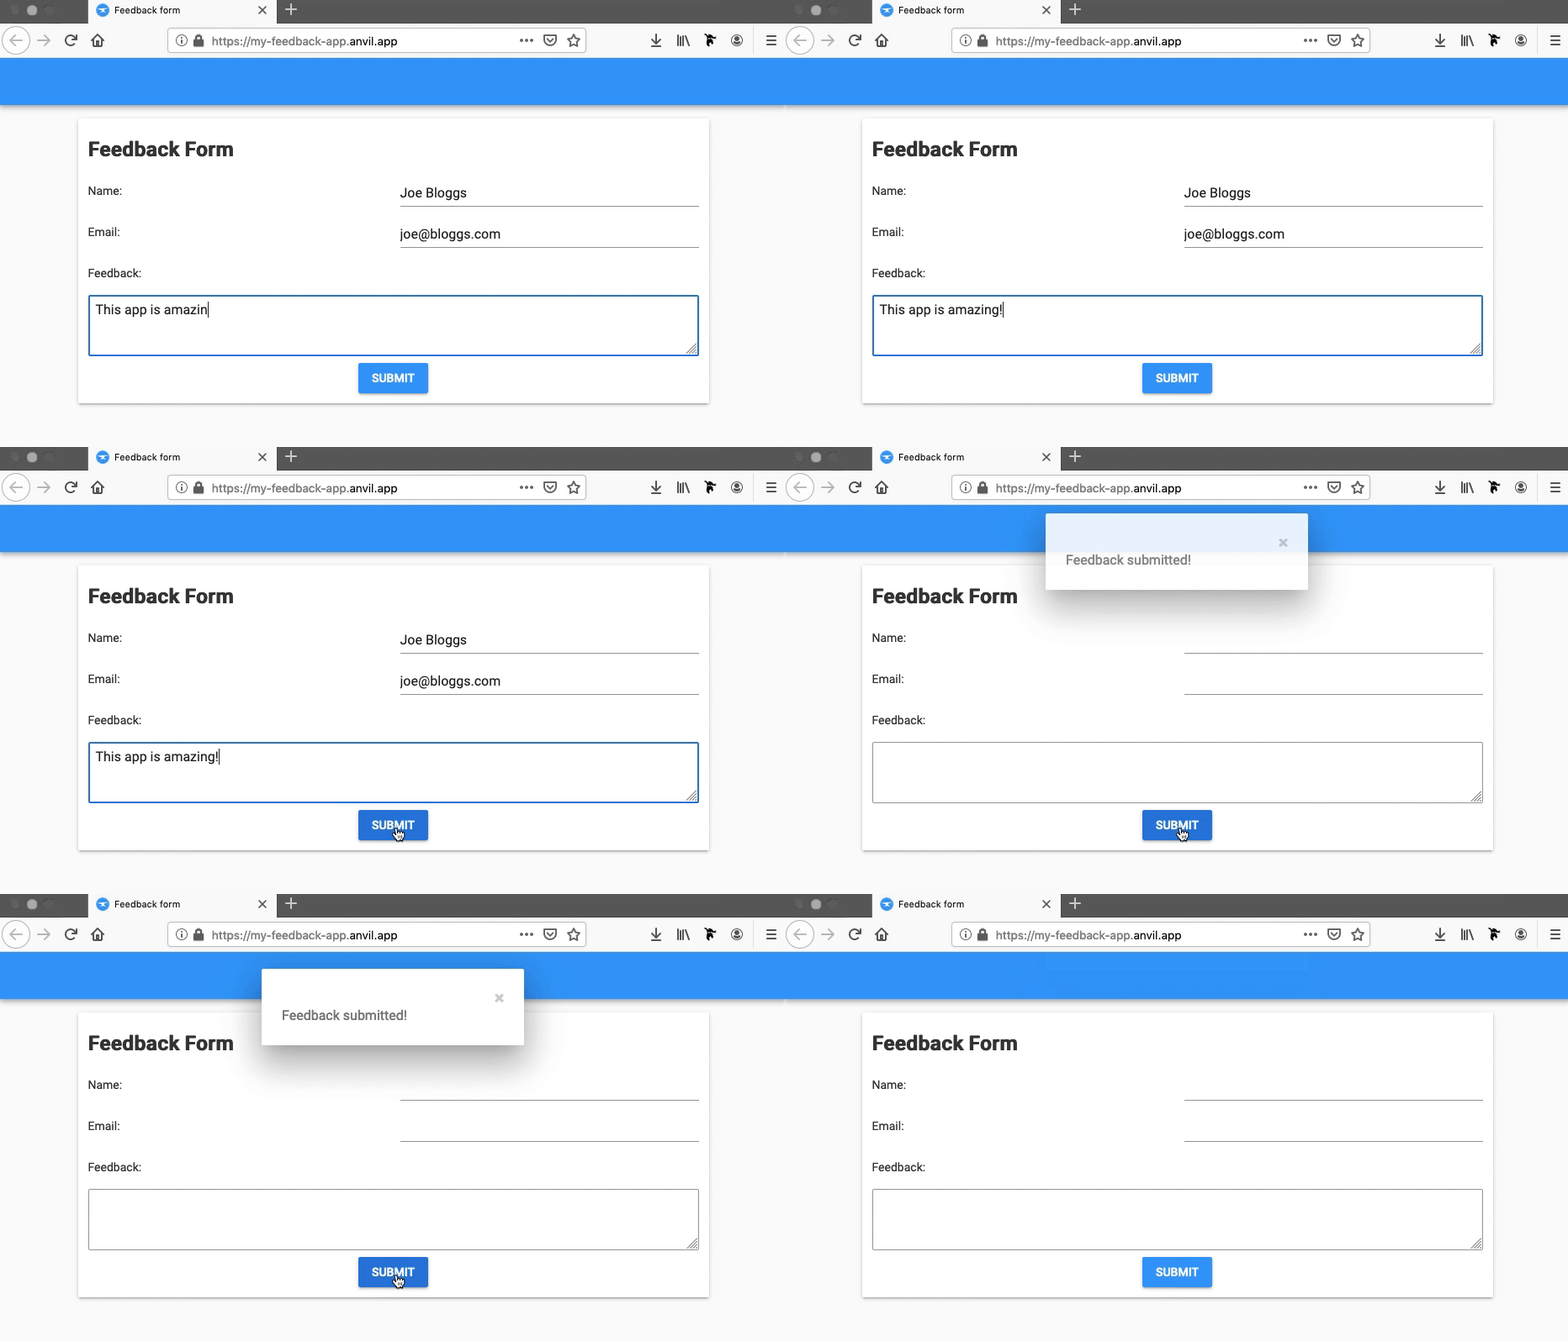
The techniques you’ll learn in this tutorial are fundamental to building any Anvil app, and mastering them will give you a good understanding of how Anvil works.
You don't need any prior experience with Anvil or web development to complete this tutorial.
All you'll need is a little bit of Python. If you’re new to Python, here are some resources to help you get started.
In this tutorial, you’ll:
- Build your user interface using Anvil’s drag-and-drop editor
- Create a database to store feedback from users
- Write server-side Python to save feedback to the database
- Write client-side Python to submit user feedback to the database
- Make your app send email notifications when someone leaves feedback
- Optional: Challenge yourself and reinforce what you’ve learned
Step 1 - Build your user interface
Let’s start by creating your app.
Create an app
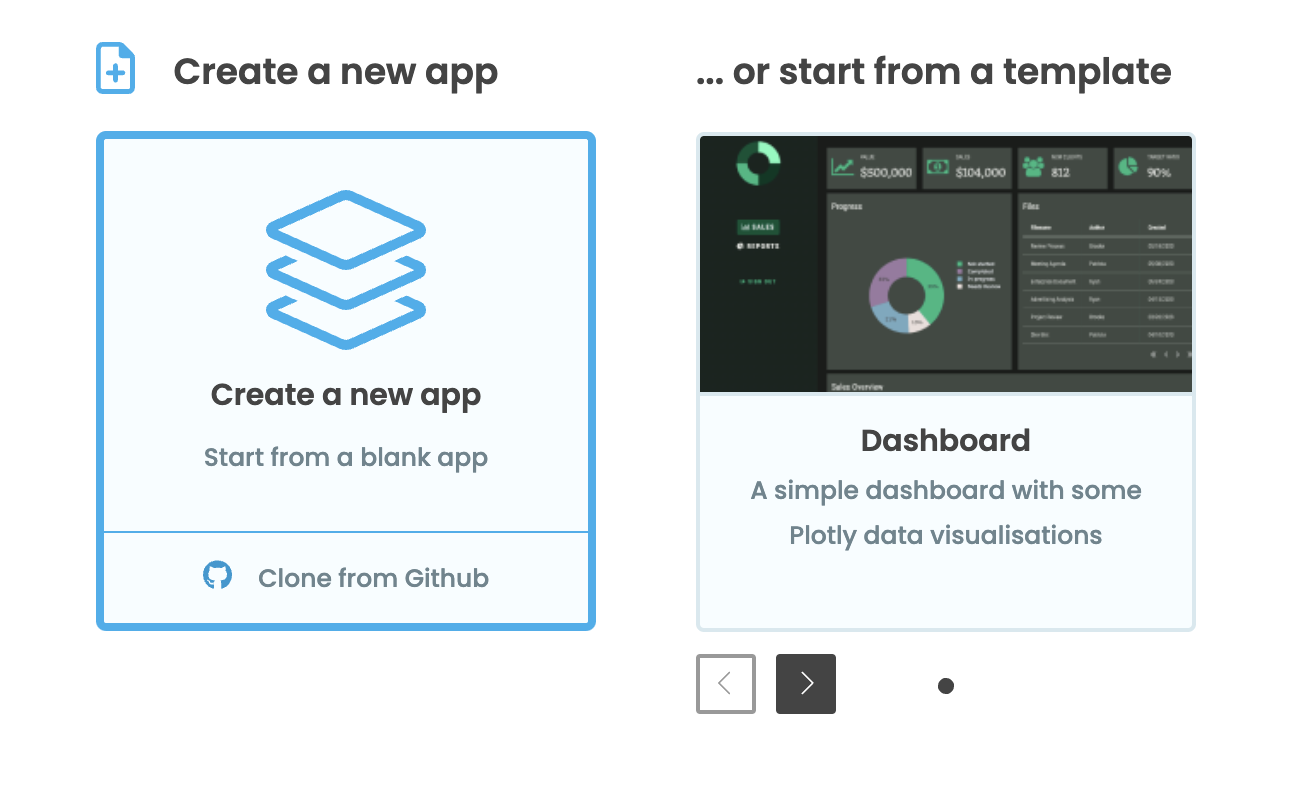
Log in to Anvil and click ‘Create a new app’. Choose the Material Design theme.
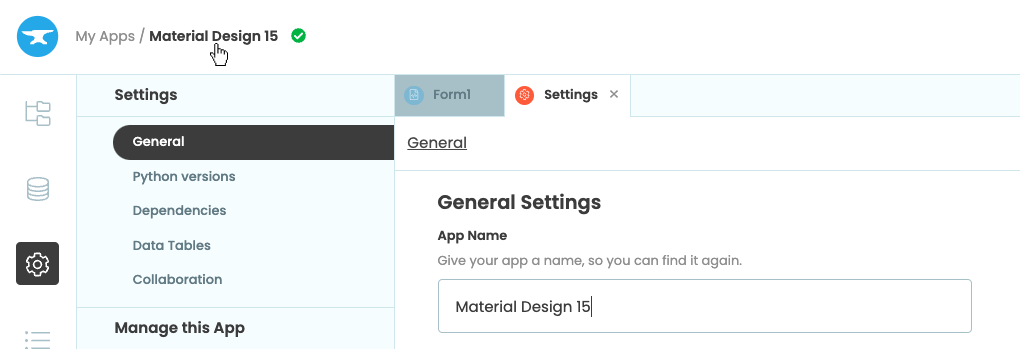
First, name the app. Click on the name at the top of the screen and give it a name.
Add the first components
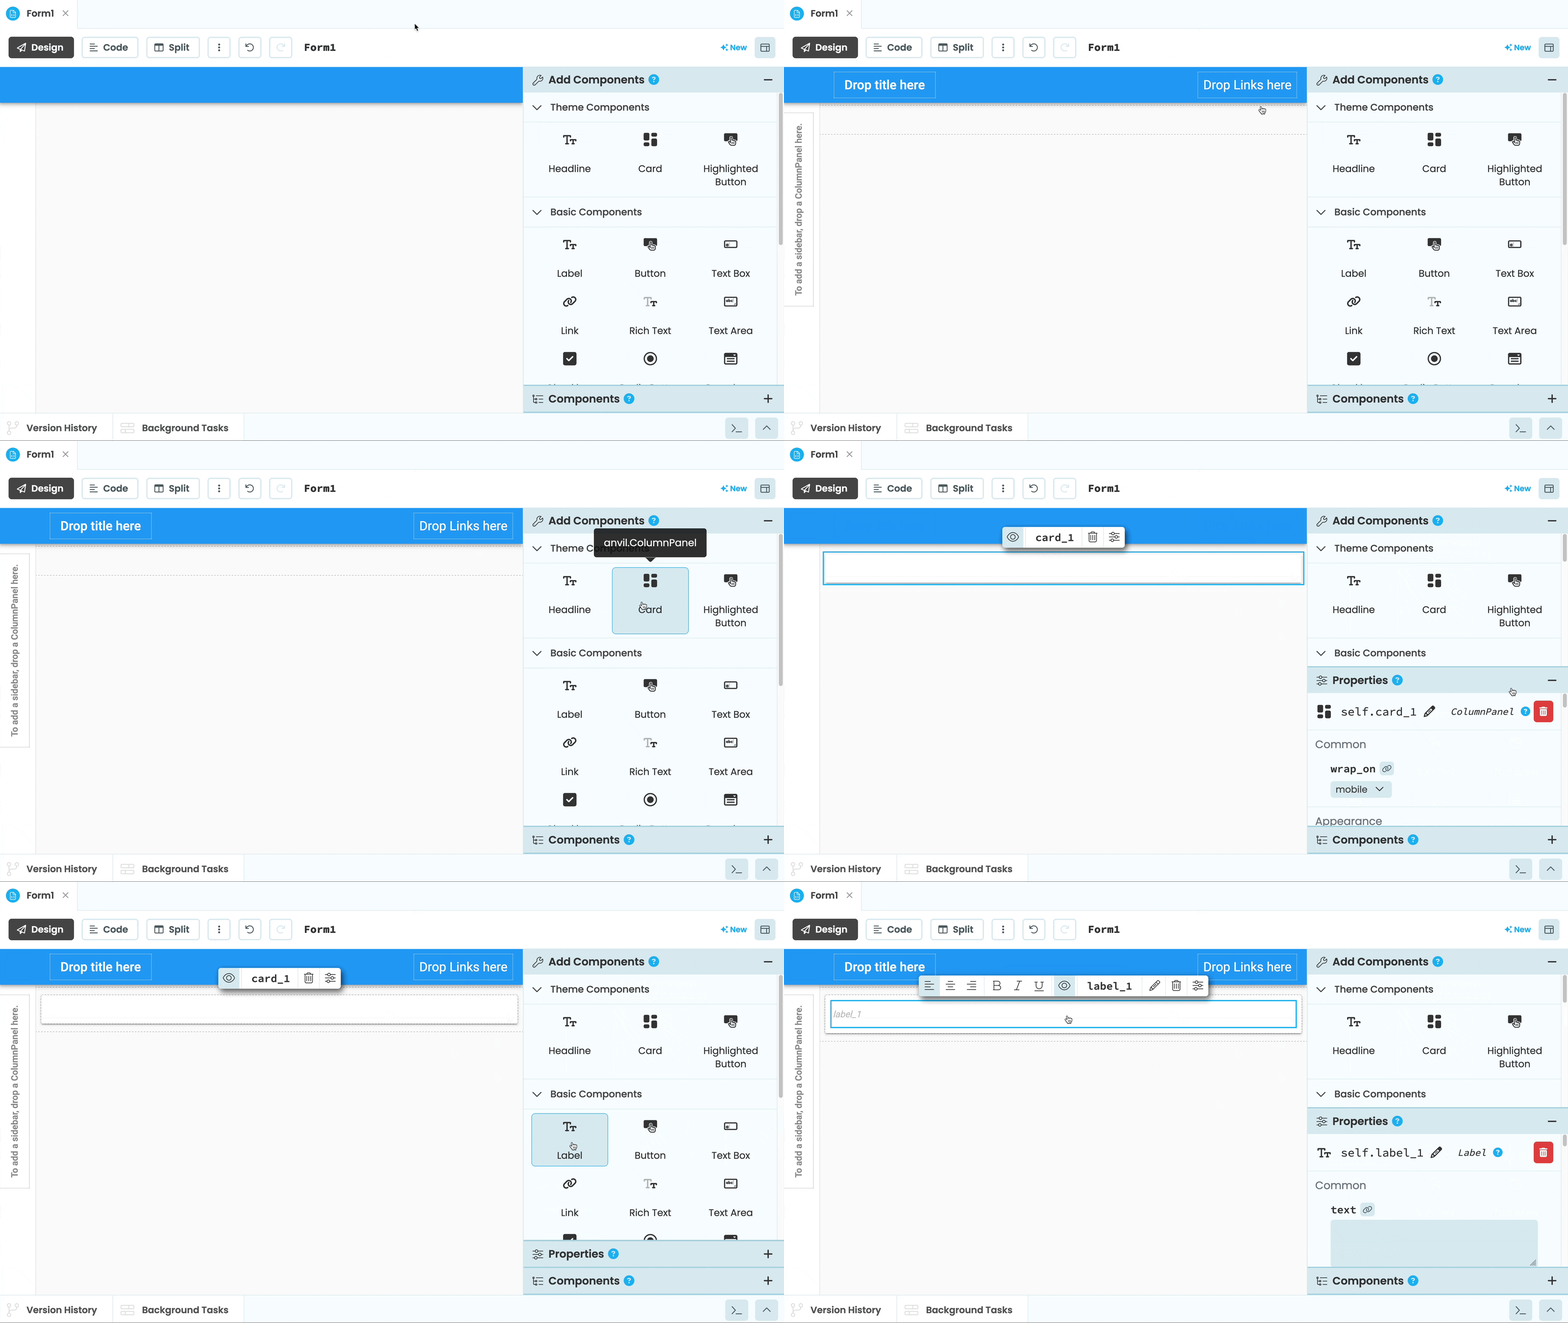
Next, we will construct the UI by dragging-and-dropping components from the Toolbox into the page.
The Theme Components part of the Toolbox contains components that are specific to the current app’s Theme. Here, you’ll find the Card component:
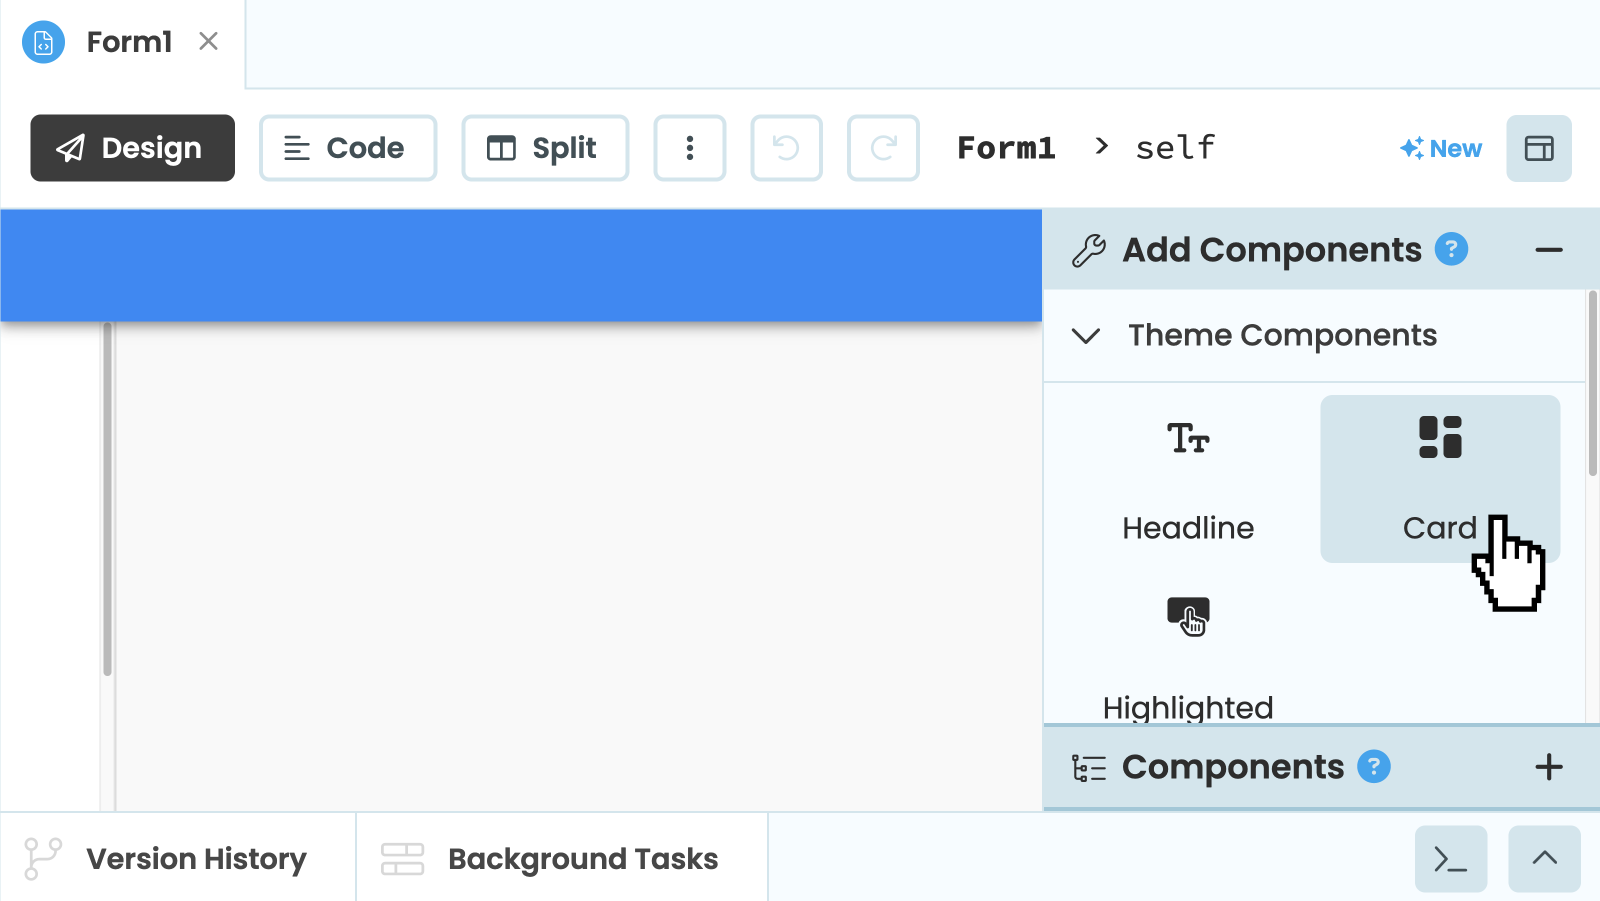
Location of the Card component in the Toolbox
Drop a Card  , and a Label
  into the page as demonstrated below:
Change component properties
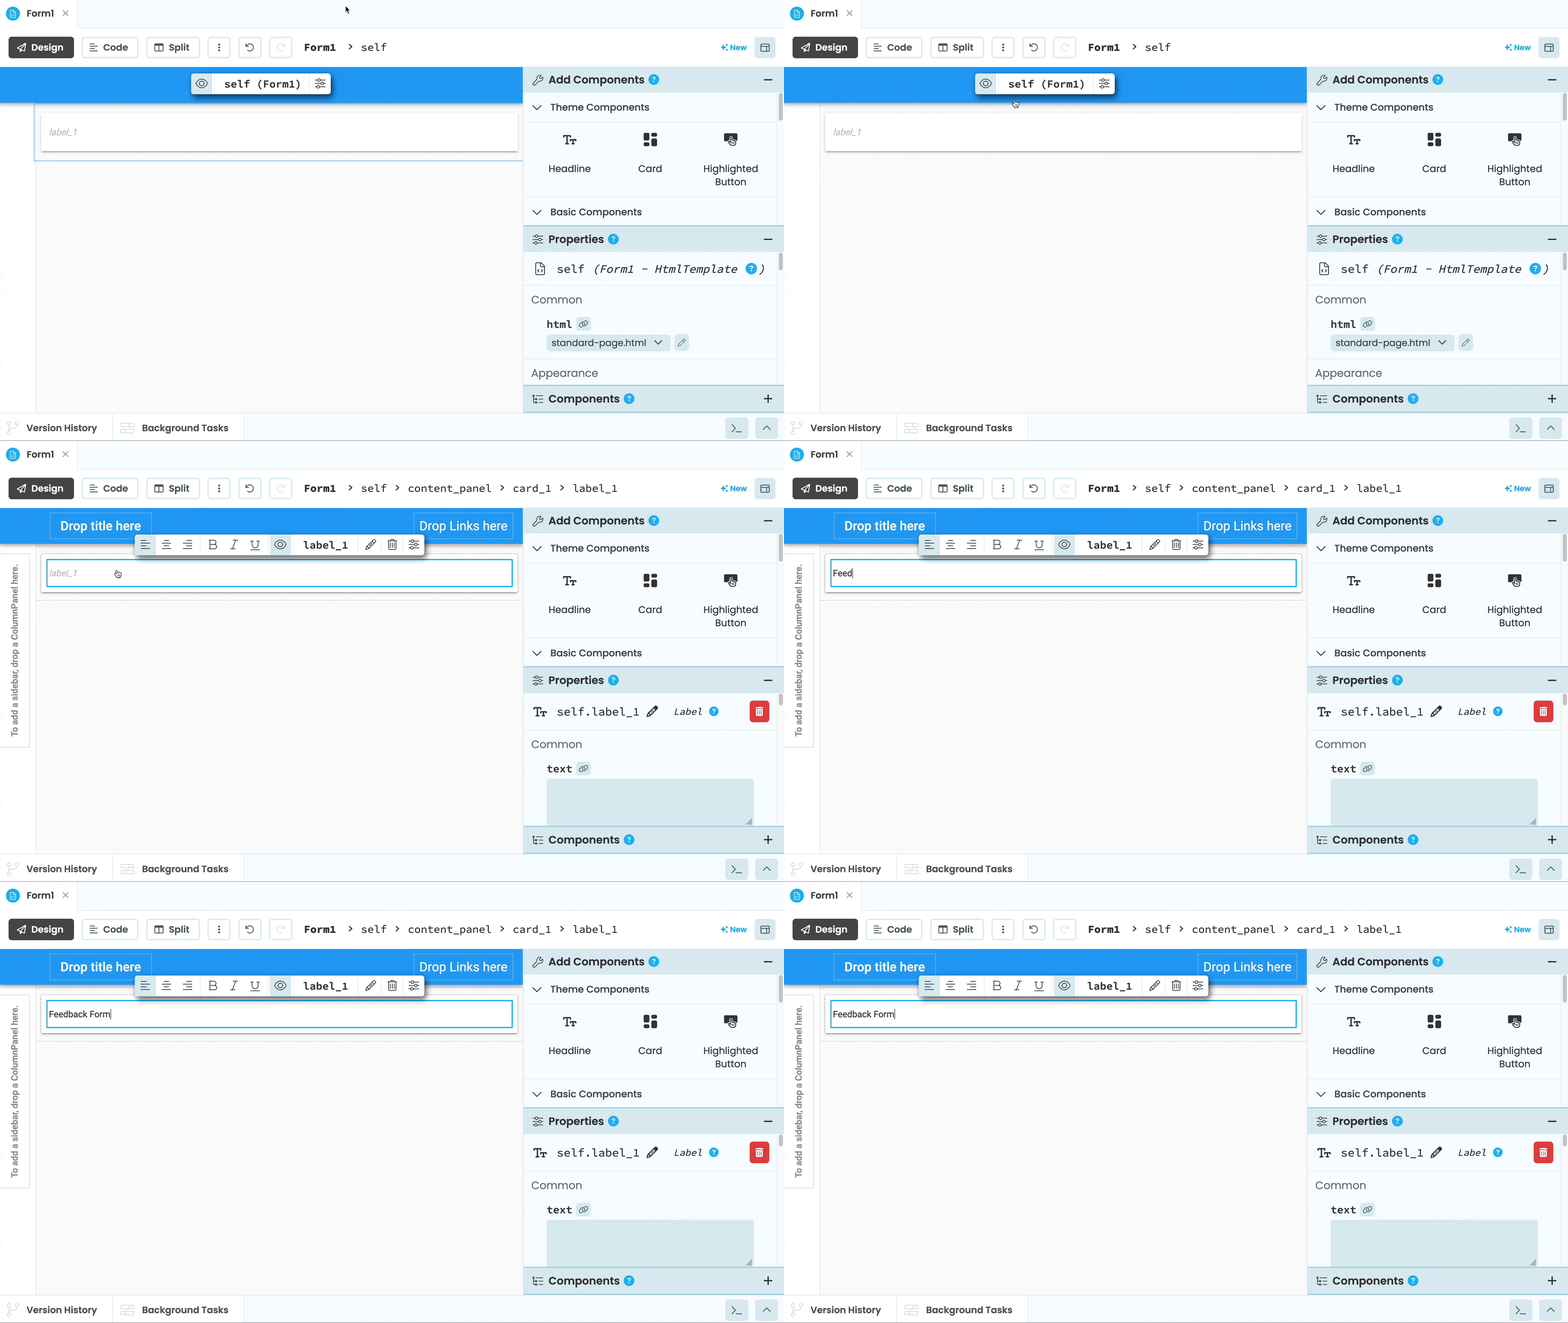
Select the Label you just added to the page. Then modify the text to ‘Feedback Form’ by double clicking the Label in the designer.
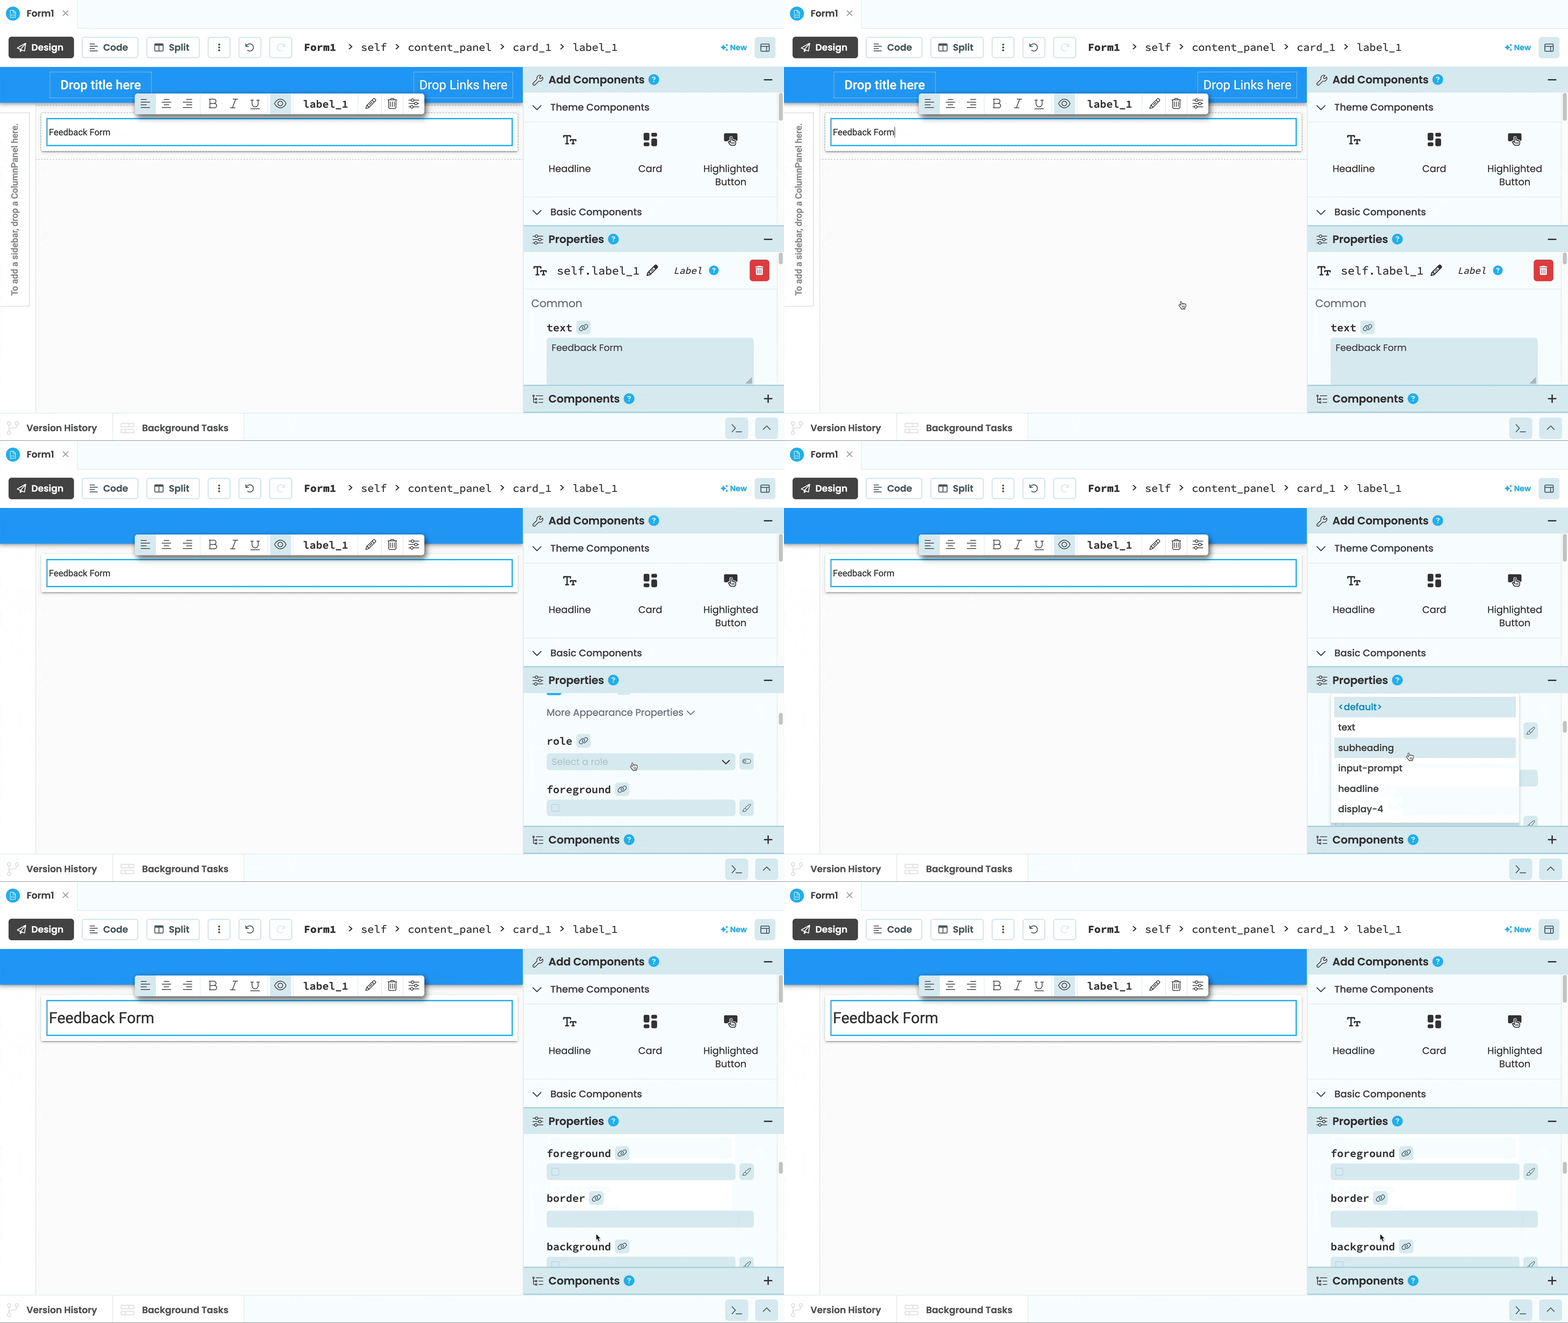
Below the Toolbox on the right, you’ll find the Properties Panel where you can edit the styling and behaviour of your components. Under Appearance expand the More Appearance Properties section and change the role to Headline.
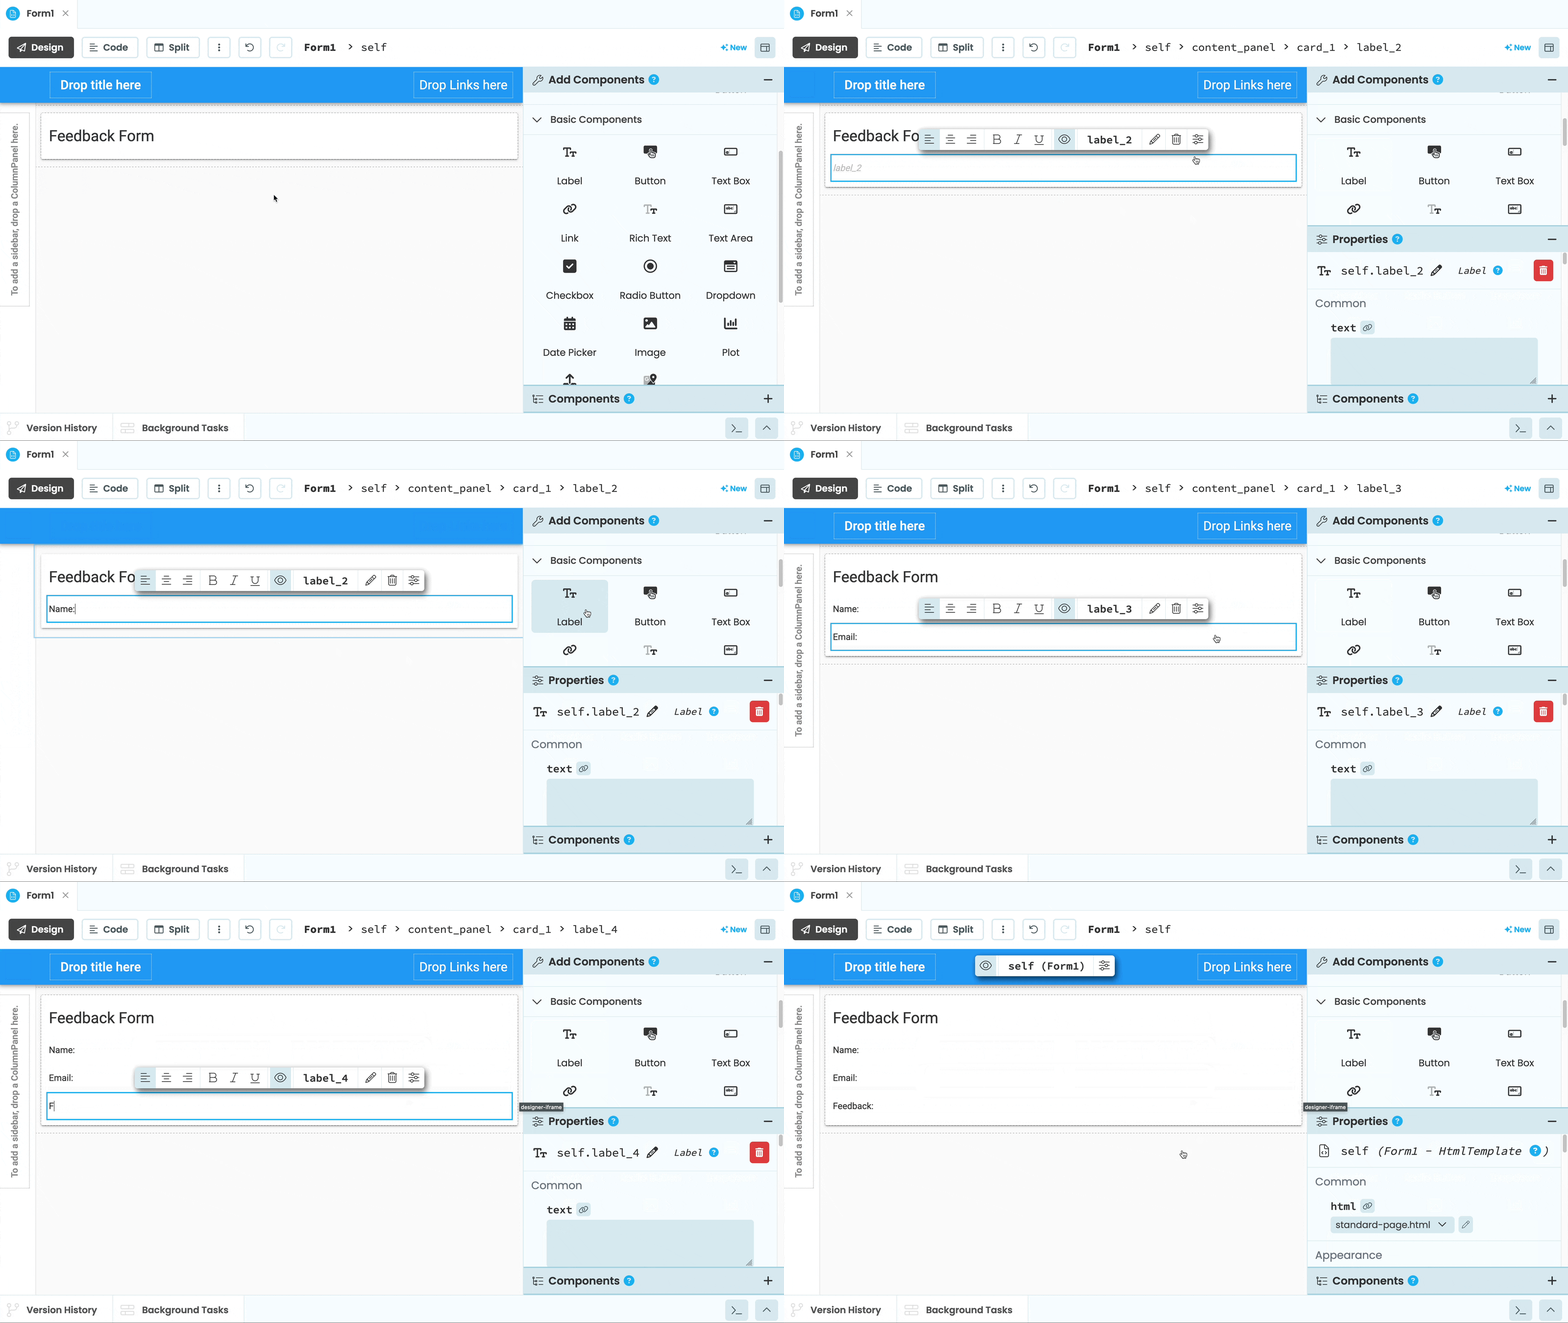
Add field labels
Our feedback form will ask our users for their name, email address, and to leave some feedback.
We’ll use Labels for our input prompts. Drop three Labels into the page, and change their text properties to:
- Name:
- Email:
- Feedback:
Add input components
Drop a TextBox  into the page next to our “Name:” label. Then change the component name to
 name_box by clicking the component name in the Object Palette. Repeat this with another TextBox beside our “Email:” label and change its name to email_box.
Finally, add a TextArea  underneath our “Feedback:” label and rename it to
 feedback_box.
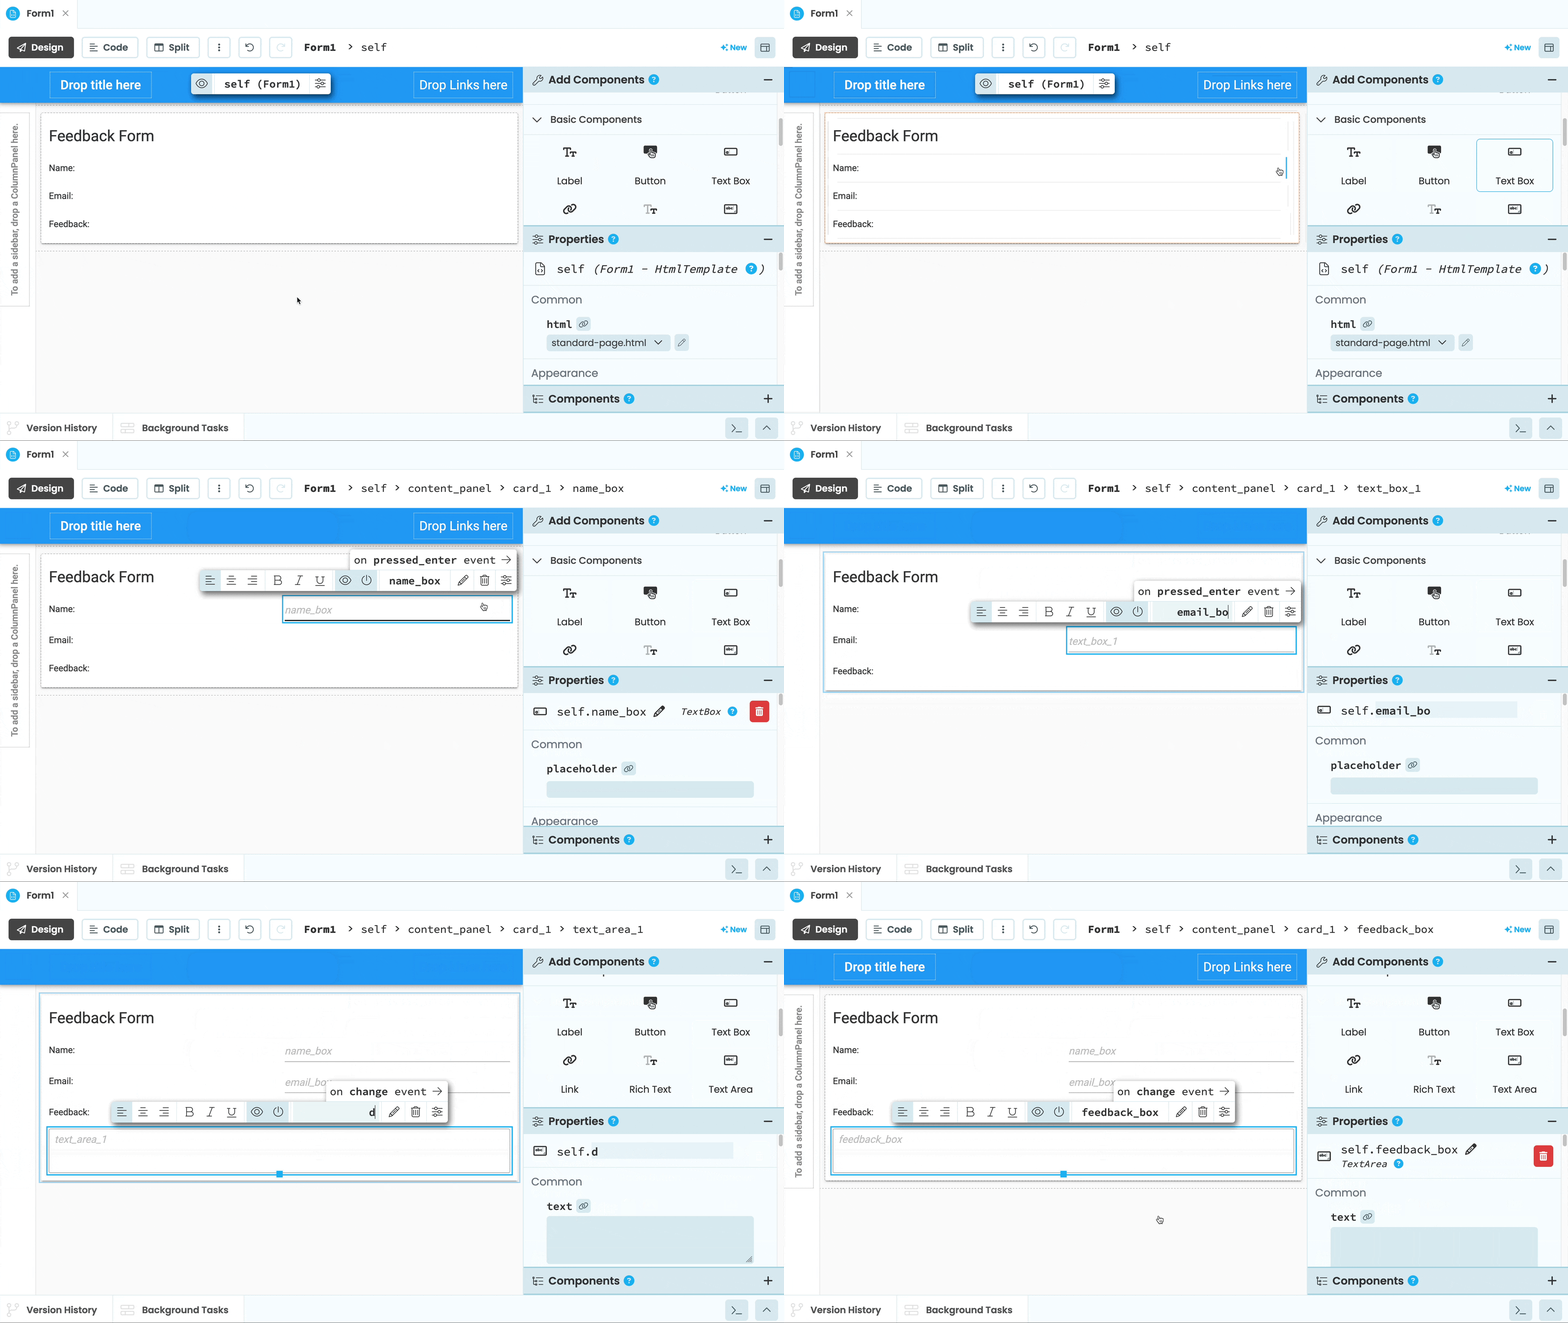
We’re changing the name of each user input component, to make it easier to identify them from code.
Add submit button
Finally, drop a Button  into the page. In the Properties Panel:
- Change the
namefrom ‘button_1’ to ‘submit_button’ - Change the
textfrom ‘button_1’ to ‘Submit’ - Change the
roleto ‘primary-color’.

Congratulations, you’ve just built a User Interface in Anvil! Your users can now enter feedback into your app.
In the next step, you’ll create a database table to store the feedback.
Step 2 - Create your database
We’ll use Data Tables to store feedback from our users. Data Tables are an out-of-the-box option for data storage in Anvil, and they’re backed by PostgreSQL.
Add a Data Table to store your feedback
In the Sidebar Menu on the left, click the database icon  .
.
Click on ‘+ Add Table’ and name it ‘feedback’.
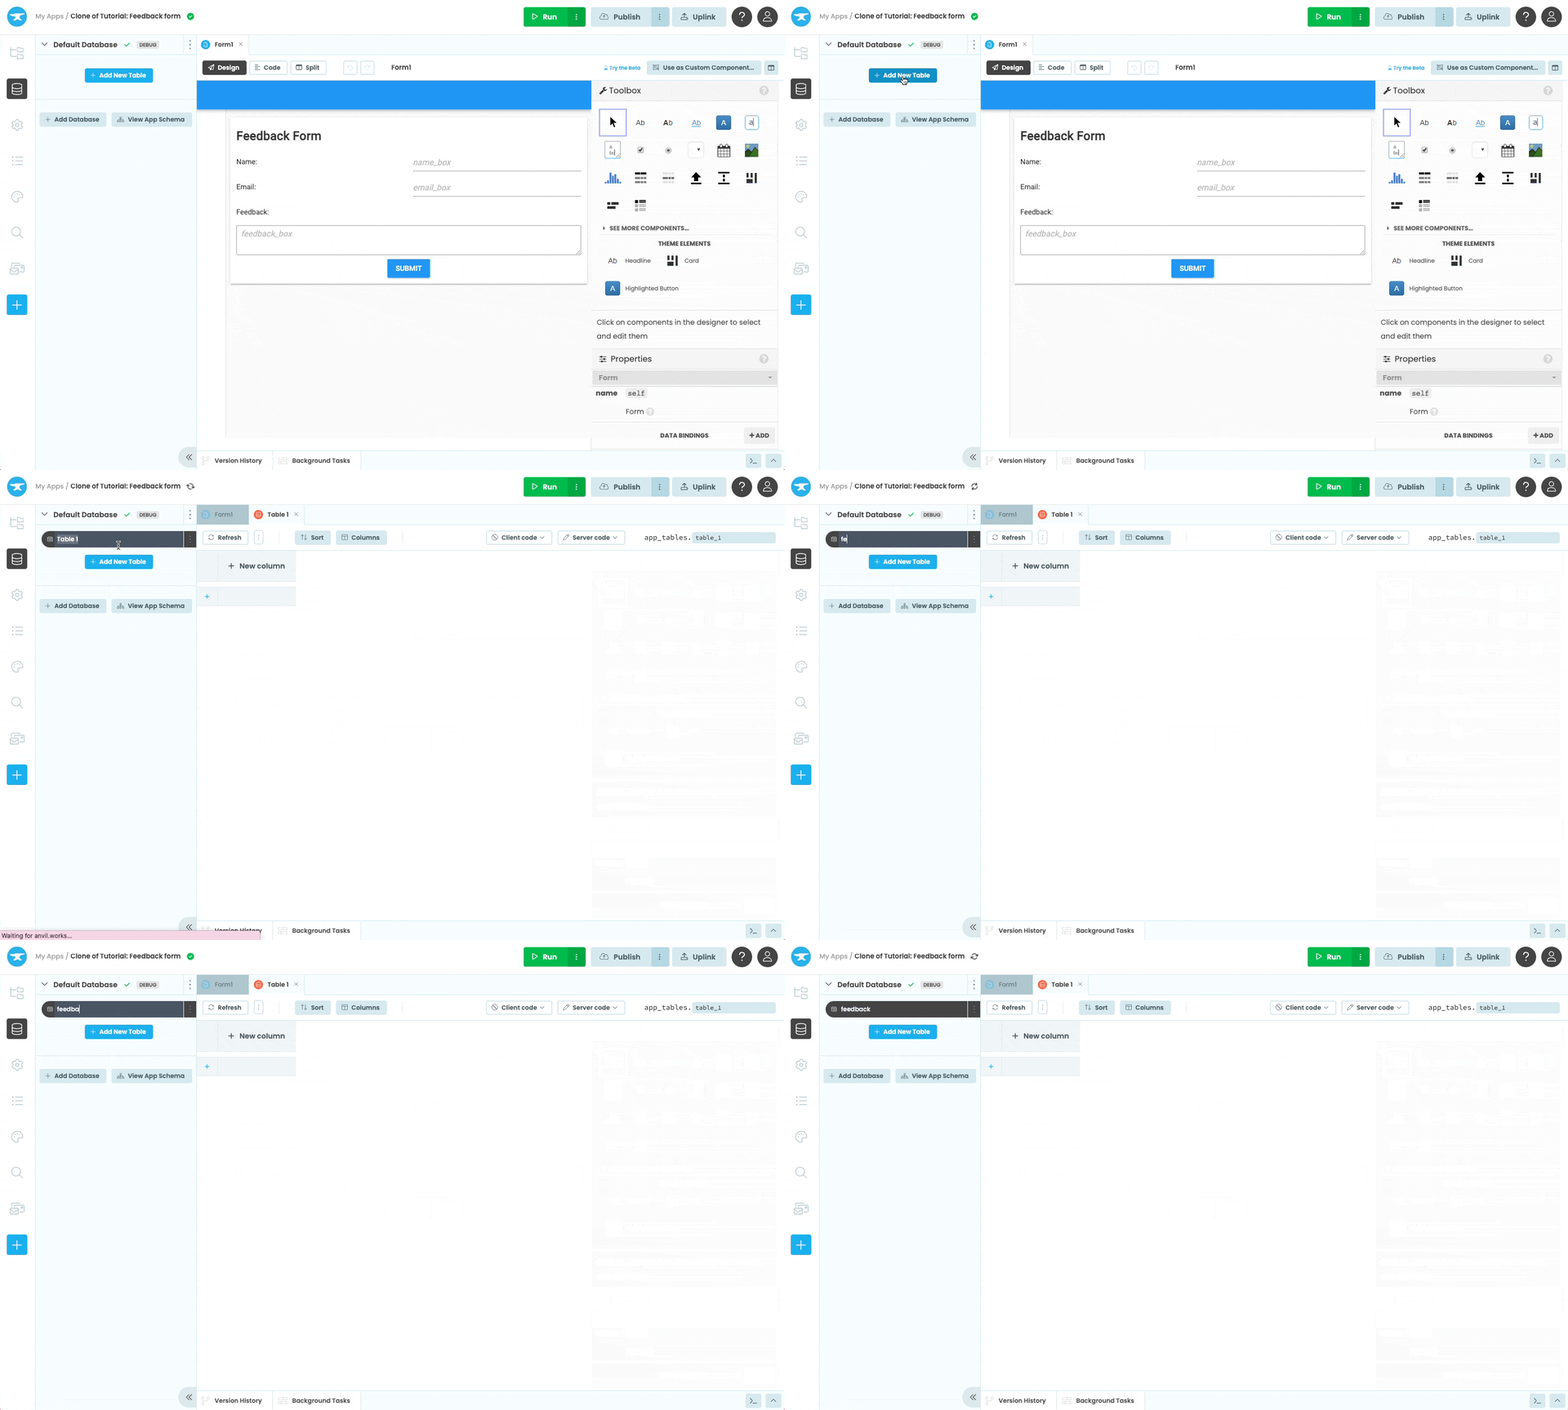
Renaming the table
Set up your table
Now set up your “feedback” table, with the following columns:
name(Text column)email(Text column)feedback(Text column)created(Date and Time column)
Here’s how to do that:
- Add a column for the name of the person submitting feedback, by clicking ‘+ New Column’. Call this column ’name’ and under Column Type select
Text. Click ‘Ok’. - Keep adding columns until your Data Table has the structure we described above. Column titles are case sensitive, so let’s stick to lower case.
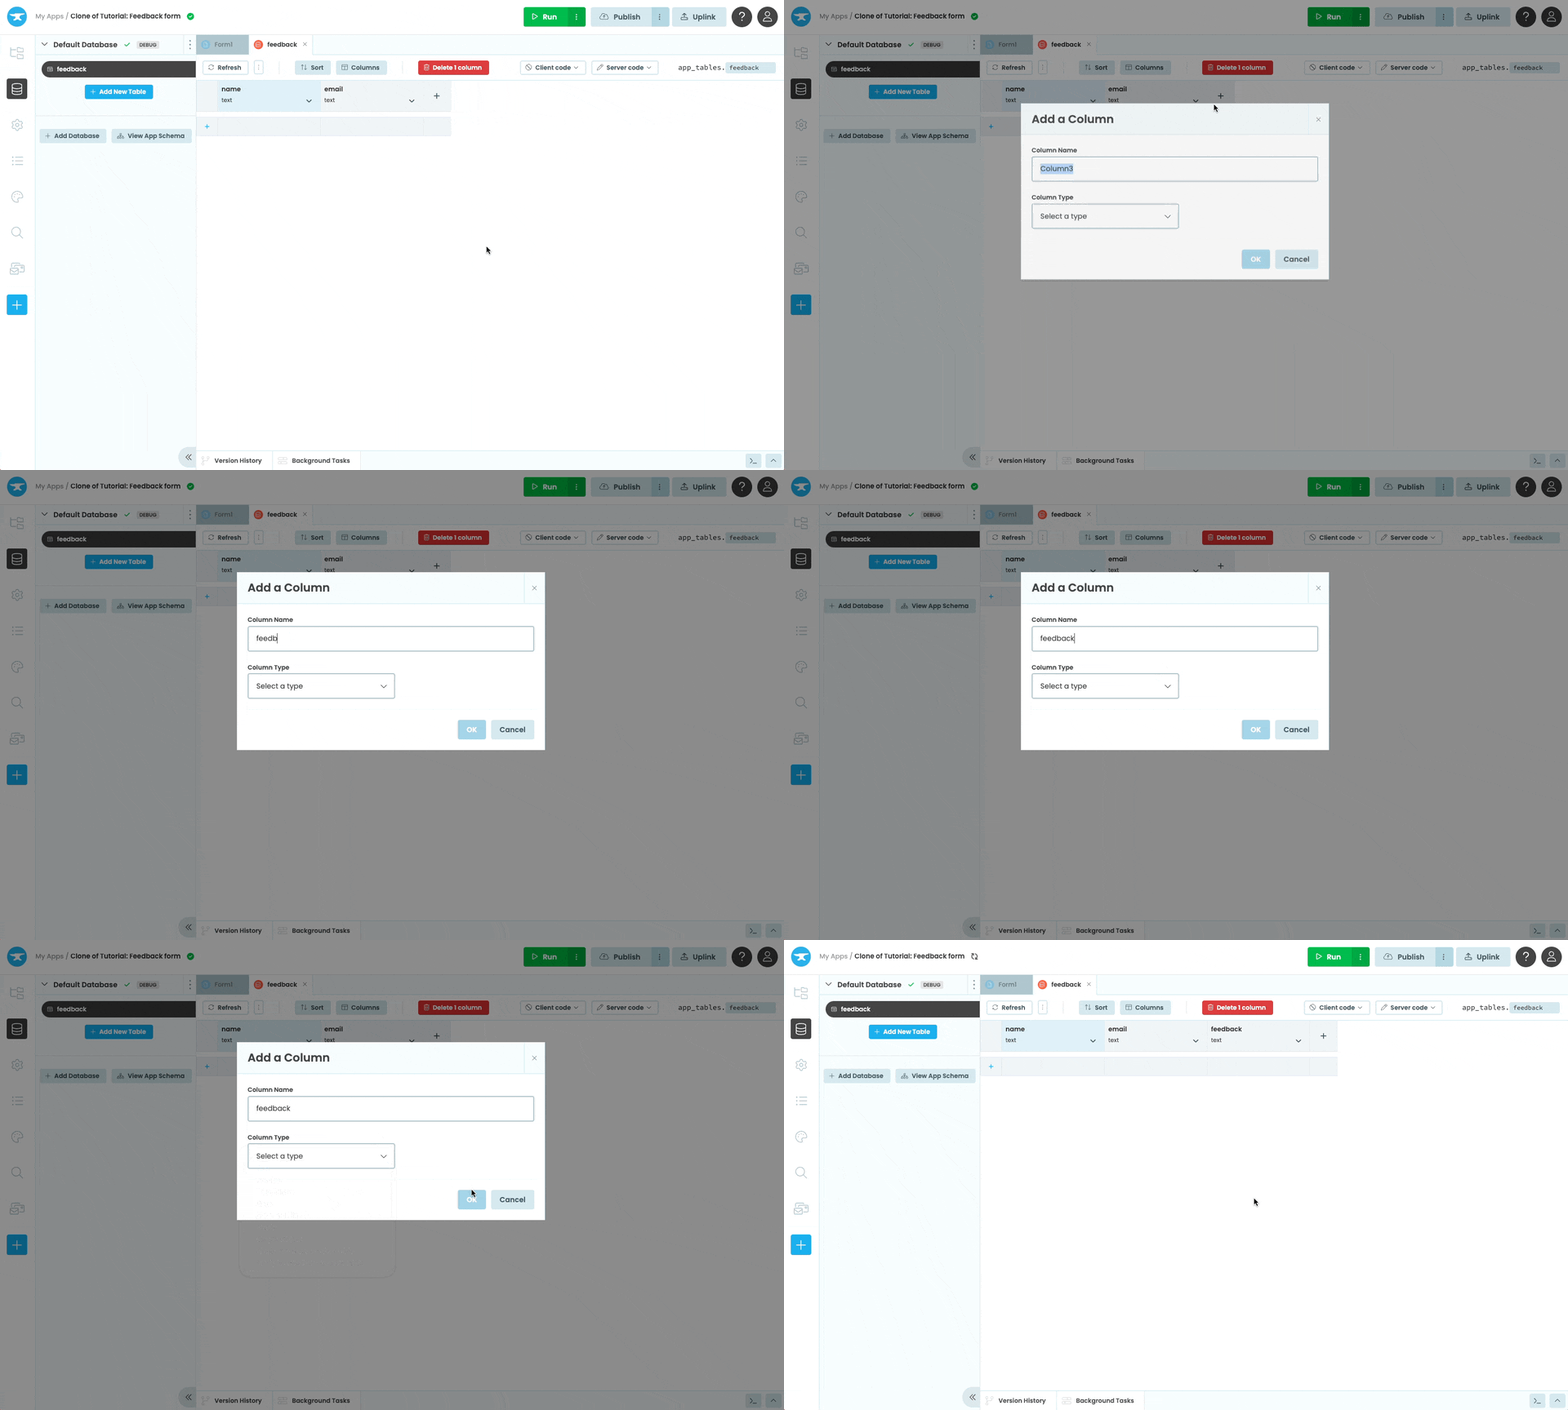
Your Data Table should look something like this:
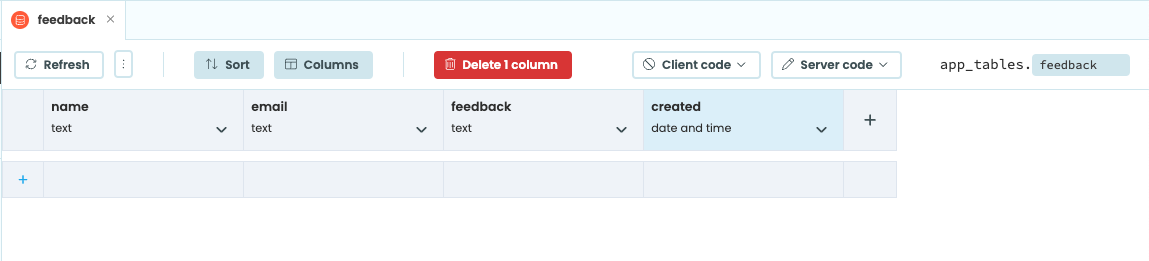
The finished table
Nice work! Your Data Table is set up and ready to use. Next, you’ll write some server-side code to store the feedback in it.
Step 3 - Write server-side Python
Anvil’s Server Modules are a full server-side Python environment. Server Modules cannot be edited or seen by the user, so we can trust them to do what we tell them. This is why we’ll use a Server Module to write to the Data Table.
Create a Server Module
Create a Server Module by selecting the App Browser  in the sidebar menu and clicking ‘+ Add Server Module’.

Adding a Server Module
Store data using a server function
We’ll write a server function to add a new row to the ‘feedback’ Data Table we just created. We’ll use the add_row method to do this.
Add this function to your Server Module:
@anvil.server.callable
def add_feedback(name, email, feedback):
  app_tables.feedback.add_row(
    name=name,
    email=email,
    feedback=feedback,
    created=datetime.now()
  )
The @anvil.server.callable decorator allows us to call this function from client code.
We’re using the datetime library to set the ‘created’ column to the current date and time, so you’ll also need to import the datetime class at the top of your Server Module:
from datetime import datetimeGreat! We now have a server function that will add a new row to our Data Table when it’s called.
Let’s go ahead and link it up with our UI.
Step 4 - Write client-side Python
We want to store information in our Data Table when users click the ‘Submit’ button. This means calling the add_feedback server function when our users click the Submit Button.
We’ll use Events for this.
Set up an event handler
Anvil components can raise events. For example, when a Button is clicked, it raises the ‘click’ event.
Click on ‘Form1’ in the App Browser to go back to your UI.
Click on the ‘Submit’ Button, and click on click event -> in the Object Palette.

You will be taken to the Form Editor’s ‘Split’ view, where you’ll see the Code Editor. This is where you write your client-side Python code that runs in the browser.
You’ll see a submit_button_click method on your Form that looks like this:
  @handle("submit_button", "click")
  def submit_button_click(self, **event_args):
    """This method is called when the button is clicked"""
    pass
This is the Python method that runs when the ‘Submit’ Button is clicked. It is decorated with @handle("submit_button", "click"). This tells Anvil that the decorated function will run when the submit_button fires the click event.
For example, to display a simple popup with the text ‘You clicked the button’, edit your submit_button_click function as follows:
  @handle("submit_button", "click")
  def submit_button_click(self, **event_args):
    # Display a popup that says 'You clicked the button'
    alert("You clicked the button")
Run your app
To see it in action, click the ‘Run’ button at the top of the screen:

Click the Submit button and your popup should appear!
Capture user inputs
When someone clicks Submit on our feedback form, we want to store a name, email address, and some feedback for that person in our Data Table.
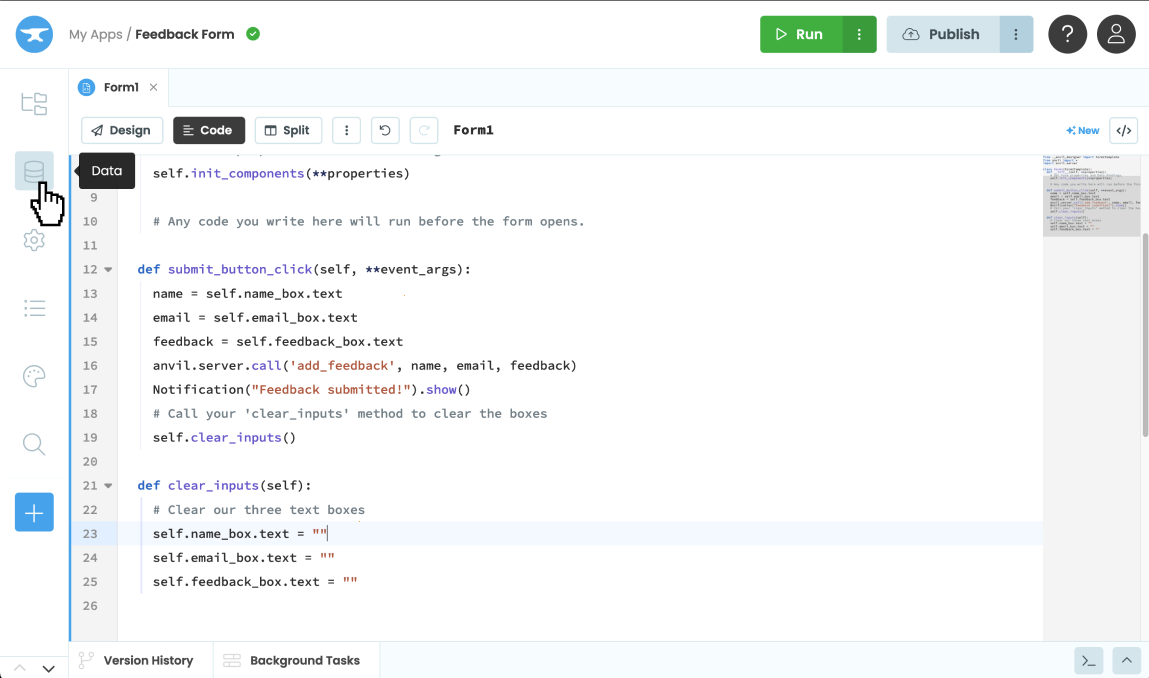
We can read data from our input components by reading their properties. For example, we can read the text in our TextBoxes using their text property.
Edit your submit_button_click function to look like this:
  @handle("submit_button", "click")
  def submit_button_click(self, **event_args):
    # Set 'name' to the text in the 'name_box'
    name = self.name_box.text
    # Set 'email' to the text in the 'email_box'
    email = self.email_box.text
    # Set 'feedback' to the text in the 'feedback_box'
    feedback = self.feedback_box.text
Great! Now we’ve captured the name, email, and feedback that we want to store in our Data Table.
We want to call our add_feedback server function when the button is clicked, and pass in the user inputs. We made our add_feedback server function available to our client-side code by decorating it as @anvil.server.callable.
This means we can call it from our client-side code using anvil.server.call('add_feedback', <arguments>)
Let’s call our add_feedback server function from our submit_button_click function:
  @handle("submit_button", "click")
  def submit_button_click(self, **event_args):
    name = self.name_box.text
    email = self.email_box.text
    feedback = self.feedback_box.text
    # Call your 'add_feedback' server function
    # pass in name, email and feedback as arguments
    anvil.server.call('add_feedback', name, email, feedback)
Display a notification
We’ll also display a temporary popup using a Notification to let our users know their feedback has been submitted.
Edit your submit_button_click function to look like this:
  @handle("submit_button", "click")
  def submit_button_click(self, **event_args):
    name = self.name_box.text
    email = self.email_box.text
    feedback = self.feedback_box.text
    anvil.server.call('add_feedback', name, email, feedback)
    # Show a popup that says 'Feedback submitted!'
    Notification("Feedback submitted!").show()
Clear our user inputs
There’s one final step left, and that’s to clear our user inputs each time someone submits feedback.
We’ll do this in a separate function to keep our code nice and clean.
Add this method to your Form, underneath your submit_button_click() method:
  def clear_inputs(self):
    # Clear our three text boxes
    self.name_box.text = ""
    self.email_box.text = ""
    self.feedback_box.text = ""
Finally, let’s call this from our submit_button_click method, so that we clear our inputs each time feedback is submitted.
Edit your submit_button_click function to look like this:
  @handle("submit_button", "click")
  def submit_button_click(self, **event_args):
    name = self.name_box.text
    email = self.email_box.text
    feedback = self.feedback_box.text
    anvil.server.call('add_feedback', name, email, feedback)
    Notification("Feedback submitted!").show()
    # Call your 'clear_inputs' method to clear the boxes
    self.clear_inputs()
Run your app
Time to Run your app! Click the ‘Run’ button at the top of the screen, fill in a name, email address, and some feedback and click Submit.
Then, stop your app, and go to your Data Tables. You’ll see you have a new row of feedback in your Data Table!
Congratulations! You’ve created an app to gather and store user feedback.
We’ll take it one step further: let’s make it email you whenever somebody enters feedback.
Step 5 - Send Emails
We’ll use the Email Service to send you an email each time someone leaves feedback.
Add the Email Service
Let’s start by adding the Email Service to our app. Select the blue ‘+’ button in the sidebar menu to open the list of available services. Then, click on the ‘Email’.
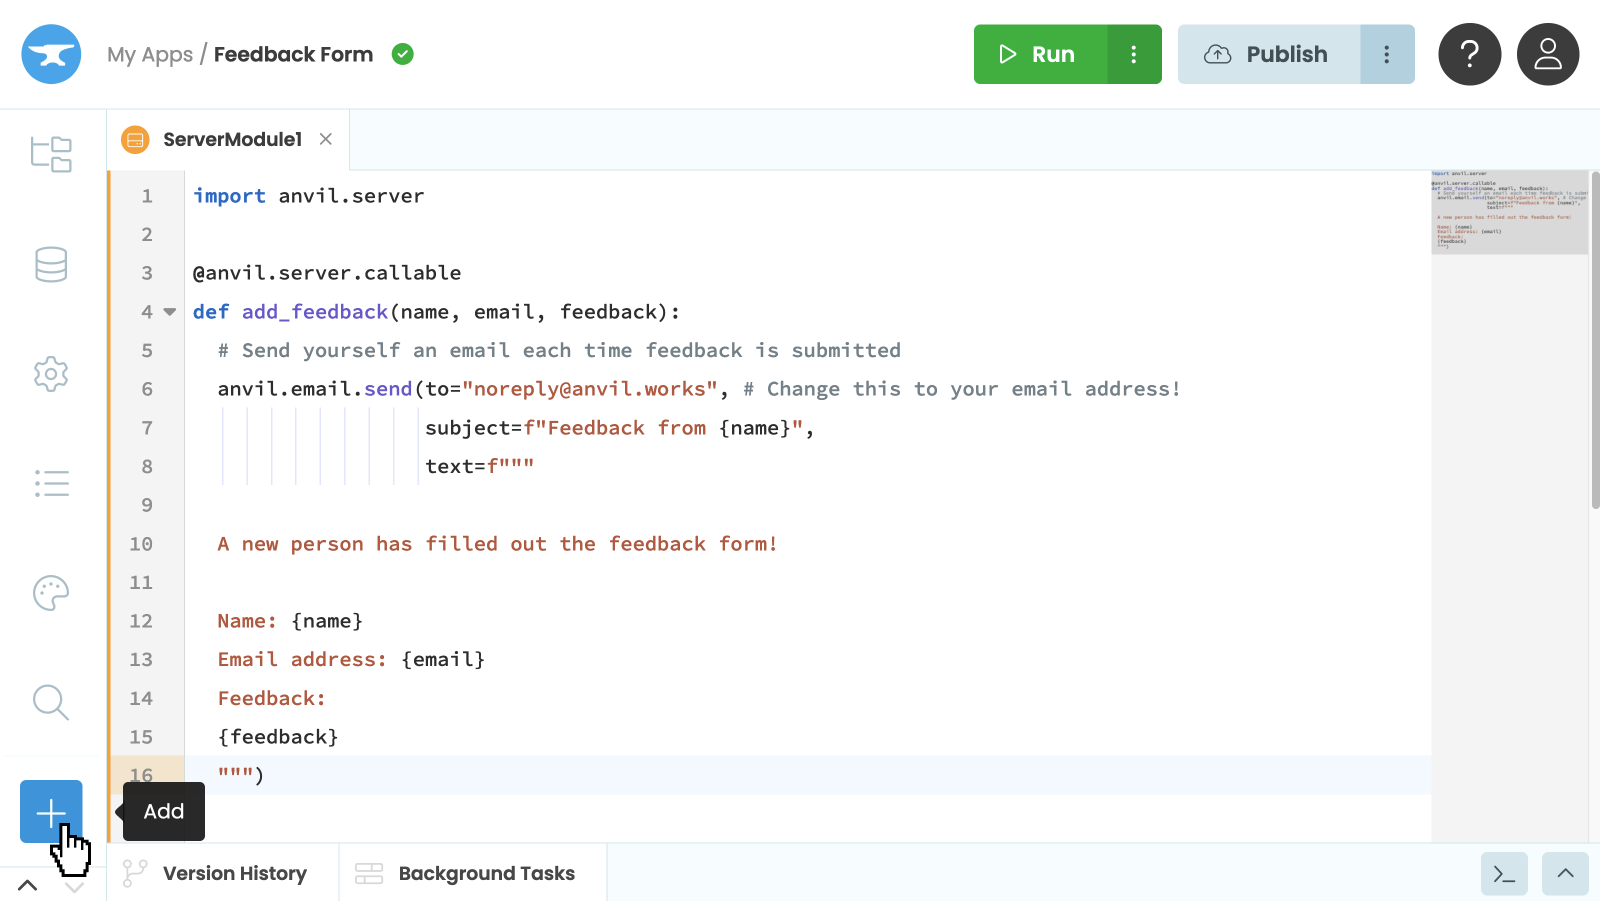
Add a service
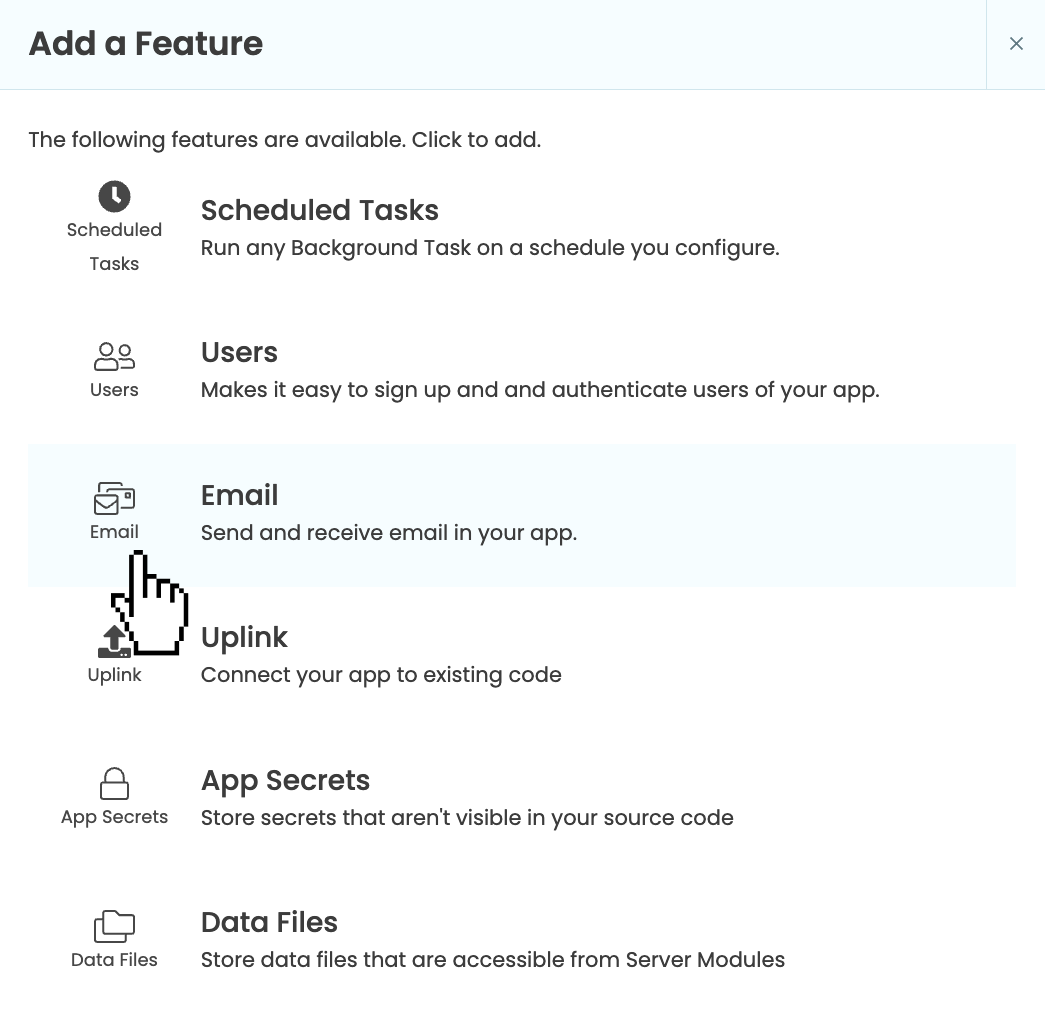
Select the Email Service
Now you’ve enabled the Email Service, you can send an email just by calling anvil.email.send.
Call the send function
Go to your Server Module, and modify your add_feedback function to look like this. Remember to change the address to your email address! We added this function in Step 3.
@anvil.server.callable
def add_feedback(name, email, feedback):
  app_tables.feedback.add_row(
    name=name,
    email=email,
    feedback=feedback,
    created=datetime.now()
  )
  # Send yourself an email each time feedback is submitted
  anvil.email.send(#to="noreply@anvil.works", # Change this to your email address!
                   subject=f"Feedback from {name}",
                   text=f"""
  A new person has filled out the feedback form!

  Name: {name}
  Email address: {email}
  Feedback:
  {feedback}
  """)
Test your function
We’ll test our add_feedback function using Anvil’s built-in REPL. On the right of the editor’s Bottom Panel, select the “Launch Server REPL” button  .
.
This will open a server console which is a Python interpreter, very similar to what you’d use on your own machine. To test our function, we’ll import the function from our server module and then run our function feeding it some dummy data:
from .ServerModule1 import add_feedback
add_feedback("Ryan", "test@email.com", "Anvil is super cool!")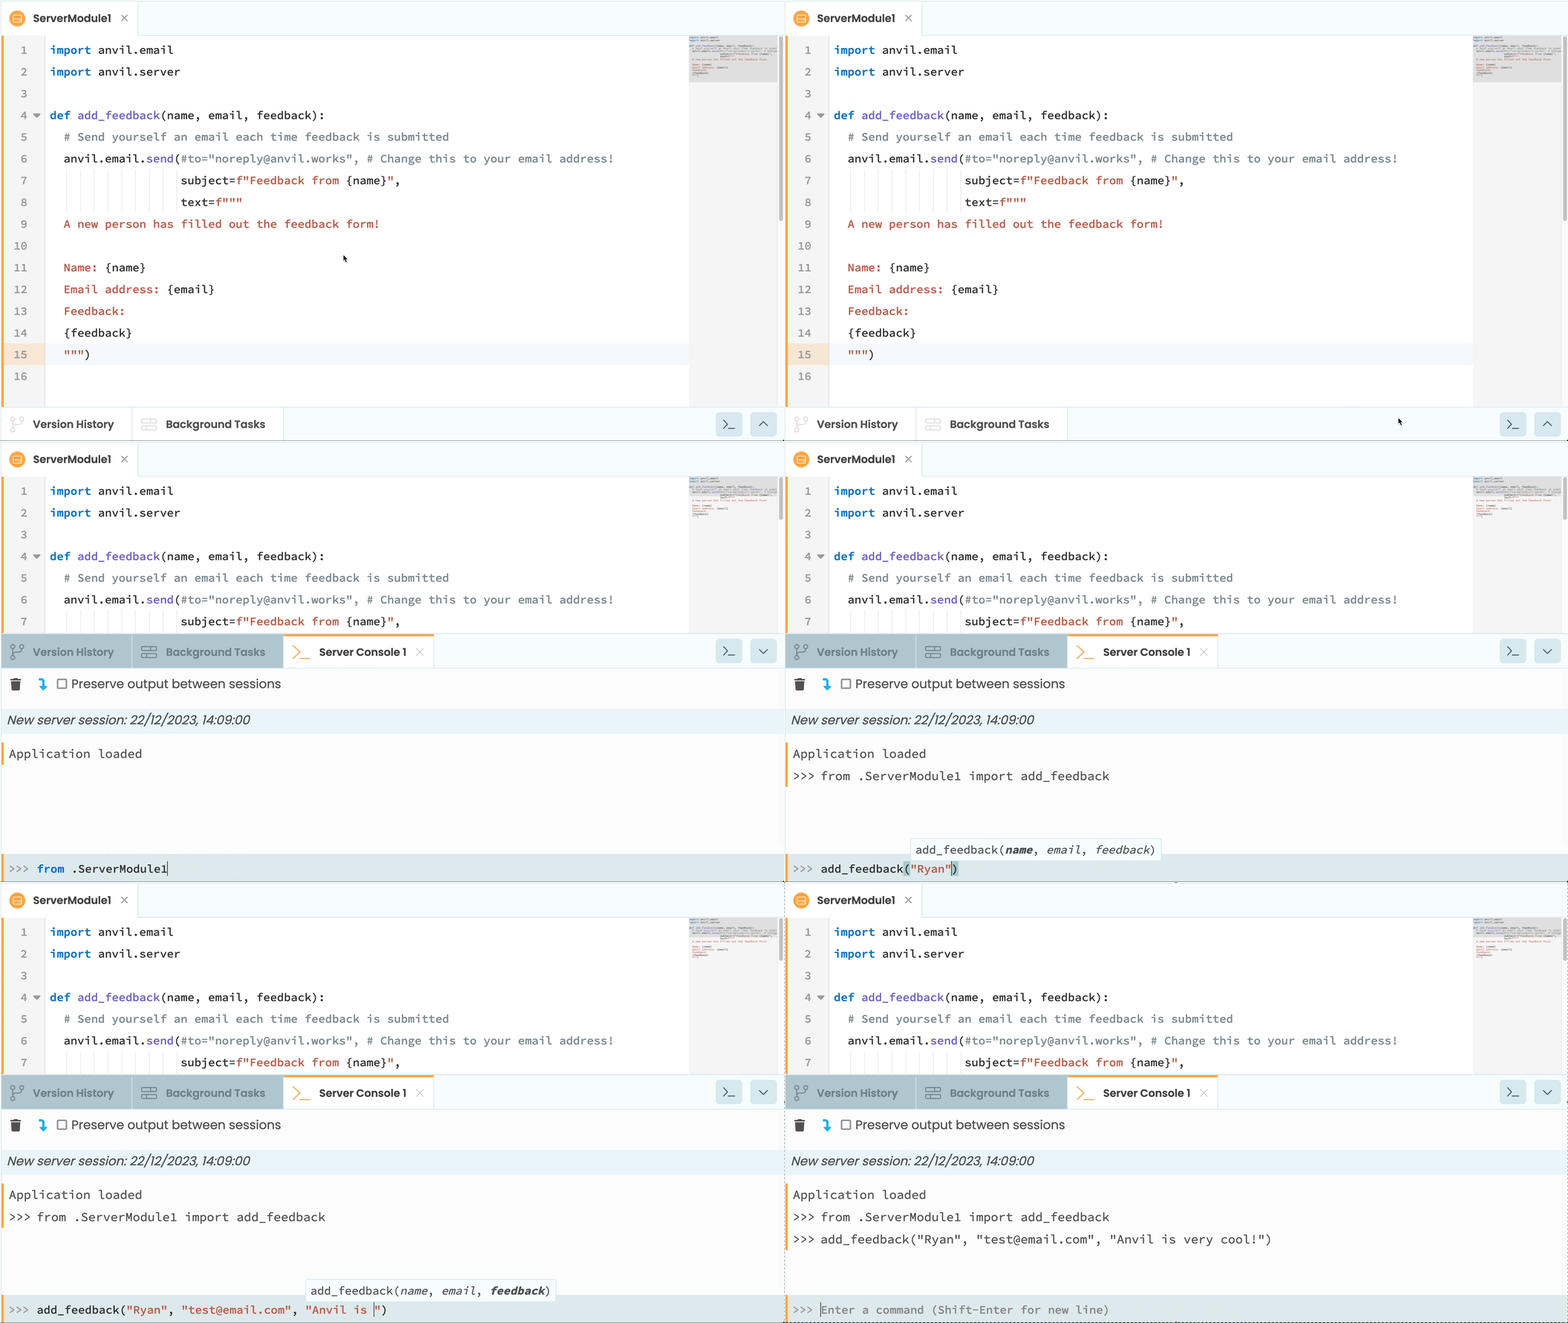
You’ll notice Anvil’s built-in autocomplete helping you find the server module and function.
Hit enter and you’ll see a new row of feedback appear in your Data Table. An email will also be sent to the address you registered with on Anvil!
Publish your app
You can easily publish you app online for anyone to use. Click the ‘Publish’ button at the top right of the editor, then select ‘Publish this app’ and use the public URL provided or enter your own.

The publish button highlighted at the top of the Editor
Fill in a name, email address, and some feedback and click Submit. You’ll receive an email letting you know someone has filled out your feedback form.
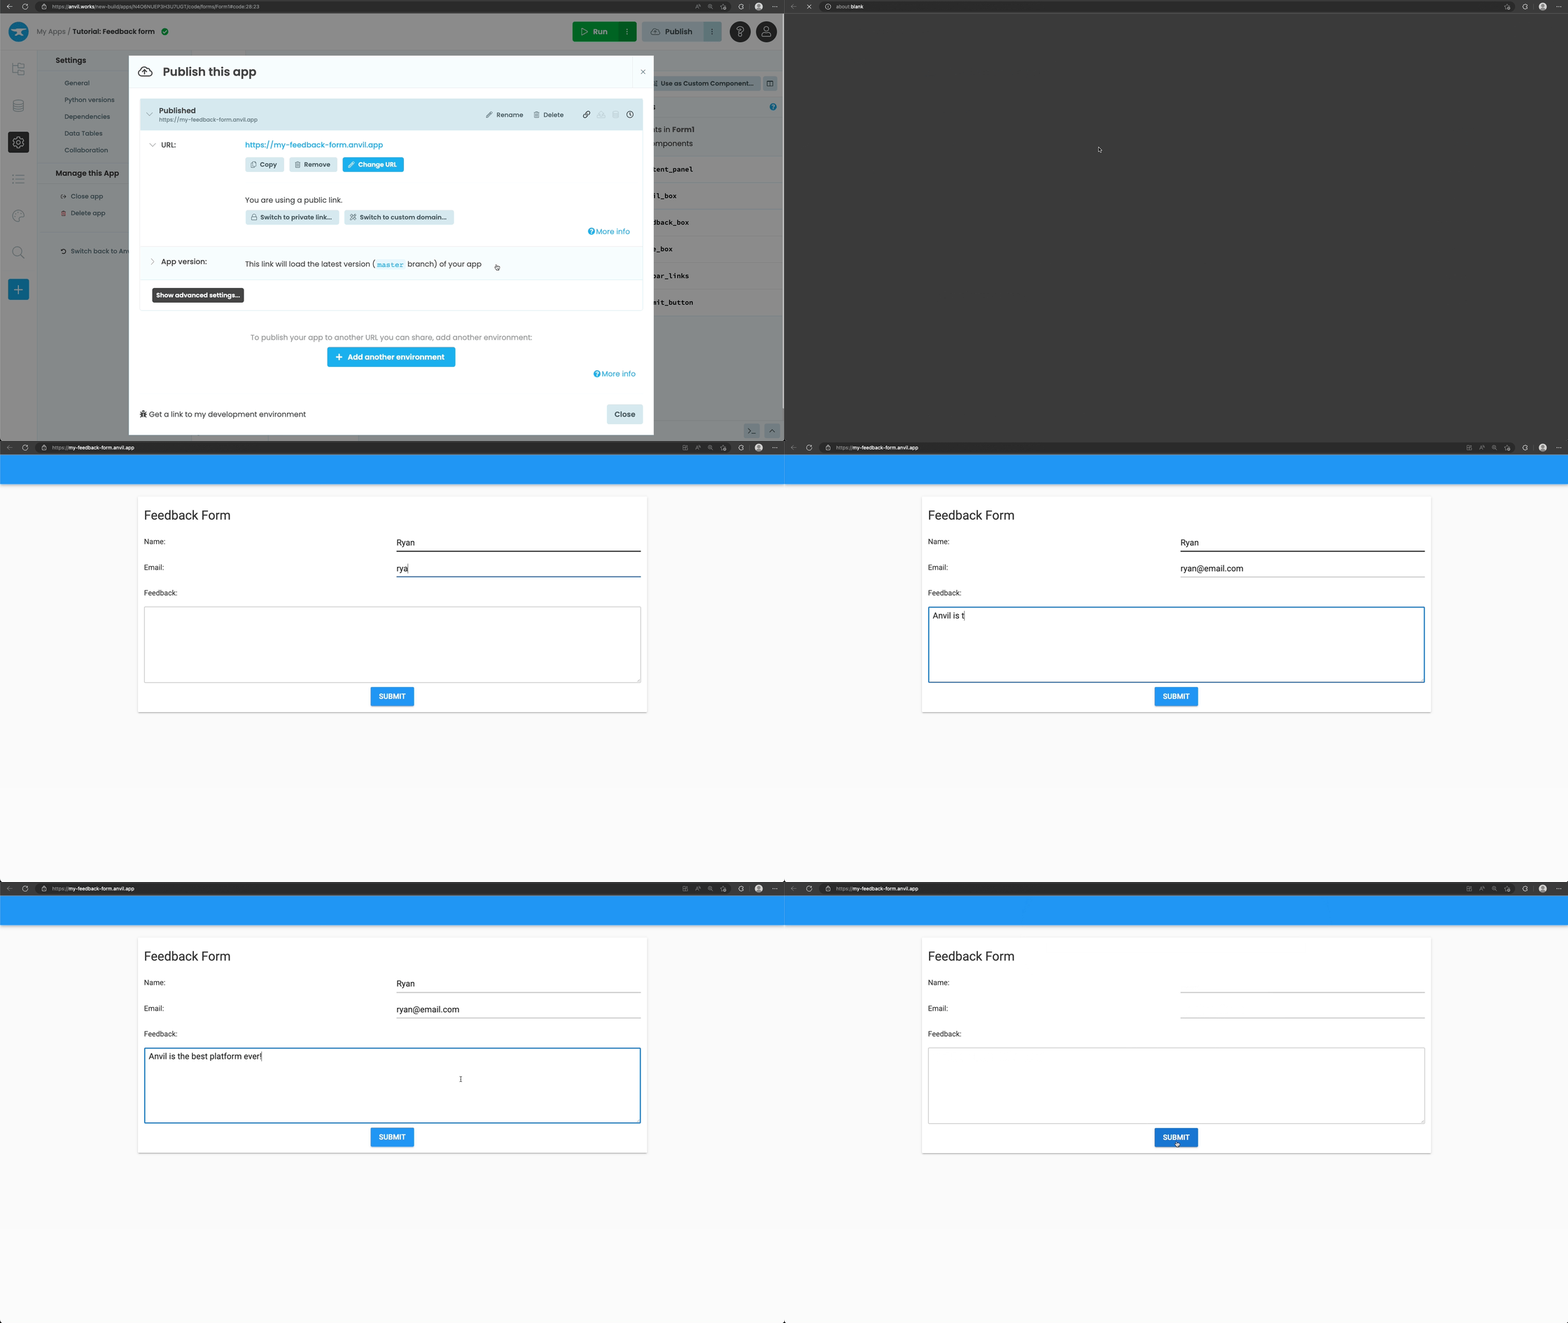
Using the deployed app
Congratulations!
And that’s it. You’ve just built a working database-backed feedback app in Anvil.
You can also use the following link to clone the finished app and explore it yourself:
In the next step, you can challenge yourself to reinforce what you’ve learnt and learn more!
Step 6 - Optional: Challenge yourself
Improve the feedback form
A common question when asking for feedback is “How likely you would be to recommend us to a friend or colleague?”. Add this question to your feedback form app with a DropDown component that gives your users the options “Very unlikely”, “Unlikely”, “Likely” and “Very likely”.
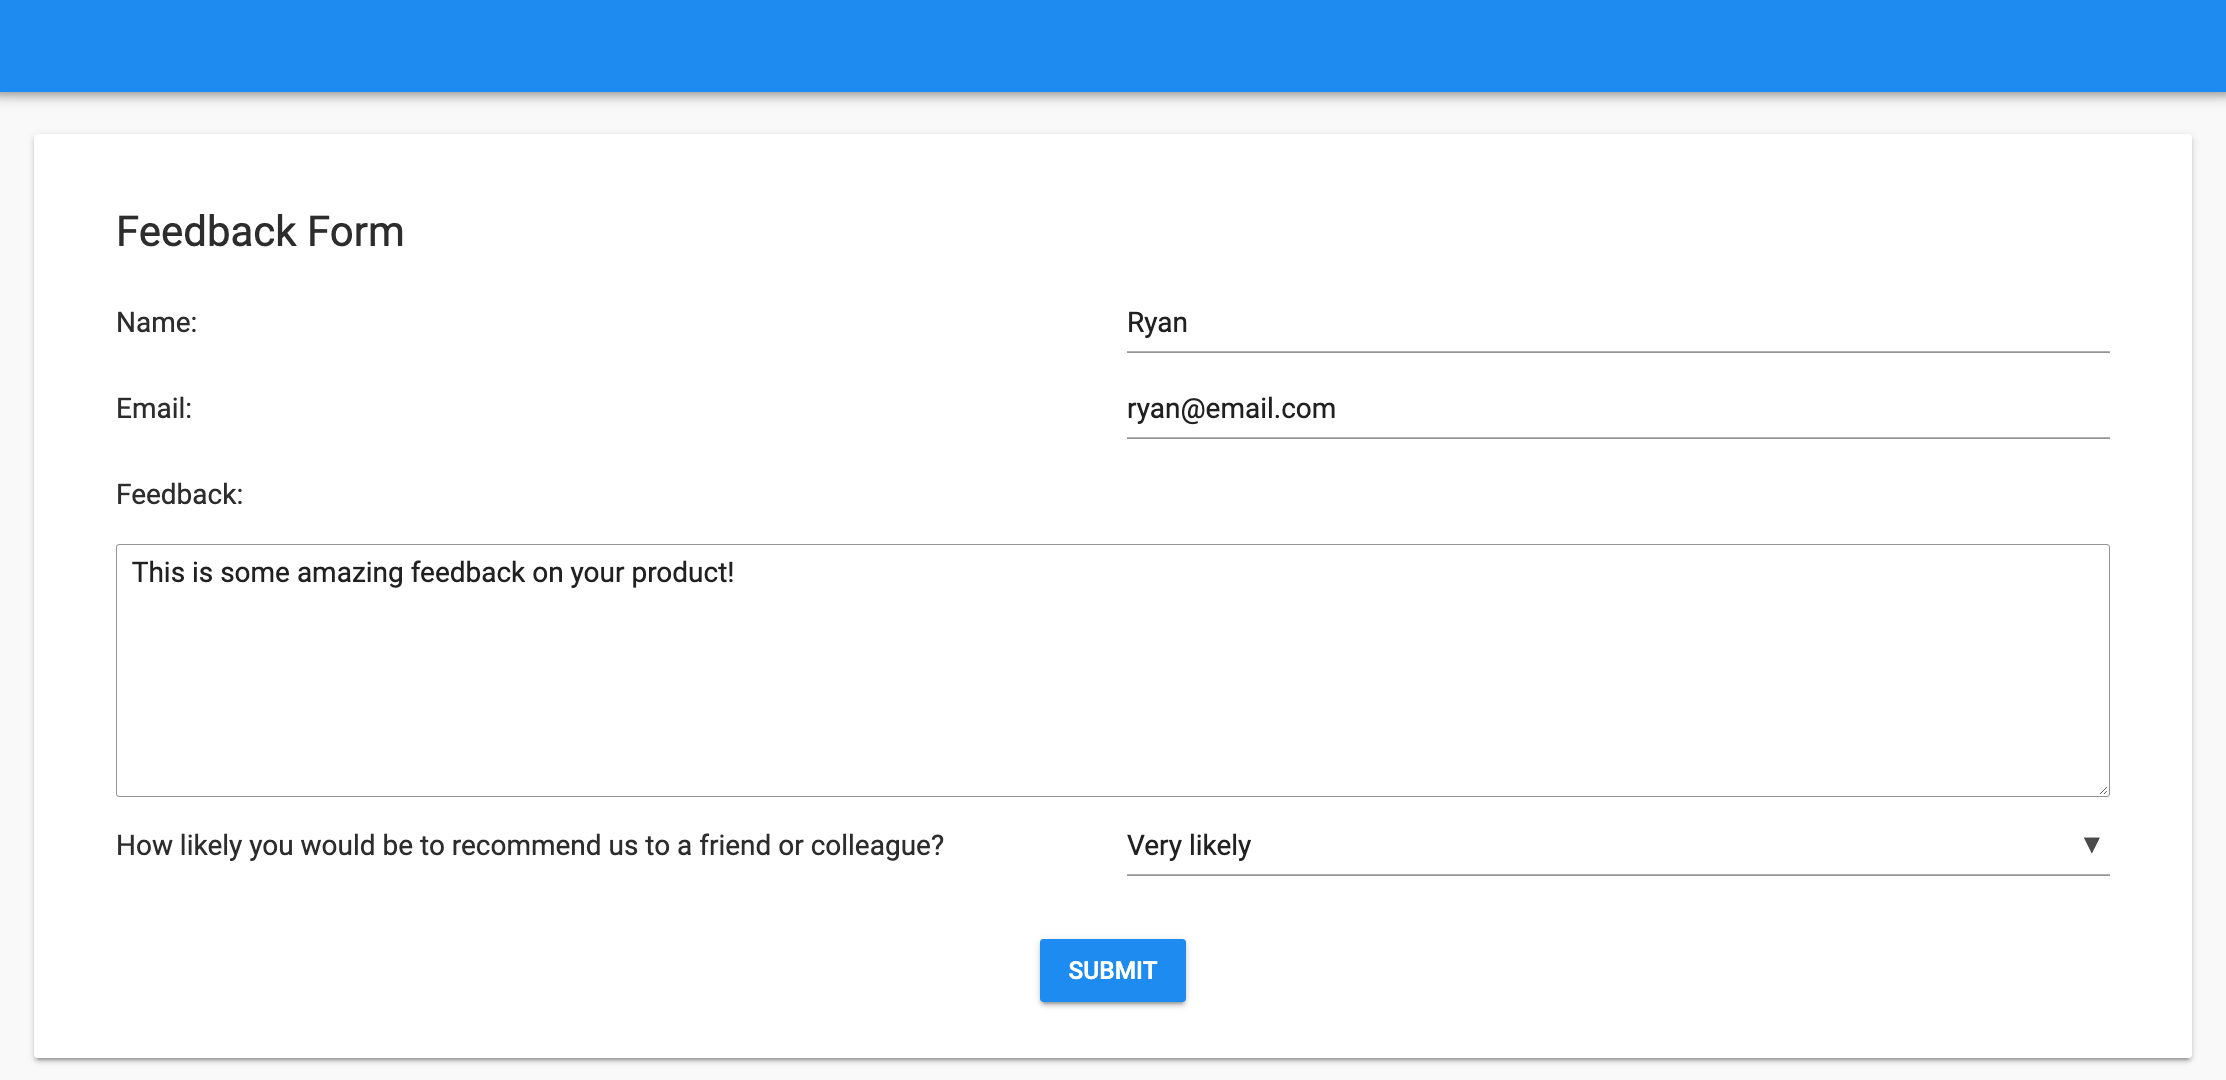
An example of the app with a dropdown
Don’t forget to add a column to your database to store the response, and update the client-side and server-side code to send the response from the client to the database.
With this challenge finished, you now have a solid foundation in Anvil.
What next?
Head to the Anvil Learning Centre for more tutorials, or head to our examples page to see how to build some complex apps in Anvil.
Build Database-Backed Apps

In this tutorial, you’ll learn how to do all of those things and more in Anvil.
Display data on a dashboard

A Guide to Styling Apps with CSS