
Building clean database-backed apps
There are many ways to build database-backed, or CRUD (Create/Read/Update/Delete) apps with Anvil. This guide describes our recommended approach for building CRUD functionality in Anvil. It’s not mandatory – Anvil provides tons of flexibility, so you can do whatever you need to – but we’ve found that these principles make your apps faster to build and easier to maintain.
Don’t repeat yourself
Reusing code and UI components can save you a lot of time and dramatically simplify your CRUD apps.
One Form for Creating and Updating
Often, it’s possible to use one Form to both Create and Update records.
We recommend using a Form’s self.item property, a Python dictionary and Data Bindings to do this.
For example, say you have a Form with a set of prompts and user input fields to be used to Create a record:
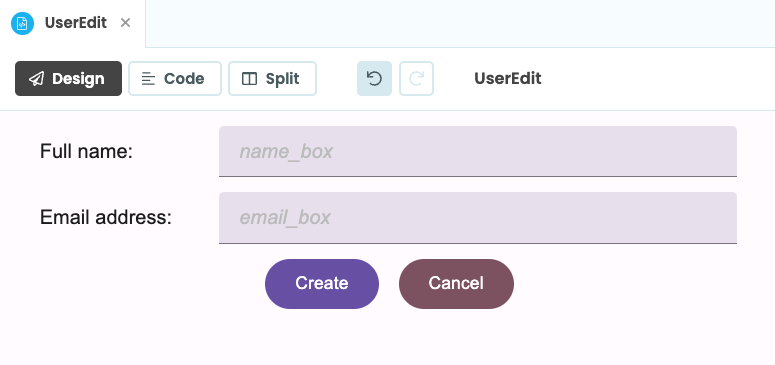
You’ll want to keep track of the user’s inputs as they fill in the Form. You’ll also want a simple way to discard user inputs if they decide not to save the record. You can do this by setting that Form’s self.item attribute to a dictionary.
If you’re Creating a new record, that can be an empty dictionary:
from UserEdit import UserEdit
# Add the UserEdit Form to the page and set `self.item` to an empty dictionary
self.content_panel.add_component(UserEdit(item={}))
As the user fills in the form, add their inputs to the dictionary using Data Bindings. For example, using the UserEdit Form from above:
name_box: Bind thetextproperty toself.item['name']email_box: Bind thetextproperty toself.item['email']
If the user decides to create the new record, write the data in the dictionary into the Data Table. If they cancel, you can just discard the dictionary.
In our example, you can also use the UserEdit Form for Updating records. Instead of setting the self.item property of UserEdit to an empty dictionary, this time we pass a copy of the record from the Data Table that we want to edit:
from UserEdit import UserEdit
user_row = """This is the user row from the Data Table"""
# Call dict() on this row to create a copy of it
self.user_copy = dict(user_row)
# Add the UserEdit Form to the page and set `self.item` to the copy of the user_row
self.content_panel.add_component(UserEdit(item=self.user_copy))
We already have Data Bindings to self.item in our UserEdit Form, so any updates the user makes will also be written back to the user_copy dictionary. If the user saves their changes, we use that dictionary to update the row in the Data Table, and if they cancel – we can just discard the dictionary, and leave the row as it is.
You can see a full worked example of using Python dictionaries, and Data Bindings to reuse Create and Update Forms in our Building Database-Backed Apps tutorial.
Global vs record-specific logic
For example, if your app has a ‘Homepage’, or ‘Main’ Form, keeping your CRUD operations inside this ‘Main’ Form simplifies your app:
- All actions in your app that perform the same operation (e.g. deleting a record) can just call the same ‘Main’ delete function, rather than having several functions performing the same operation. This also makes things simpler if you decide to change your delete function – you’ll only have to change it in one place.
- If you’re reusing similar components (e.g. using the same form for Creating and Updating a record), the components don’t need to know which CRUD operation they’re performing. They can just accept user inputs, and leave the ‘Main’ Form to perform the correct CRUD operation.
For example, take the ‘UserEdit’ Form above. All this Form does is record user inputs using Data Bindings – no CRUD operations or logic are stored in the Code of the ‘UserEdit’ Form. Since the Form is only responsible for taking user inputs, we can use it to both Create and Update user records.
Event handlers on the ‘Main’ Form
Keeping the logic of your CRUD operations inside the ‘Main’ Form means you’ll sometimes need to call a function on the ‘Main’ Form from inside a nested or ‘child’ Form. We recommend setting a custom event handler on the child’s container (often a RepeatingPanel), and triggering this from the ‘child’ Form. You can look up a component’s ‘parent’ container with the .parent attribute.
Cancelling operations
It’s important to consider what your app will do if a user cancels the operation they’re performing.
We recommend using a Python dictionary to record user inputs. If the user cancels the operation, the dictionary containing the user inputs can just be discarded.
When performing the Update operation, make a copy of the record that’s being updated, and use that dictionary to record user inputs. If the user clicks “Save”, you can then write that data from the dictionary back to the database record. If the user clicks “Cancel”, you can discard the dictionary and you haven’t overwritten any data.
The reusing components section above has more information and examples about using dictionaries to simplify data management and cancelling operations.
Data Bindings
It’s likely you’ll want to use Data Bindings to keep a component’s properties in sync with the underlying data. You’ll need to decide where you’ll use Data Bindings in your app.
We recommend you data bind to things that can be refreshed quickly (e.g. without a round-trip to the server).
Data Binding to data from a server function
If you’re data binding to data returned from a server function, we recommend you set your component properties in code. This way, you can be explicit about when you’re performing round trips to the server.
Validation
You’ll often want to validate your users’ inputs. For example, you might want to ensure that the “name” field is not empty, or that “date_of_birth” is in the past.
Validation has two purposes:
- To provide good feedback to the user, to prompt them to correct their input.
- To ensure that your app does not write malformed data into the database.
It’s easiest to provide feedback (#1) in client code, but client code cannot be trusted (see our security recommendations), so the final check (#2) must happen in server code.
We therefore recommend validating inputs on both client and server. The easiest way to do this is to place your validation logic inside a ‘Validation’ Module, so you can import it from both client and server code. Validation functions should return error messages that can be handled by both client and server.
For example, let’s say our ‘Validation’ module contains the the following get_user_errors() function. It checks whether the dictionary provided contains a name, and returns an error message if not:
def get_user_errors(user):
  error_messages = []
  if not user.get('name'):
    error_messages.append("You must provide a name")
  return error_messages
We can handle the error message on the client using an alert:
import Validation

# ...
# When we want to create a new user:
error_messages = Validation.get_user_errors(new_user_dict)
if error_messages:
  alert("The following errors occurred: \n{}".format(' \n'.join(msg for msg in error_messages)))
else:
  anvil.server.call('add_user', new_user_dict)
# ...
On the server, if we get passed invalid data, we can raise an Exception.
If we receive invalid data in a server function, something has gone badly wrong. If nobody has tampered with our client code, we should never have got this far – the client-side validation logic would have caught the error! So there’s a good chance something fishy is going on.
Therefore, at this point, we don’t need to display a clean error. We just need to make sure we don’t add the incorrect data to our database. Raising an Exception (that probably won’t be caught) is a good way to do this.
import Validation

# ...
@anvil.server.callable
def add_user(new_user_dict):
  exceptions = Validation.get_user_errors(new_user_dict)
  if exceptions:
    raise Exception("The following errors occurred: \n{}".format(' \n'.join(word for word in exceptions)))
  else:
    app_tables.users.add_row(**new_user_dict)
# ...
Security
Anvil is designed with security in mind.
If your CRUD app uses Data Tables or an external database to store data, we recommend restricting database access to Server Modules.
This is because client-side code can’t be trusted. As is the case with any web app, client-side code is executed in the user’s web browser - this means that any user can edit the client code to do whatever they like. We can’t trust that Forms (and Modules they import) will do what we tell them, and we must write our app bearing this in mind.
Server modules, by contrast, cannot be edited by the user, so we can trust them to do what we tell them. This is why it is best practice to carry out all database transactions from a server module.
By default, Anvil Forms (which contain your client-side code) are not given any access to your Data Tables. This is to encourage users to always access Data Tables from within a server module.
Make sure database rows are real before using them
You will sometimes write server code that accepts a database row from the client, and performs some action on it. For example, here is a naive Update server function that does not perform any checks. (We’re using the datamodel from our CRUD tutorial:)
# THIS FUNCTION IS DANGEROUSLY INSECURE. Do not do this!
@anvil.server.callable
def update_article(article_row, article_dict):
  article_row.update(**article_dict)
Because this code doesn’t check that article_row belongs to the articles table, malicious client code could pass any database row to this function, and it will be updated! Not a good idea.
Here’s what you should do instead:
# This function is safe: It will only update rows from the
# `articles` table.
@anvil.server.callable
def update_article(article_row, article_dict):
  if app_tables.articles.has_row(article_row):
    article_row.update(**article_dict)
  else:
    raise Exception('No such article')
Naming conventions
We use certain naming conventions in our example code, which we’ll outline below. You don’t have to stick to them, but we’ve found they make our code a lot clearer.
For example, this code is far easier to follow:
def refresh_articles(self):
  # Load existing articles from the Data Table, and display them in the RepeatingPanel
  self.articles_panel.items = anvil.server.call('get_articles')
than this:
# What 'data' are we refreshing? What is 'repeating_panel_1' for?
# Who knows!
def refresh_data(self):
self.repeating_panel_1.items = anvil.server.call('get_data')Naming Forms
Create & Update
If can use our Create Form to also Upate records, we call our Create / Update Form ‘UserEdit’
If we have a separate Create and Update Forms, we call these ‘CreateUser’, and ‘UserEdit’
Read
If we have a number of columns in our Data Table, it’s likely that we will have two views for Reading a record: one displaying summary information, the other displaying more detailed information about a record.
Forms presenting summary information are called ‘UserSummary’. Forms presenting detailed information are called ‘UserView’.
Information for Reading a record is often presented in a list, using a Data Grid or RepeatingPanel. The ItemTemplate of the RepeatingPanel should be named ‘UserSummary’ or ‘UserView’, depending on the level of information it is displaying
For example, in our basic CRUD example, the ItemTemplate of our RepeatingPanel is displaying detailed information for a list of news articles, so the ItemTemplate is called ‘ArticleView’
Naming Buttons
We give our buttons useful names so that it’s easy to recognise them from code. We use names like add_user_button, edit_user_button, delete_user_button.
Naming Functions
When displaying a list of users (for example, on the Homepage), we load all user data in a function called refresh_users, and call it from the Form’s __init__ method. We use the term refresh because the function can also be called anywhere else the data needs reloading, for example after a Create, Delete or Update operation.
To make operations easy to cancel, we recommend using a Python dictionary to store user inputs. We define a function called reset_new_user to initialise the dictionary which will record user inputs.
def reset_new_user(self):
  # Initialise a dict for creating a new user
  # & write back to it using data bindings
  self.new_user = {}
reset_new_user() can be called whenever the dictionary needs to be reset. For example, we would call reset_new_user in the __init__ method of our Form to create the dictionary when our app is run for the first time. We would also call this function if the user cancels the current CRUD operation. This would reset the dictionary, discarding any user inputs made before the operation was cancelled.
Naming Events and Handlers
We recommend using events to communicate between forms in your app. If you are setting a custom event handler on your ‘Main’ Form to handle Delete operations, call the custom event x-delete-user, and use this to trigger a self.delete_user(user) function.
For example:
# In your Main Form
def __init__(self, **properties):
  # Set Form properties and Data Bindings.
  super().__init__(**properties)
  self.refresh_users()
  self.set_event_handler('x-delete-user', self.delete_user)

# ...

def delete_user(self, user):
  anvil.server.call('delete_user', user)
  self.refresh_users()
Do you still have questions?
Our Community Forum is full of helpful information and Anvil experts.