
Collaborate as a team in Anvil
When working as a team, it is important to protect your production deployments, sensitive data, and app secrets from accidental changes and unauthorised access.
In this guide, you will explore two development workflows that separate your production environment from your development environment(s). These workflows will ensure your production deployment is secure while enabling smooth collaboration within your development team.
Recommended development workflows
The production environment is the live version of your Anvil application—the version real users interact with. This means handling sensitive data, including user accounts, passwords, payment details, and other critical information.
To safeguard your production environment from accidental changes or unauthorised access, we recommend creating a dedicated Anvil app exclusively for production. This app should house all essential components, such as production data tables, deployments, and app secrets, and be managed solely by an admin.
With a separate production app, you can then structure your workflow in one of two ways:
- A shared development app: A single Anvil app serves as the development environment where all developers collaborate. Changes are made and tested in this app before being reviewed and merged into the remote GitHub repository. The production app, which is synced to this remote repository, then pulls the updates.
- Individual developer apps: Each developer works in their own separate Anvil app by cloning the app’s source code from a central GitHub repository. This allows them to work in isolated environments with their own data tables, deployments, and App Secrets. Once changes are complete, they submit a pull request for review. After merging, the production app (which is also cloned from and synced to this GitHub repository) pulls the updated changes.
Let’s explore these approaches in detail and walk through the setup process.
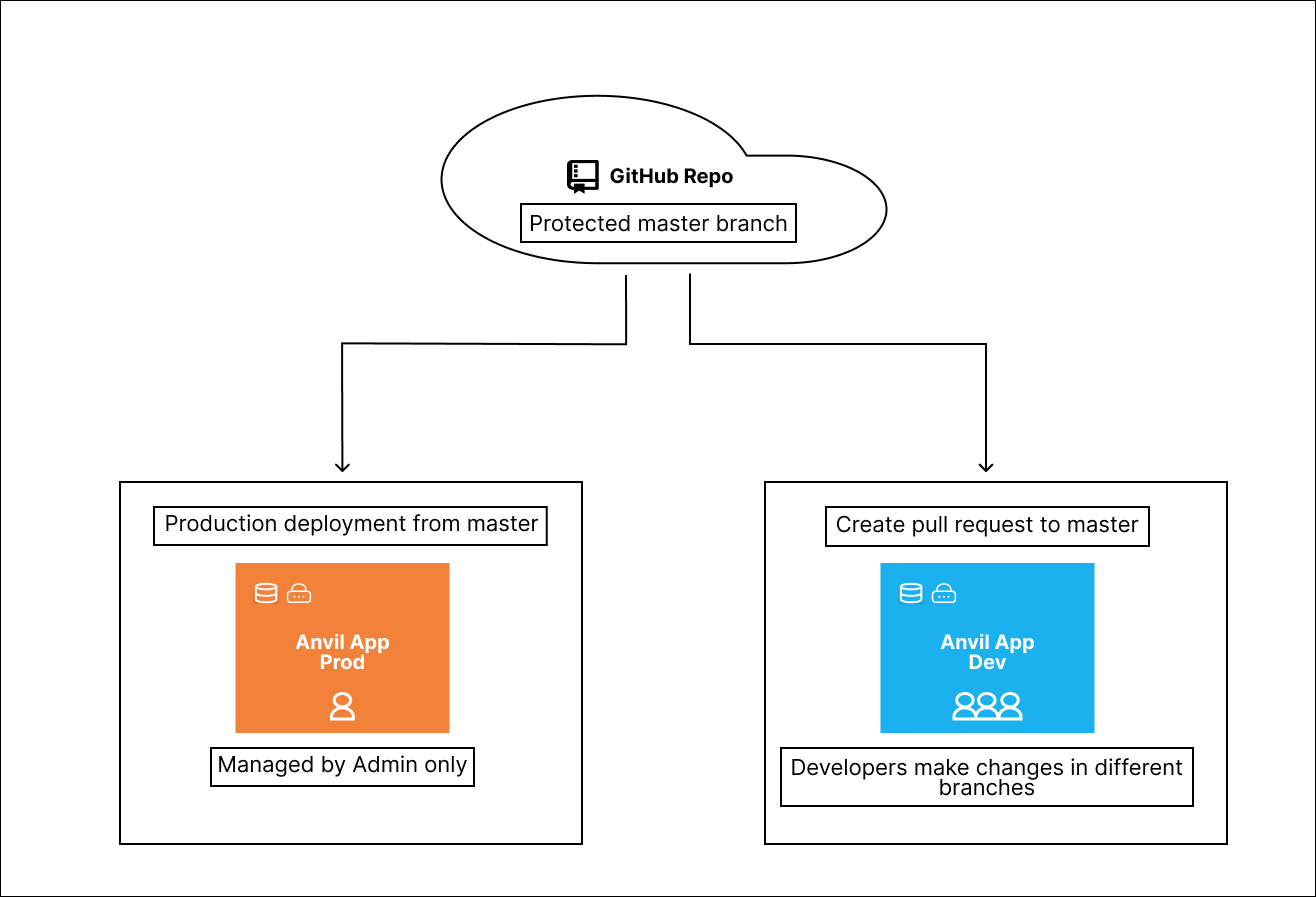
Workflow 1: Shared development app
In this workflow, all developers collaborate in a single shared development Anvil application. Changes are made and tested here before being merged into the remote repository and then pulled into the production Anvil app.
Step 1: Create the development environment and connect it to a GitHub repository
-
Create an Anvil application as you normally would. This will be your development app. Every Anvil app is a git Repository, and by default, it starts on the
masterbranch. -
Connect the app to a new GitHub repository. You will need to authorise Anvil to access your personal or organisation’s GitHub account. Once connected, the “Save app to GitHub” button will be renamed to “Sync Git Remotes”. Click on the more options
 icon to the right of this button and select “View on GitHub” to open the newly created repository.

View repo on GitHub
-
Next, In this GitHub repository, add branch protection rules for the
masterbranch as this is where your production environment will deploy from.To use protected branches in a private repository, you need a GitHub paid plan.
-
Invite your developers as collaborators to the repository or organisation, if you haven’t already.
Step 2: Invite collaborators to your development environment
Next, add your developers as collaborators to your development Anvil app.
Add collaborators
With branch protections in place, collaborators cannot push direct edits to the master branch in the GitHub repository. Instead, they will follow this secure workflow:
- Create a branch from
masterfor their changes, - Develop and test their changes in this branch,
- Push this branch to GitHub, and
- Submit a pull request for review before merging into
master.
Step 3: Set up the production environment
To create the production app:
- Clone your GitHub repository into a new Anvil app. This app should be managed solely by the admin.
- Name your app (you can append “Prod” to the original app name).
If your app uses a database, you will need to migrate your database the first time you clone it and any time the schema changes in the future.
- Deploy your app and point it at the
masterbranch.
Developers will not have access to the production deployment, secrets, or data. The only way to deploy changes is by merging a pull request into the protected master branch on GitHub.
Once a pull request is merged, the master branch updates in both the development and production apps, automatically deploying the new code.
By enforcing branch protection, accidental or unauthorised changes to master are prevented.
Step 4: Configure App Secrets
If your app uses App Secrets, you need to configure values for your secrets in the production app. These values will not be accessible to the development app, which means ordinary developers will not have access to them.
- Create a new branch—since
masteris protected, direct edits are not allowed. - Open the Secrets Service configuration and set the values for each secret.
- Create a pull request to merge these new values into
master.
Secrets are stored encrypted in the application source code and can only be extracted from this service in the production app. To learn more about how App Secrets work with multiple checkouts, read App Secrets and Multiple Checkouts.
Separate production app with a shared development app
Workflow 2: Individual developer apps
In this workflow, the production app’s source code is stored in a central GitHub repository. Each developer clones this repository into their own private Anvil app, where they can make and test their changes. Once their work is complete, they create a pull request, which is reviewed and merged into the remote repository. The changes are then pulled into the production Anvil app.
Step 1: Create the production environment and connect it to a GitHub repository
- Create an Anvil application as you normally would. This will be your production app and should be accessed only by the admin.
- Follow steps 2, 3, and 4 in “Creating the Development Environment and Connecting It to GitHub” to connect the app to a new GitHub repository, add branch protection to
master, and invite collaborators to your GitHub repository. - Configure the necessary secrets for your production environment, as described in the “Configure App Secrets” section.
- Deploy your app and point it at the
masterbranch.
Step 2: Setup developer apps
Now each developer can clone the GitHub repository into a new Anvil app, where they can work in an isolated environment with their own database and secrets.
Since all the developer Anvil apps are synced to a central GitHub repository, each developer can see the updated code at any time, either from their colleagues’ branches or from the master branch. However, they won’t be able to push changes directly to the master branch due to branch protection rules.
To make changes that should be reflected in production, a developer would:
- Create a branch in their Anvil app
- Develop and test their changes in this branch,
- Push this branch to GitHub, and
- Submit a pull request for review before merging into
master.
Once merged into master, you can pull the changes into the production Anvil app, which automatically goes live to users.
This approach is a good fit for enterprises that use GitHub-based workflows, integrating authentication, auditing, and third-party tools with Anvil just as with any other development framework.
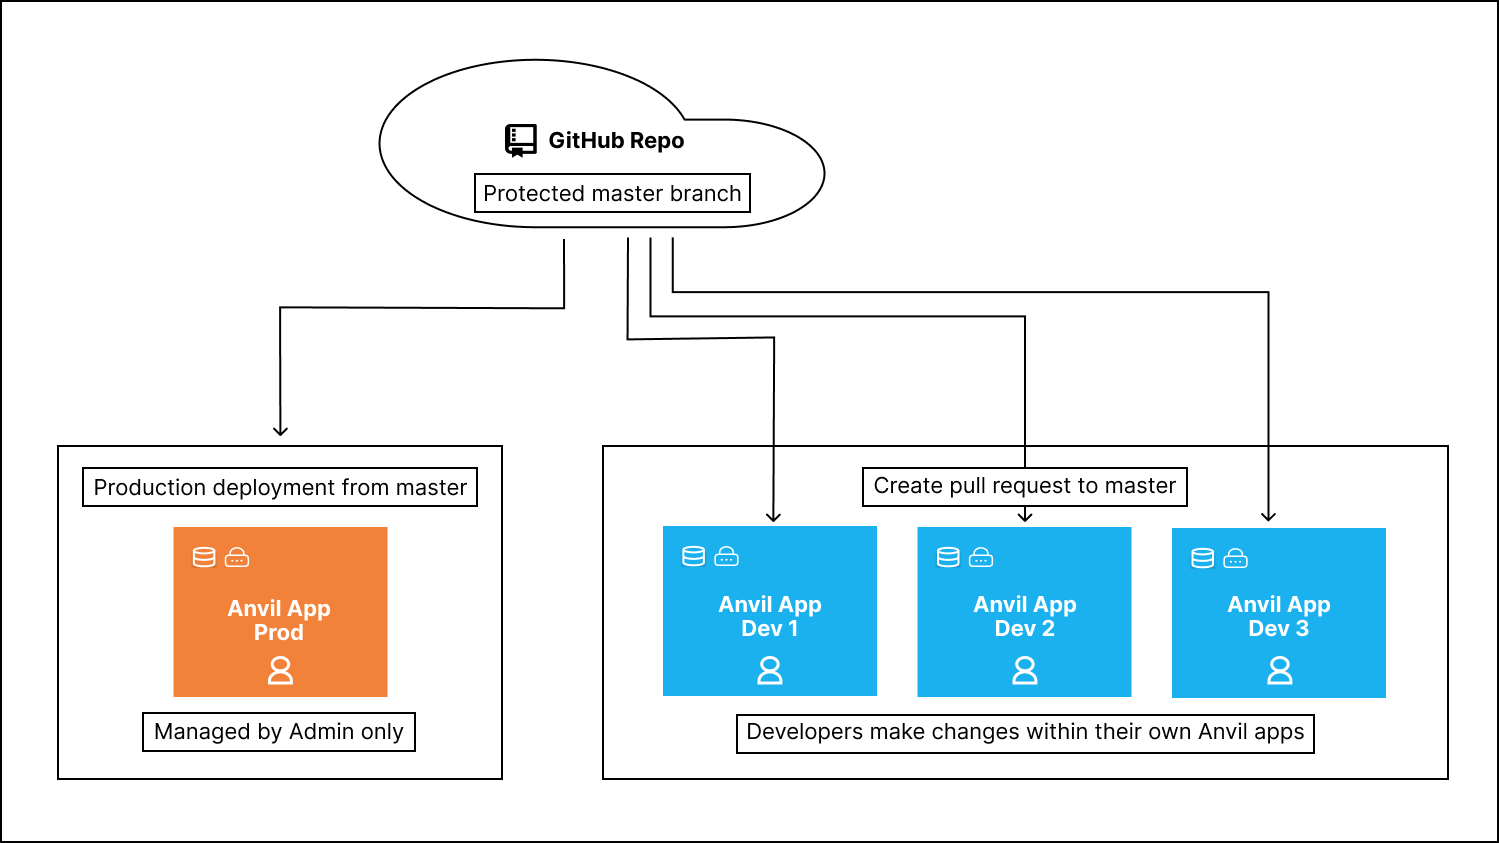
Separate production app with individual apps for developers
Collaborating in Open Source projects
For open source projects, you can still maintain a separate production app synced to a GitHub repository with branch protection rules in place for the master branch. Open source collaborators can propose changes even when they do not have write access to the upstream repository by creating forks:
- Create a fork of the public GitHub repository.
- Clone the forked GitHub repository into a new Anvil app.
- Create a branch, make changes in the Anvil app, and push to the forked repo.
- Submit a pull request to the project owner.
This allows project maintainers to review contributions from the wider community while maintaining security and control over the production environment.
Keeping production apps secure
Even though the master branch on GitHub is protected from direct changes, it’s still possible to edit the master branch directly within the Anvil editor. This will cause your Anvil master branch to become out of sync with the remote master branch on GitHub. You can fix this by synchronising changes.
If your production app is deployed from the latest version of your Anvil master branch, any edits made on this branch in the Anvil Editor will go live immediately—bypassing your GitHub review process. These changes won’t appear in the remote repository, but users will still see them. You can fix this by resetting the local branch to match the remote one. This is why it’s very important to keep your production app separate and restricted to admin access.
Do you still have questions?
Our Community Forum is full of helpful information and Anvil experts.