 By
By Chapter 5:
Allow users to delete movies
We want to allow the user to delete individual movies, too. This will be done similarly to editing them.
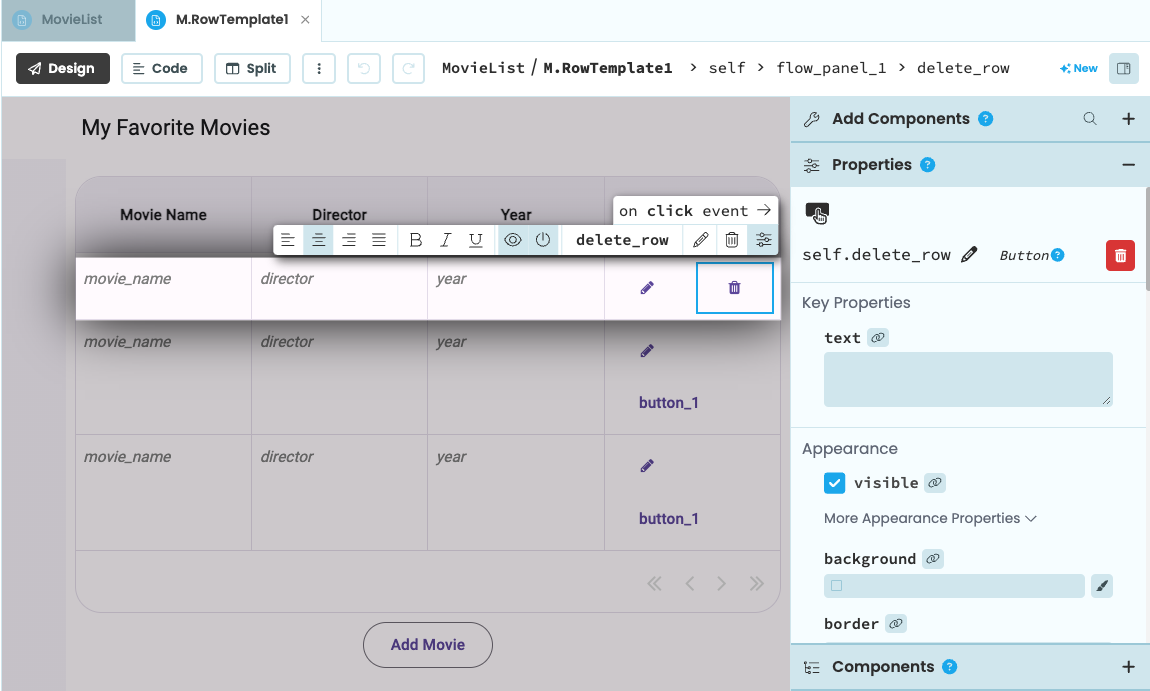
Step 1: Add a delete button to the Data Grid
Switch back to Design View and edit the RowTemplate for the Data Grid. Add a new Button to the FlowPanel that contains the edit_row Button. Name the new button delete_row, delete the text and change the icon to “trash”. Go ahead and create a click event handler for it. We’ll write the code for that function in step 3.
Step 2: Write server code
We need a server function for deleting a movie. Switch to ServerModule1 and add the following function. movie will be a row from the movies Data Table:
@anvil.server.callable
def delete_movie(movie):
movie.delete()Step 3: Set up the event handler
Next, we’ll create a function in MovieList that calls the delete_movie server function we just wrote. We’ll confirm this operation since it’s a destructive one by calling the confirm function. This displays a modal dialog that allows us to get a Yes or No answer from the user before continuing. The confirm function returns True when the user answers “Yes”.
Switch to the code view for MovieList and add the following function:
def delete_movie(self, movie, **event_args):
  if confirm(f"Do you really want to delete the movie {movie['movie_name']}?"):
    anvil.server.call('delete_movie', movie)
    #refresh the Data Grid
    self.repeating_panel_1.items = app_tables.movies.search()
Like before, we need to add a custom event handler to the RepeatingPanel in the init function of MovieEdit. This time, we’ll call the event x-delete-movie.
def __init__(self, **properties):
  # Set Form properties and Data Bindings.
  super().__init__(**properties)

  self.repeating_panel_1.items = app_tables.movies.search()
  self.repeating_panel_1.add_event_handler('x-edit-movie', self.edit_movie)
  #add this line
self.repeating_panel_1.add_event_handler('x-delete-movie', self.delete_movie)Step 4: Fire the event handler
Finally, switch back to the code for the RowTemplate. In the delete_row_click function, fire the x-delete-movie event and pass in the movie to be deleted (which is the row’s self.item):
def delete_row_click(self, **event_args):
  self.parent.raise_event('x-delete-movie', movie=self.item)
Now run the app and confirm that you can add, edit, and delete movies.
Step 5: Optional: Display Plot Summary
Since the plot summary can be longer than the other fields, it may look odd displayed in a regular column. Another option is to display the plot summary below the other columns.
Double click below the column headers (where the placeholders for the row data are displayed) to edit the RepeatingPanel’s RowTemplate. By editing the RowTemplate, we can customize the look of the rows of the list, including adding in extra components.
Once there we’ll drag a Label below the row.
Anvil will not automatically populate any additional components we add to the RowTemplate, so we’ll need to set up a data binding for that new Label. Bind its text property to self.item['summary'].
Now run the app and you’ll see the plot summaries displayed.
That’s it!
You’ve just created an app that uses a Data Grid to display tabular data!
You can use the following link to clone the finished app in the Anvil editor and explore it yourself:
What next?
Level up your Anvil skills by completing another tutorial, or head to our examples page to see how to build some complex apps in Anvil.
Build a Simple Feedback Form
Build Database-Backed Apps
Turning a Google Colab Notebook into a Web App