 By
By I’m going to teach you how to use Docker and Anvil’s Uplink to transform your Jupyter notebooks from local resources into powerful backends driving your websites. You don’t need to run your notebooks locally for others to be able to use them!
You’ve already learnt how to drive a web app using a Jupyter notebook - now take the next step and free that notebook from your local PC.
Now powered by the cloud!
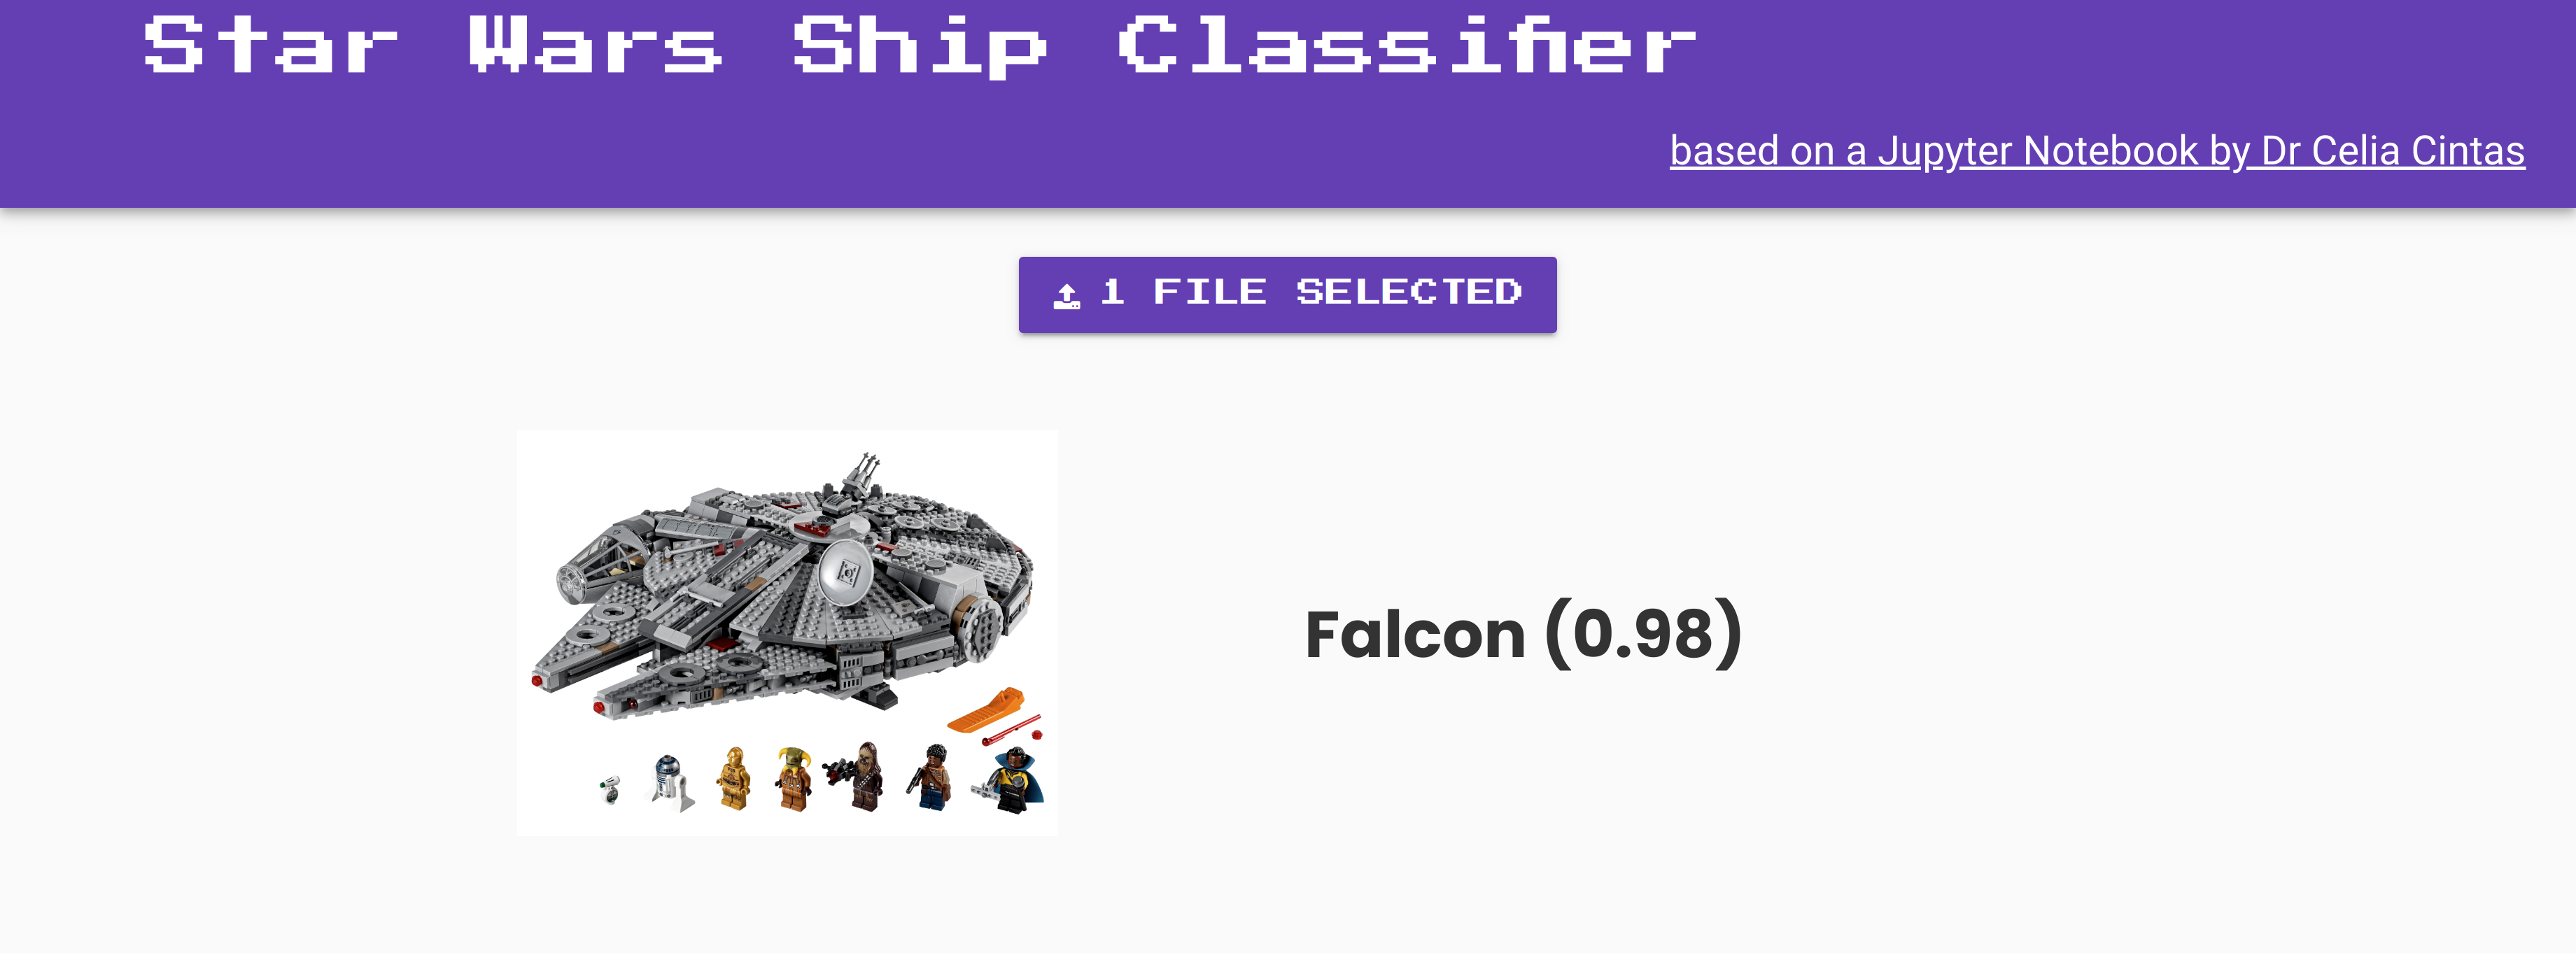
It’s how my Star Wars app works under the hood. I’m not running the notebook for it all the time on my computer any more - instead, I have it running in a container in the cloud.
I’ll walk you through how that works in detail.
Learn you a Docker for Great Good
Docker can seem daunting but we only need to understand a couple of things to use it for this purpose. Docker is a container system. This means it packages up your software in ‘containers’ which have all the libraries and configurations needed to run code in a self-contained way.
This is really handy when running a Jupyter notebook in different places. If you have a container set up for it, your notebook will be happy to run inside that wherever it is - whether that’s on your laptop, on a friend’s, or in the cloud.
You don’t need to worry about remembering to pip install the right things each time, or downloading the same versions of your machine learning libraries - the container will take care of it all. You can also run different containers with different versions of the same libraries at the same time on your machine, and they won’t interfere with each other, which is really handy if you’re working on a few projects at once.
Get Ready
You’ll need to have Docker Engine installed to build and run Docker containers locally. There are versions of this for all operating systems, but my instructions will focus on the shell command line interface from here (Mac, Linux and Windows Subsystem for Linux).
You may also end up finding it handy to use Docker Compose, but that isn’t necessary for the steps I’m going to walk you through here.
The Dockerfile
The Dockerfile is like a recipe that tells Docker what to do. When you call docker run inside of the folder that contains the Dockerfile, Docker uses the file to set up your container nicely.
This is what the Dockerfile for my Star Wars app looks like:
FROM pablo1n7/tatooine:3.4
RUN pip install anvil-uplink
ENTRYPOINT jupyter nbconvert --to notebook --execute star_wars_hackathon/PyConUK/demo_CNN.ipynb --ExecutePreprocessor.timeout=None
I’ll break down what each line is doing.
1. Reduce, Recycle, Re-use
Docker containers can be quite complex - they can replicate whole OSes in miniature with a lot of installed libraries and tools. But we don’t need to worry about creating our container from scratch. There is often a pre-existing container on Docker Hub that has what we want installed - or nearly what we want. Many companies and individuals build images and share them with the world this way.
That’s what this line in the Dockerfile is doing:
FROM pablo1n7/tatooine:3.4It goes and gets the Docker container pablo1n7/tatooine:3.4, which has a lot of machine learning libraries pre-installed for our convenience for this project. As you can see from the name, this container was made by pablo1n7, and it’s called tatooine because the project is Star Wars themed! We’ve asked for version 3.4 of the container.
If you’re not sure what container to use for your Jupyter notebook project, the Python Containers are a good place to start from.
2. Making sure your container has Anvil’s Uplink installed
Once we have the container we want to build on, we need to see if there’s anything extra that should be installed to get our notebook running happily inside it. In this case, it’s just one thing - we need to make sure Anvil’s Uplink module is installed;
RUN pip install anvil-uplinkThat way the notebook will be able to use this library to connect to your Uplink.
3. Keeping your notebook running
Normally we would call jupyter notebook to start up Jupyter. Then we can click to run our notebooks at localhost:8888 in the browser. But what do we do to execute a notebook just using the command line alone, inside a container?
One answer is the tool nbconvert. It’s really handy for running Jupyter notebooks inside a Docker container. You call it like this in the Dockerfile:
ENTRYPOINT jupyter nbconvert --to notebook --execute your_notebook.ipynb --ExecutePreprocessor.timeout=NoneIt starts up your notebook and executes it without any timeouts, so that the notebook stays connected to the Anvil Uplink. No need for any mouse clicks!
Inside of that Jupyter notebook, the last lines of code call:
import anvil.server

with open("../keyfile.txt", 'r') as fin:
    uplink_key = fin.read().splitlines()[0]  # first line in file

anvil.server.connect(uplink_key)  # our Ship Classifer app

anvil.server.wait_forever()  # So executed notebook will not close
This sets up a connection with your Anvil app and waits forever for calls from it, just like we’re familiar with.
Looking inside the container
With Docker containers, it can be a little awkward to understand what’s going on inside of them and whether your code is working the way you want. There are a couple of things we can do to look inside our Docker container and check our Jupyter notebook is doing what we expected.
To check which Docker containers are running locally at any time, you can call docker ps which will give you a list:
hhazi@lovelace:~/Code/star_wars_hackathon [master ≡]$ docker ps
CONTAINER ID        IMAGE                                             COMMAND                  CREATED             STATUS              PORTS                              NAMES
f6398d2a841d        hhazi/tatooine:3.5                                "/bin/sh -c 'jupyter…"   36 seconds ago      Up 36 seconds       8008/tcp, 0.0.0.0:8000->8888/tcp   tatooine
If you want to stop a container just call docker stop <name of container> - in this case,
hhazi@lovelace:~/Code/star_wars_hackathon [master ≡]$ docker stop tatooineIt should return you the name of the container, and then you can double check it’s stopped by calling docker ps again.
You can also check what’s happening by looking at the command line. There are two main ways of running your docker containers: in the background and in the foreground. That’s changed by the -d flag. Here’s how that looks in the little shell script To build and run my tatooine container I call:
docker build -t hhazi/tatooine:3.5 .
docker run -td --name tatooine -i -p 8000:8888 --rm -v $(pwd):/star_wars_hackathon hhazi/tatooine:3.5
If you’d like to see logging from nbconvert to check it’s working ok, call docker run -t to run in the foreground. Once you’re happy with how your notebook is running inside the container, you can call docker run -td which sends the running container into the background so you can continue to use that command line for other things afterwards.
Even more information can be found by calling docker logs <name of container> while your container is running.
We Need A Host
Neat, we have our Jupyter notebook running inside a handy self-contained docker image! All you need to do now is find somewhere to host that container so that you don’t need to leave it running locally on your laptop. You could run it on a dedicated local machine if you like - perhaps a spare desktop computer in the lab, or a Raspbery Pi you’re not using for anything else.
But if you want to make sure your website is robust and guaranteed to stay up, I’d recommend using a third-party cloud hosting service. There are a lot of different services out there to do this, but one that I have found handy is Amazon EC2. That’s what I use for hosting my Star Wars Ship classifier notebook container. It’s helpful because you only get billed for what you use, and there are a lot of different options for different kinds of notebooks - such as cloud machines with extra GPU for running intensive neural network tasks.
So there you have it! That’s how to turn your Jupyter notebook into a sturdy backend driving your web app forever.
Learn more
Watch this one-minute video to see how Anvil makes web development with Python a snap:
Anvil is free to use – why not give it a try for your next project?
To dig deeper, take a look at some examples and tutorials:
Turning Photos into Paintings
Anvil tutorial - learn the essentials in just 10 minutes
Build a data-entry app, and learn the techniques fundamental to building any Anvil app. In this tutorial, you will:
- Build your User Interface
- Write client-side Python
- Write server-side Python
- Store data in a database
- Deploy your app
Build a Dashboard with Python