 By
By In the Data Grids Getting Started tutorial, we created a simple paginated table that presented employee data.
Then, the Add Button Tutorial showed how to give the user a widget to add new entries with.
This is great, but what if I accidentally add the wrong data? Usually you’ll want to allow editing the data and deleting rows entirely as well. In this tutorial, we’ll modify the Data Grid to allow just that.
We’ll start with the endpoint of the Add Button Tutorial, and try two approaches to making rows user-editable. We’ll also create a delete button on each row.
Starting point
To follow along, clone the Data Grids example app with the add button - it’s the starting point you’ll build from.
If you’ve not done the Data Grids Getting Started tutorial, you may find it better to go through that before following this.
Making all rows editable
A simple way to allow records to be edited is to make all rows editable all the time.
Double-click on the Repeating Panel to open its RowTemplate. You can drag-and-drop TextBoxes and DropDowns into the Repeating Panel, in much the same way as you did for the ‘add’ row.

Populate some editable components
This time, the new components need to have their contents populated from the existing data.
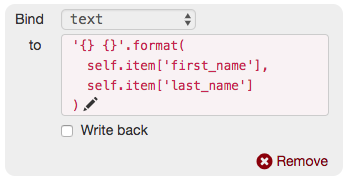
The Employee TextBox needs a Data Binding that binds its text property to the employee name:
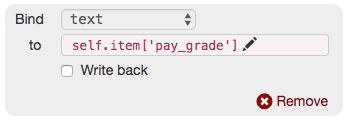
The Grade TextBox needs a Data Binding that binds its text property to the pay grade:
The Team DropDown’s selected_value should be self.item['team'], so you need to set a Data Binding up for that:

The Team DropDown also needs to have a list of all available teams, for the user to choose between. We need to fetch this
list from the employees table. There is one DropDown per row, and we don’t want to waste time fetching the data from the server once for every single DropDown,
so we’ll need to store the team list in a global variable. Create a Module called State and add some code to fetch the set of teams, sorted alphabetically:
# Get a set of all teams
teams = {employee['team'] for employee in anvil.server.call('get_employees')}
# Cast to a list and sort alphabetically
teams = sorted(list(teams))
Now you can import this in RowTemplate1 and initialise the Team DropDown from it:
from State import teams as TEAMS

class RowTemplate1(RowTemplate1Template):
  def __init__(self, **properties):
    # ...
    self.drop_down_team_edit.items = TEAMS
Write back to the database
By this stage, you have populated your editable components in your table. But once they are changed, how do you get the data back into the database?
You can’t use the ‘write back’ feature of data bindings because 1) you munge the data slightly before you display it, and
2) your employee data is sensitive, so you don’t want to allow the client to write to the database - that’s why you’ve got
the DatabaseProxy server module.
So you need to set up event handlers to edit the database when the row is edited. This code needs to go in RowTemplate1 because the edit boxes are inside the RowTemplate:
from ParseEmployeeName import parse_employee_name


class RowTemplate1(RowTemplate1Template):
  # ...
  def text_box_employee_edit_lost_focus(self, **event_args):
    """This method is called when the text box loses focus."""
    self.edit_employee()

  def drop_down_teams_edit_change(self, **event_args):
    """This method is called when the drop down is changed."""
    self.edit_employee()

  def text_box_grade_edit_lost_focus(self, **event_args):
    """This method is called when the text box loses focus."""
    self.edit_employee()

  def edit_employee(self):
    first_name, last_name = parse_employee_name(self.text_box_employee_edit.text)
    anvil.server.call(
      'edit_employee',
      self.item,
      first_name=first_name,
      last_name=last_name,
      team=self.drop_down_teams_edit.selected_value,
      pay_grade=self.text_box_grade_edit.text,
    )
Bind these event handlers to the appropriate components using the Properties window.
To edit the data, they call a simple server function - you need to add this to the DatabaseProxy Server Module:
@anvil.server.callable
def edit_employee(employee, first_name, last_name, team, pay_grade):
  employee.update(first_name=first_name, last_name=last_name, team=team, pay_grade=pay_grade)
And that’s all there is to making the rows editable. Now you have a table where each of the rows is made of editable fields:
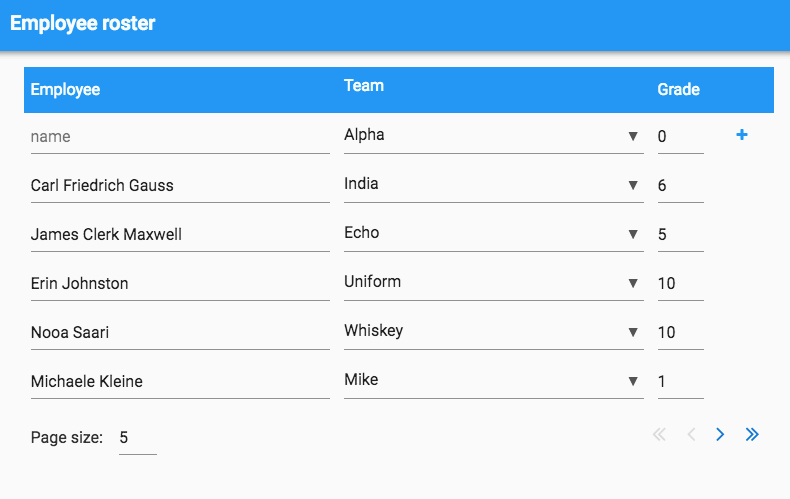
Being able to edit the data after you’ve added it is a big improvement. But you might prefer to make most of the table read-only until the user explicitly decides to click an ’edit’ button.
Edit button
Maybe you prefer to make the user click a button to make a row editable. This puts more clicks in the user workflow, but it stops the user accidentally editing stuff if they’re a bit click-happy.
You’ve got that ‘column for putting buttons into’ on the right of the Data Grid. In your Repeating Panel, this is currently empty - it’s only used by the Add row for the Add button. Let’s put a Save button into the Repeating Panel. You’ll need to drag-and-drop a FlowPanel into the column first, so that you can put the Delete button in later.
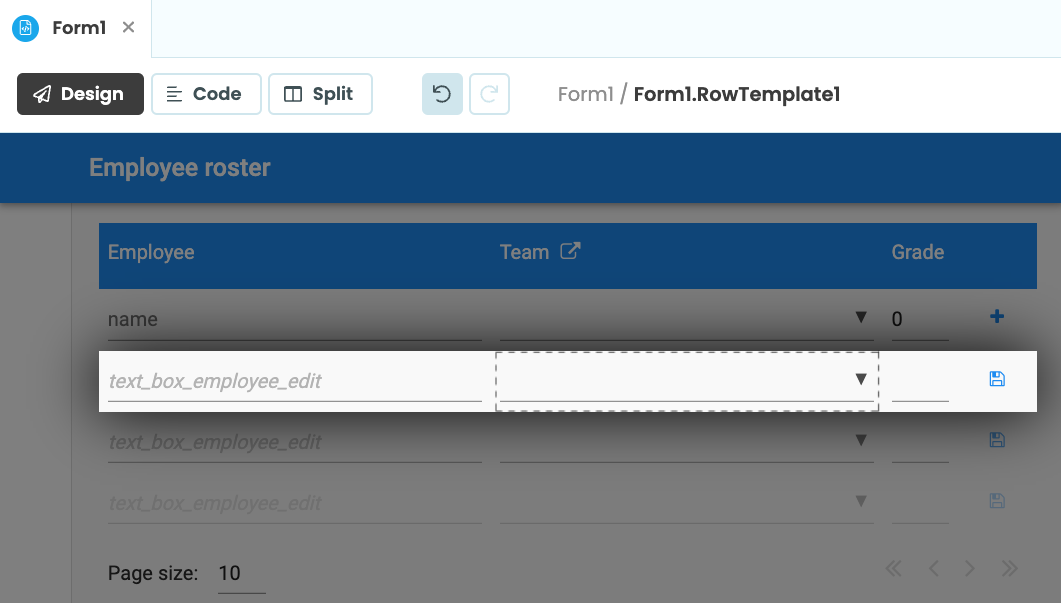
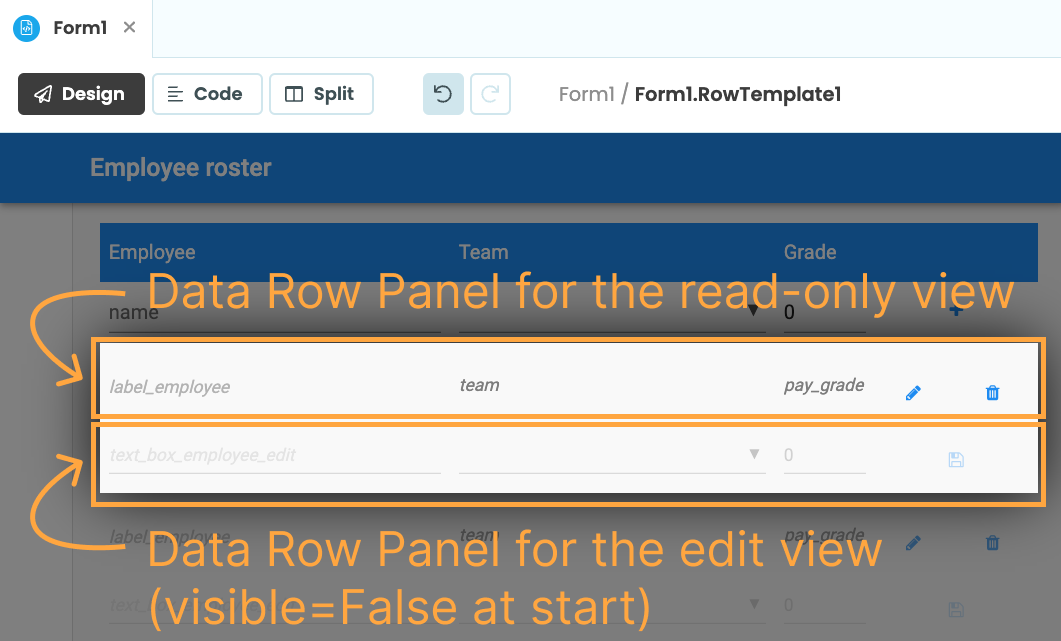
Each row has two states: ‘being edited’ and ’not being edited’. For each state, you want to show a different set of components. So you need two Data Row Panels in the Repeating Panel. One should be the ‘read view’, showing the employee data when it’s not being edited. The other should be the ‘write view’, showing the employee data using editable components.
The ‘write view’ will be how the row was in the ‘Making all rows editable’ section above, and the ‘read view’ will be how the row was before you made it editable, at the very start of this tutorial. The ‘read view’ should have a button with an ’edit’ icon ‘write view’ should have a button with a ‘save’ icon.
Make sure you add a new Data Row Panel for the write view and drag the existing components into it. You need to add your own Data Row Panel because you need to be able to refer to it by name in the code.
The pre-existing Data Row Panel that is built in to the Repeating Panel will now not be used. It should have no
components in it and its auto_display_data should be unchecked.
When the Edit button is clicked, the read view should be hidden, and the write view should be visible:
  def button_edit_click(self, **event_args):
    """This method is called when the button is clicked"""
    self.data_row_panel_write_view.visible = True
    self.data_row_panel_read_view.visible = False
The Save button does the opposite. It also includes a call to edit_employee in order to persist the changes to the
database. (The event handlers for the Write View components must be removed, so they don’t write to the database until
the Save button is clicked.)
The Data Bindings must also be refreshed after save, in order to update the Read View with what’s just been written.
  def button_save_click(self, **event_args):
    """This method is called when the button is clicked"""
    self.data_row_panel_read_view.visible = True
    self.data_row_panel_write_view.visible = False

    self.edit_employee()
    self.refresh_data_bindings()
That’s the Edit button complete. Now an individual row can be switched into Edit mode, edited, and saved to the database:
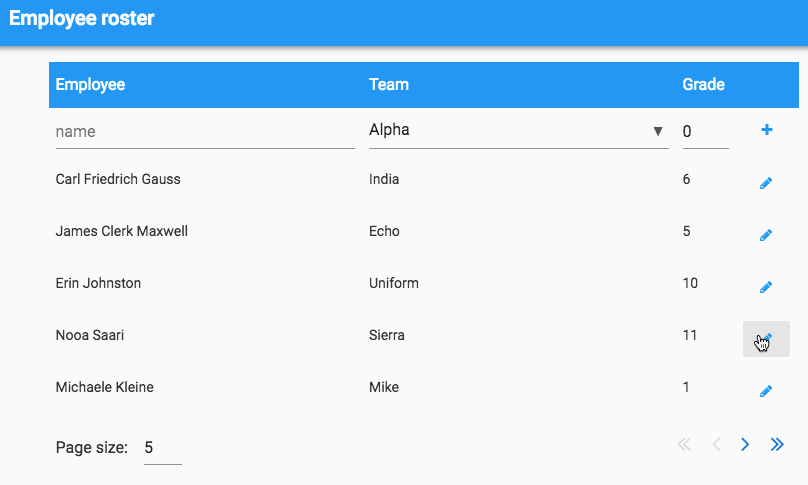
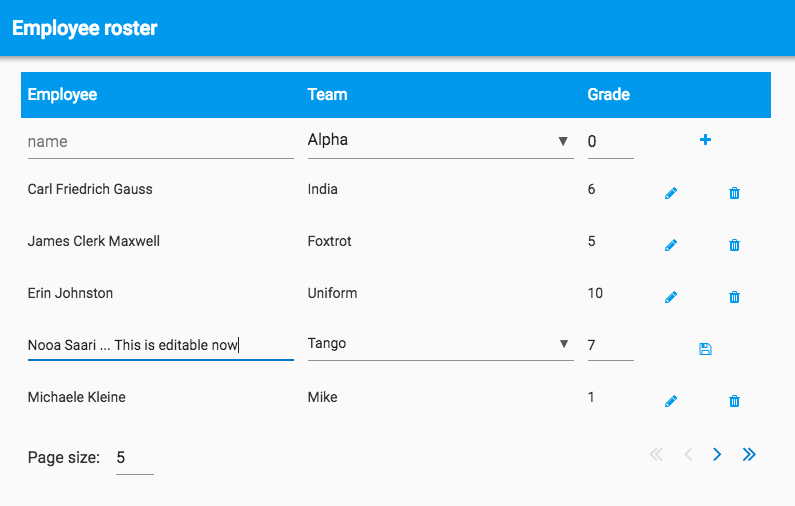
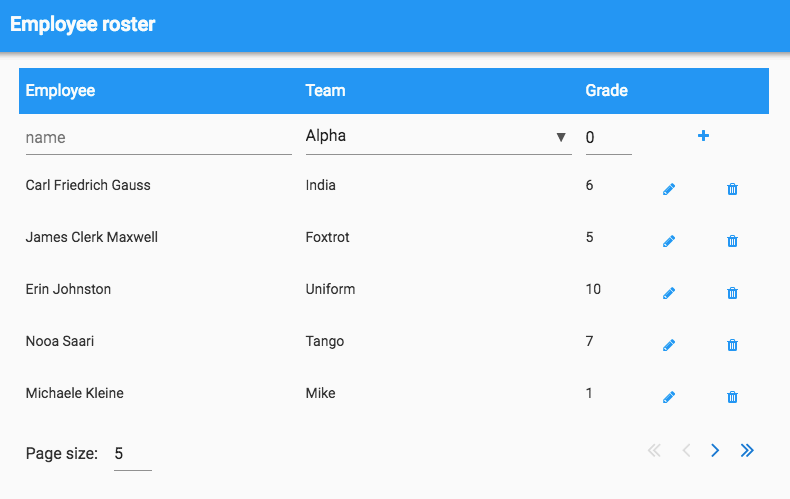
Delete button
Add a Delete button next to the edit button. You’ll probably need to make the column that the buttons are in a bit wider.
Making the Delete button work is simple. Following the now-familiar pattern, create a server function to access the database on the server side:
@anvil.server.callable
def delete_employee(employee):
  employee.delete()
and call it from an event handler on the client side (which also removes the row from the Repeating Panel):
  def button_delete_click(self, **event_args):
    """This method is called when the button is clicked"""
    anvil.server.call('delete_employee', self.item)
    self.parent.raise_event('x-refresh-employees')
That final line triggers a custom event on the Repeating Panel to make sure its employee list is updated
to reflect the deletion of the row. You need to set up an event handler in the __init__ of the outer Form:
class Form1(Form1Template):
  def __init__(self, **properties):
    # ...
    self.repeating_panel_employees.set_event_handler('x-refresh-employees', self.refresh_employees)
And define that refresh_employees method so that it re-loads the employee data into the Repeating Panel:
  def refresh_employees(self, **event_args):
    self.repeating_panel_employees.items = anvil.server.call('get_employees')
And now your delete button is hooked up.
A one-table CRUD app
You now have a table that can Create, Read, Update and Delete data!
To explore the final result, clone the finished app:
Feel free to use it and share it - our code examples are open-source under the Apache License.
Here are our other tutorials on Data Grids:
- Getting started
- Adding a search box to a Data Grid
- Grouping data into categories within a Data Grid
- Making rows editable/deletable