In the Data Grids Getting Started tutorial, we created a simple paginated table that presented employee data.
What if you want to write the data as well as reading it? Data Grids make this easy by allowing you to add components that the user can interact with.

We’ll start with the original read-only table, and modify it to allow adding rows.
Starting point
Clone the basic Data Grids example app to follow along with this tutorial - it’s the starting point you’ll build from.
If you’ve not done the Data Grids Getting Started tutorial, you may find it better to go through that before following this.
Adding an ‘add’ widget
Composing the UI
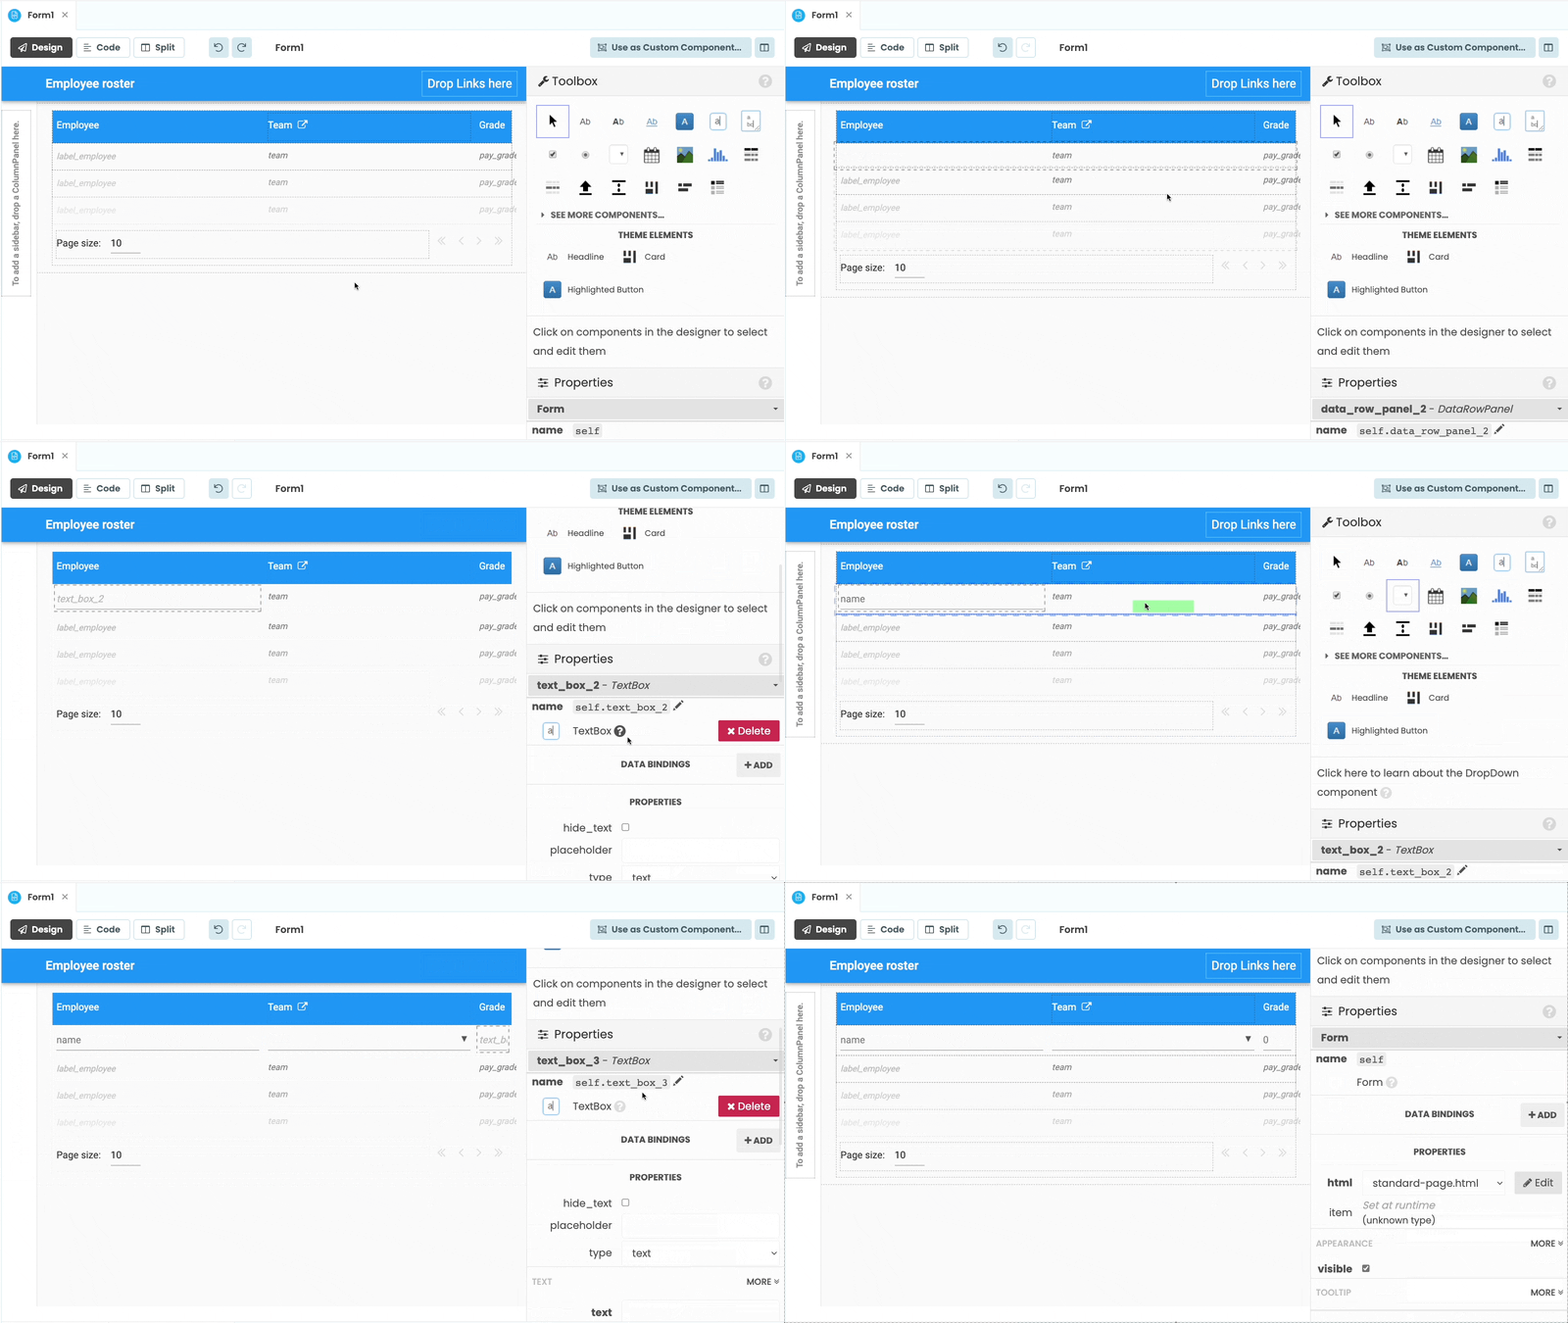
In the Data Grids Getting Started tutorial, we added a header to display the column names. The ‘add’ widget is very similar - it’s just a header made from a Data Row Panel.
To start off, drag-and-drop a Data Row Panel into the appropriate place - we’ve gone for just below the column names.
Make sure you set it to pinned so it shows up on each page! You also need to increase the rows_per_page by 1 to account
for the new Data Row Panel.
You can drag-and-drop components into each column of this Data Row Panel. So put TextBoxes for Employee and Grade, and a DropDown for Team.
The Grade TextBox is best as type ’number’, which can be configured in the Properties panel. You can set its default
by setting the text property - we’ve gone for 0 as a default.

The Team DropDown needs to be given a list of team names for the user to choose from. Here’s how to populate it from the database when the page loads:
class Form1(Form1Template):
  def __init__(self, **properties):
    # ... after the usual init stuff ...
    employees = anvil.server.call('get_employees')

    teams = [employee['team'] for employee in employees]
    self.drop_down_team_add.items = sorted(list(set(teams)))  # De-duplicate and sort
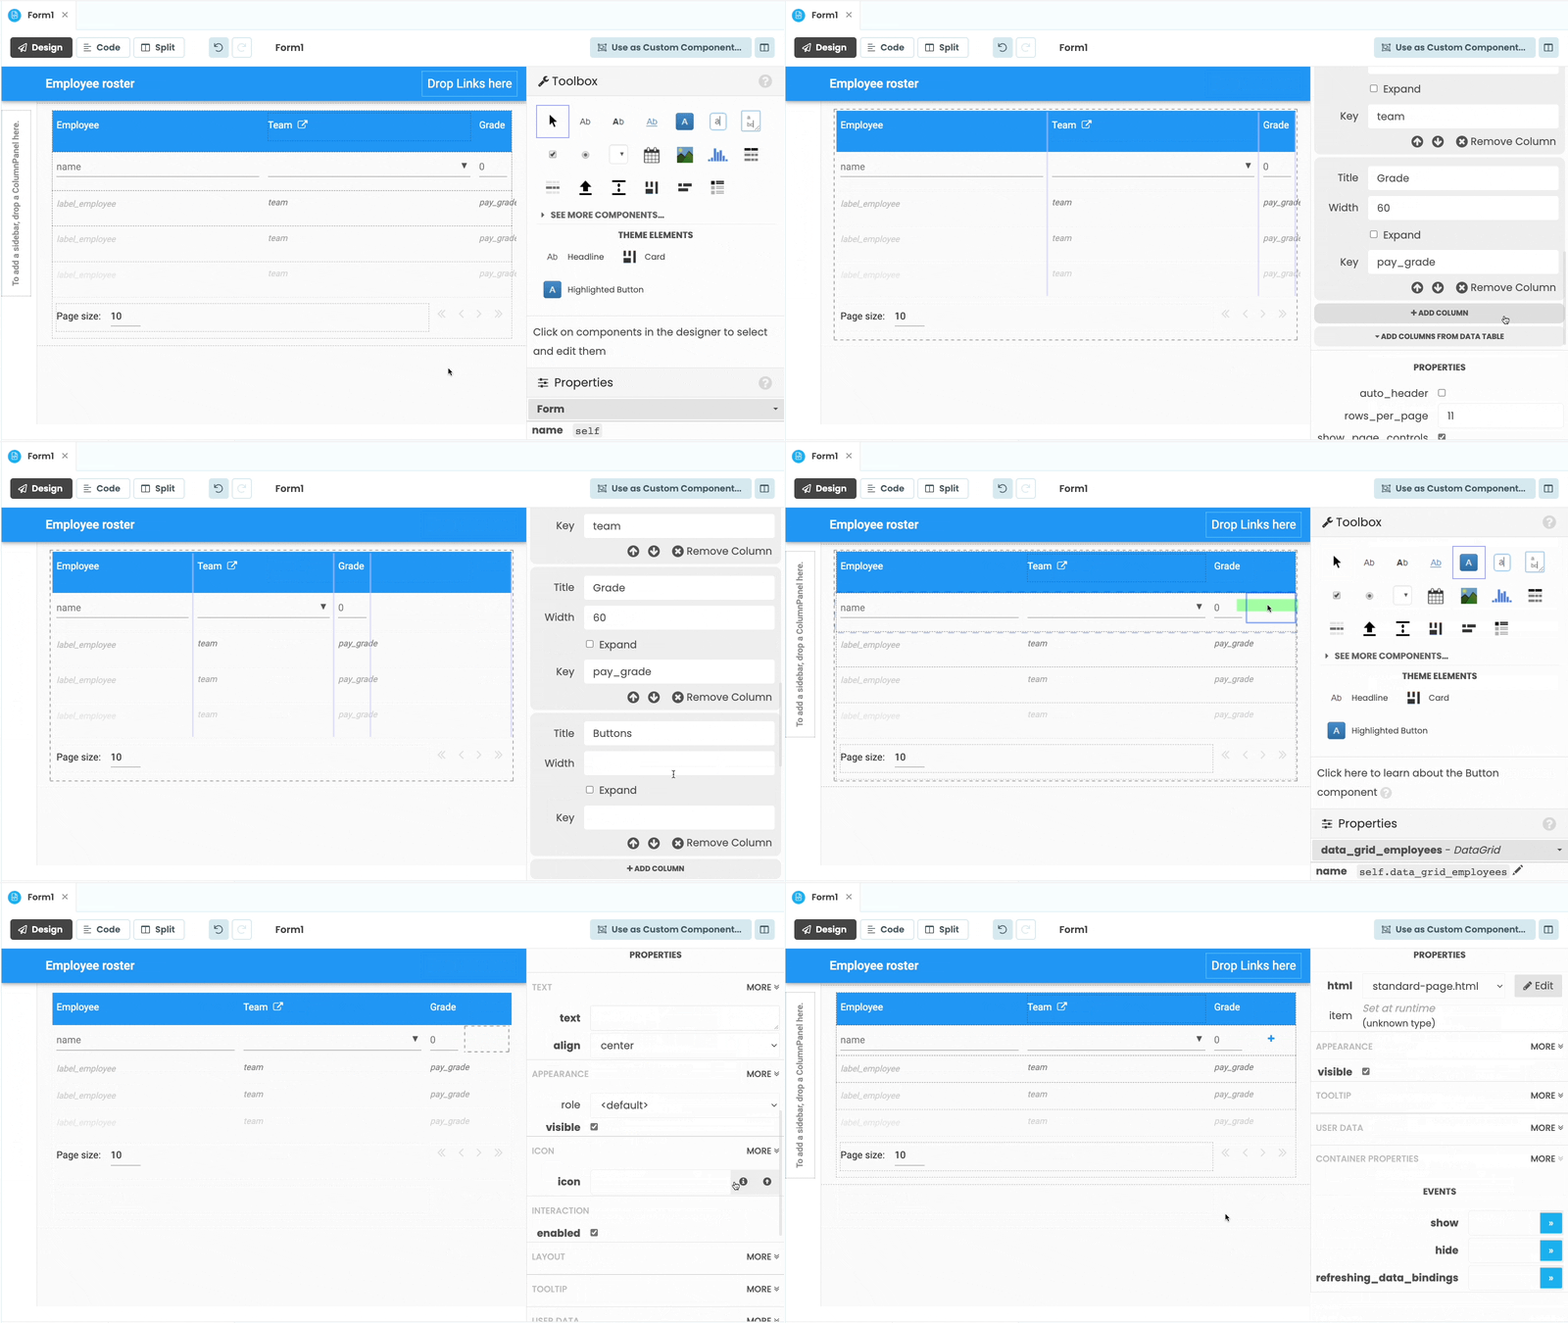
The user needs an ‘add’ button to press when they’ve finished filling in the data and they want to commit the new entry to the database. Create a new column for this, placed to the right of the Grade column. Delete the contents of the ‘Title’ and ‘Key’ properties, and you’re left with a column with no heading. You can drag-and-drop a Button Component into it:

Making the Add button work
Now all you need to do is make the add button actually do something.
First, we need to define how to handle the Employee column. The Employee column represents the full name of the employee,
but the first_name and last_name are stored separately in the database. So, you need to decide what part of the user
input to store as the first name, and what part is the last.
Write a method that defines how to do this and put it in a ParseEmployeeName module:
  def parse_employee_name(employee_name):
    if ' ' in employee_name:
      return employee_name.split(' ', 1)
    else:
      return employee_name, ''
This defines the first name as the first word in the TextBox and the last name as everything else. So if one of our
employees is James Clerk Maxwell, his first_name is ‘James’ and his last_name is ‘Clerk Maxwell’.
We also need a server function to add a new Employee row to the database:
@anvil.server.callable
def add_employee(first_name, last_name, team, pay_grade):
  app_tables.employees.add_row(first_name=first_name, last_name=last_name, team=team, pay_grade=pay_grade)
Then you can create an event handler to handle the click event of the add button:
from ParseEmployeeName import parse_employee_name

# ...

  def button_employee_add_click(self, **event_args):
    """This method is called when the button is clicked"""

    # Split the employee name into first and last
    first_name, last_name = parse_employee_name(self.text_box_employee_add.text)

    # Add the employee to the database
    anvil.server.call(
      'add_employee',
      first_name=first_name,
      last_name=last_name,
      team=self.drop_down_team_add.selected_value,
      pay_grade=self.text_box_grade_add.text,
    )

    # Refresh the employee data in the Data Grid
    self.repeating_panel_employees.items = anvil.server.call('get_employees')

    # Clear the add row's input components
    self.text_box_employee_add.text = ''
    self.text_box_grade_add.text = 0
    self.drop_down_team_add.selected_value = self.drop_down_team_add.items[0]
This is a resonably simple method. The code comments explain how it works.
Advanced tip: putting new rows at the top
When you add an employee, you probably want to see the new entry appear at the top of the table, to give you a visual cue that it’s been added successfully.
To achieve this, the app needs to know when rows were added. So you need to add a new ‘Date and Time’ column to the
employees table, called added. Then, the add_employee function should set added=datetime.now() (be sure to import
the datetime module: from datetime import datetime).
The get_employees function needs to order the results, with the most recently added at the top:
@anvil.server.callable
  def get_employees():
    return app_tables.employees.search(tables.order_by("added",
                                                       ascending=False))
Pre-existing entries will be handled gracefully - their added value will be None and they’ll be ordered as before.
The final product
That’s the add row done! When you run this app, you get a data table as before, but you can create new entries.

To explore the final result, clone the finished app:
Feel free to use it and share it - our code examples are open-source under the Apache License.
The logical next step is to allow editing and deleting entries as well as adding. Follow along with the editing and deleting tutorial to find out how.
Here are our other tutorials on Data Grids:
- Getting started
- Adding a search box to a Data Grid
- Grouping data into categories within a Data Grid
- Making rows editable/deletable
 By
By