
Using Anvil from a Local IDE
The Anvil CLI allows you to work in your preferred IDE and sync your changes instantly to the Anvil Editor.
Follow the quickstart guide to get started:
Installing the Anvil CLI
To use the Anvil CLI, you first need to install it:
macOS/Linux
curl -fsSL https://anvil.works/install-cli.sh | shWindows PowerShell
irm https://anvil.works/install-cli.ps1 | iexWindows CMD
curl -fsSL https://anvil.works/install-cli.cmd -o install.cmd && install.cmd && del install.cmdUsing npm
npm install -g @anvil-works/anvil-cli@latestnpm, run the command with sudo instead: sudo npm install -g @anvil-works/anvil-cli@latestConfiguring the CLI
After installing the Anvil CLI, we recommend you first configure the CLI by running:
anvil configureThis will prompt you with the following configuration options:
-
Default Anvil server: Set the default server to use when running
anvil loginandanvil watch. Press enter to set the default server as https://anvil.works. Enterprise customers will need to enter the URL for their Enterprise installation. -
Preferred Editor: Set your preferred local IDE to use when running
anvil checkout --open. If you have any code editor command line tools installed, these will show up here. -
Enable verbose logging: Set this to True to see detailed output in the terminal.
The CLI will then ask you to log in. You will then be directed to the browser to log into Anvil and grant the Anvil CLI access to your account.
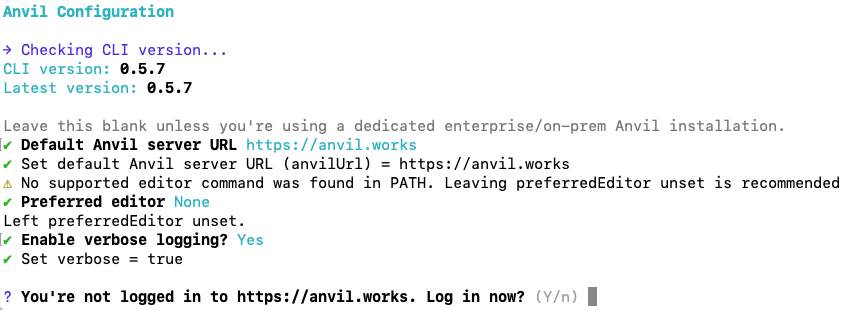
Running anvil configure from the Anvil CLI
Your configuration options will be saved in your config file.
Logging into Anvil
In order to use the Anvil CLI, you’ll need to log into your Anvil account. You can do this by running anvil login. You can log out of your account by running anvil logout.
Connecting to your Anvil app
anvil watch in your local app’s directory.After logging in, you’ll need to checkout the Anvil app you want to work on locally. There are two ways to do this.
Choose your app from the terminal
Run the following command:
anvil checkoutThis will present you with a list of your apps. Choose the app you’d like to checkout, and the CLI will create a directory with the same name as your app with all your app files inside.
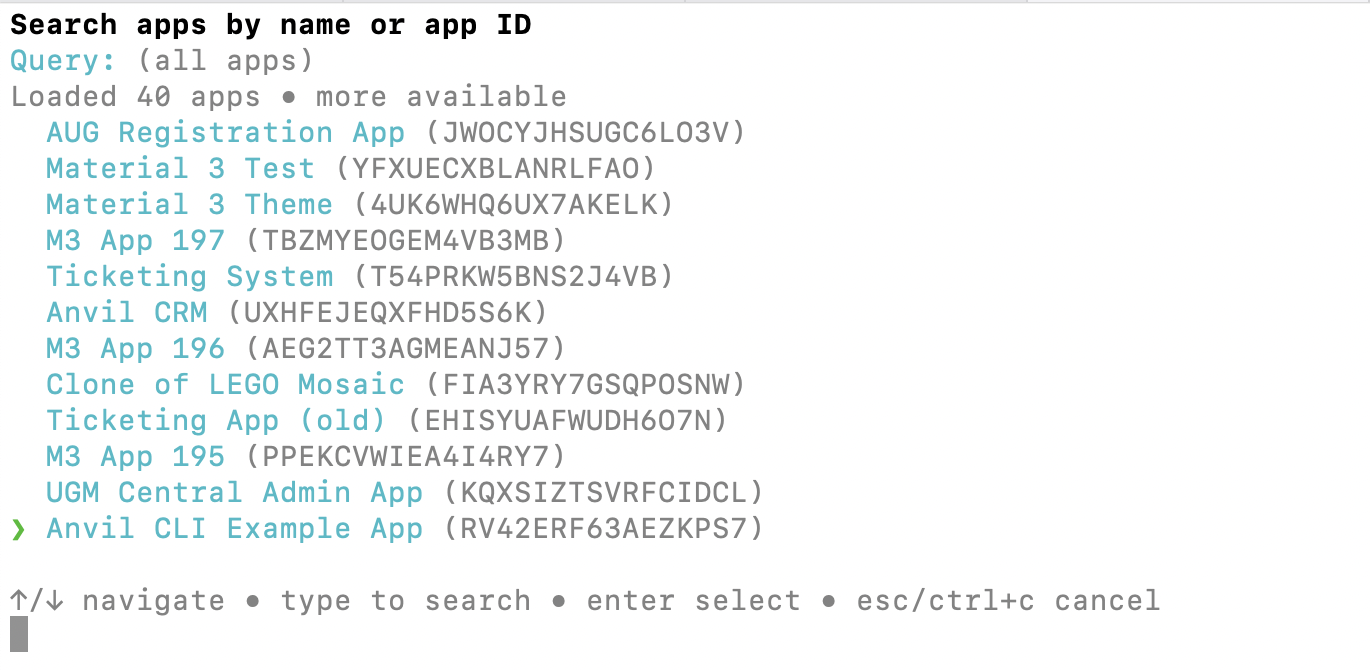
Running anvil checkout lets you choose from a list of your apps
Provide the app URL
You can also anvil checkout with your app’s URL and the name of the git directory that will be created. For example:
anvil checkout https://anvil.works/build/apps/W36XUTXGNPDK6VEA my-app
cd my-app
Syncing changes
In order to sync changes between your local app and the Anvil Editor, you’ll need to run anvil watch inside your app’s local directory.
cd my-app
anvil watch
The Anvil CLI will auto-detect which Anvil app to sync to.
If this fails, you can specify the app ID explicitly. For example:
anvil watch -A W36XUTXGNPDK6VEASyncing to Enterprise apps
When running anvil configure, you can set your Enterprise installation as your default server URL. This updates your config file to set anvilUrl as your Enterprise URL.
You can also directly update the anvilUrl value in your config file:
anvil config set anvilUrl https://anvil.mycompany.comSetting anvilUrl means that CLI commands such as login and watch will use that server by default.
Alternatively, you can manually specify the server URL to use each time you run login and watch.
anvil login anvil.mycompany.comanvil watch --url anvil.mycompany.comMultiple accounts
If you are logged in to more than one Anvil account or more than one Anvil installation, the Anvil CLI will usually infer the right installation and account from your setup. If there is any ambiguity, it will usually prompt you.
However, you can use --url and --user with the watch and logout commands to manually specify which installation and account to use.
For example
anvil watch --url anvil.company.com --user user@example.com
anvil logout --url anvil.company.com --user user@example.com
Anvil config file
The Anvil CLI is configured using a config.json file stored locally on your machine.
File locations:
- macOS:
~/Library/Preferences/anvil-cli/config.json - Linux:
~/.config/anvil-cli/config.json - Windows:
%APPDATA%\anvil-cli\Config\config.json
The config file stores:
- Authentication tokens (one per logged-in account)
- The default Anvil server URL (
anvilUrl) - CLI settings such as
devMode,verboseandpreferredEditor
You can view your current configuration by running anvil config list.
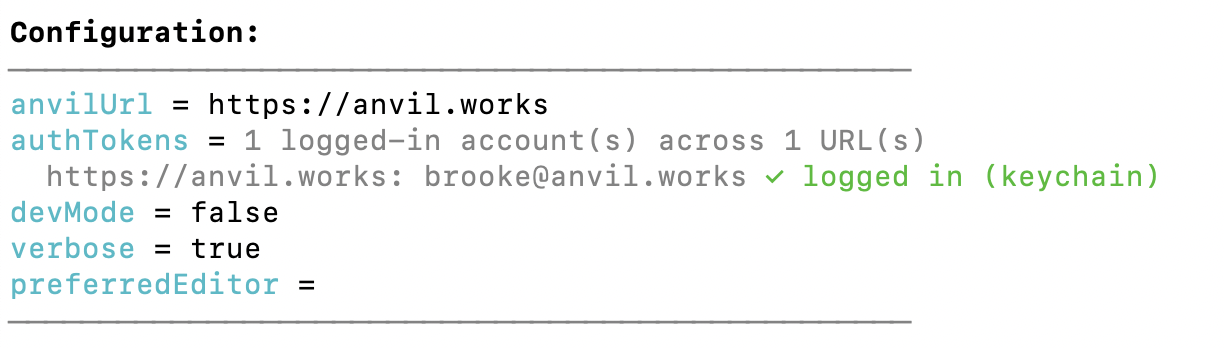
Running anvil config list shows you your config file.
You can also set values directly from the command line:
anvil config set anvilUrl https://anvil.mycompany.comFor more details, see the npm page.
Do you still have questions?
Our Community Forum is full of helpful information and Anvil experts.