 By
By Introspection in Python
Let’s investigate how you can use built-in Python tools to both:
- find out exactly what any module can do, and
- find out exactly how Python will execute your code.
This makes debugging Python code much easier than in other languages I’ve used. You can ask any object what it does and what data it holds - and this is built in to the language!
Here’s a very basic Python class:
class Vehicle():
  """A really simple class to represent vehicles."""

  def __init__(self, wheels=4, colour='red'):
    self.wheels = wheels
    self.colour = colour

  def repaint(self, colour=None):
    """Change the colour of this vehicle."""
    self.colour = colour
If I import this class and run dir on it, I can see everything it does:
>>> v = Vehicle()
>>> # Let's see what's in my vehicle...
>>> dir(v)
['__class__', '__delattr__', '__dict__', '__dir__', '__doc__', '__eq__',
'__format__', '__ge__', '__getattribute__', '__gt__', '__hash__',
'__init__', '__init_subclass__', '__le__', '__lt__', '__module__',
'__ne__', '__new__', '__reduce__', '__reduce_ex__', '__repr__',
'__setattr__', '__sizeof__', '__str__', '__subclasshook__', '__weakref__',
'colour', 'repaint', 'wheels']
I can see the method and attributes I gave the class: repaint, colour and wheels. Not only that, but dir also
tells me about all the built-in methods that my class has inherited from Python’s object class, such as __eq__ and
__str__. These all start and end with a double underscore so we refer to them as ‘dunder’ methods. Let’s try one:
>>> # I wonder what this method does...
>>> v.__dict__
{'wheels': 4, 'colour': 'red'}
So my simple class automatically has a method to get its attributes in a dictionary 1! I didn’t know that… but I found
it out just by introspecting my object using dir.
Forensic programming
If something isn’t very well documented in a library you’re using, don’t worry! You can inspect the objects the library provides and work things out for yourself.
Imagine you want to make an HTTP GET request. You’ve been recommended the requests library
but let’s pretend you can’t make head or tail of the documentation 2. So, you try importing it and running dir on it:
>>> import requests
>>> # So, what does this library give me?
>>> dir(requests)
['ConnectTimeout', 'ConnectionError', 'DependencyWarning', 'FileModeWarning',
'HTTPError', 'NullHandler', 'PreparedRequest', 'ReadTimeout', 'Request',
'RequestException', 'RequestsDependencyWarning', 'Response', 'Session',
'Timeout', 'TooManyRedirects', 'URLRequired', '__author__', '__author_email__',
'__build__', '__builtins__', '__cached__', '__cake__', '__copyright__',
'__description__', '__doc__', '__file__', '__license__', '__loader__',
'__name__', '__package__', '__path__', '__spec__', '__title__', '__url__',
'__version__', '_check_cryptography', '_internal_utils', 'adapters', 'api',
'auth', 'certs', 'chardet', 'check_compatibility', 'codes', 'compat',
'cookies', 'delete', 'exceptions', 'get', 'head', 'hooks', 'logging',
'models', 'options', 'packages', 'patch', 'post', 'put', 'request', 'session',
'sessions', 'status_codes', 'structures', 'urllib3', 'utils', 'warnings']
>>> # Quite a lot!
There’s a lot there! Looks like there’s a method named get, maybe that will make a GET request for us? Let’s see if it’s callable:
>>> callable(requests.get)
True
Great! But how do we call it? We’ll use a brilliant built-in module named inspect to tell us. It can tell us the
signature of any function or method we might be thinking of calling:
>>> import inspect
>>> # What parameters does requests.get accept?
>>> inspect.signature(requests.get)
<Signature (url, params=None, **kwargs)>
There’s a positional argument called url, and an optional keyword argument named params. The url argument is
obvious. Let’s try making a request to an API that returns Bertrand Russell quotes (what else?):
>>> requests.get("https://bertrand.anvil.app/_/api/quote")
<Response [200]>
Ok… so I’ve got a response. I guess 200 is an HTTP 200 OK status, meaning it worked. But how do I get my quote?
One more use of dir and I see that my response has a text attribute:
>>> requests.get("https://bertrand.anvil.app/_/api/quote").text
'Everything is vague to a degree you do not realize till you have tried to make it precise.'
Amazing! We’ve worked out how to use the Python requests library using nothing but our wits and Python’s built-in introspection tools.
Incidentally, I spotted something strange when I ran dir(requests). What is requests.__cake__? Maybe it ‘bakes’
a response into something I can store on disk? Maybe it’s got something to do with browser cookies? Let’s find out:
>>> # What's this?
>>> requests.__cake__
'✨ 🍰 ✨'
>>> # I see.
So we’ve seen how Python’s introspection can help you figure out precisely how to use a library, even when that library contains undocumented methods.
Let’s get even more introspective. Python can gaze into its innards and see all the way through to its very guts. It can tell you all the details of how it compiles and executes your code.
Extreme introspection
Not only will Python objects tell you what they do, but Python can tell you exactly how it plans to do it. When Python executes your code, it does it in (at least) three steps, and you can find out the exact details of each of them.
How Python understands code
The first step is parsing. Python takes the raw characters of your code and turns it into a structure that represents the meaning of the text. The long string of characters is translated into tokens that are organised into a tree - an abstract syntax tree (AST). Take a simple Python statement:
x = 4 + 8The abstract syntax tree looks like this:
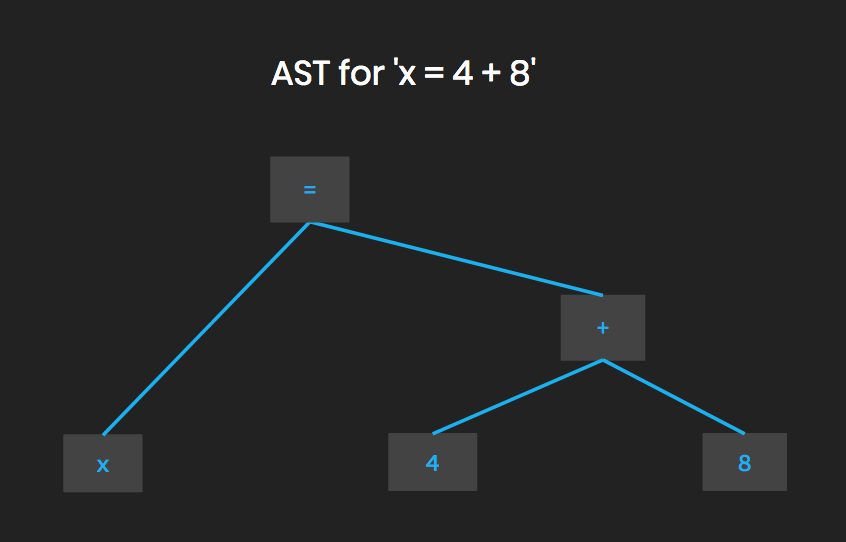
What the Python parser sees when you tell it x = 4 + 8
This is something that must occur in all programming languages except assembly code, but not all give you such easy
access to their innards as Python does. Python ships with a module you can run on your code to see the
abstract syntax tree it generates from your code. It’s called ast (here is it in the Python docs).
We can get the AST for our simple statement like so:
>>> import ast
>>> tree = ast.parse('x = 4 + 8')
Let’s use our introspection skills to explore that object. We run dir on it and see that there’s a body attribute:
>>> tree.body
[<_ast.Assign object at 0x1024a8470>]
The body of the AST is a list of all the Python statements in the code. Our program only has one Python statement, the
assignment statement x = 4 + 8. That’s why tree contains one statement, named Assign.
Let’s see what’s inside the assignment. Using dir tells us it has things called targets and value. I bet targets are
the things being assigned to (x in our case) and value are the things being assigned (so for us that’s 4 + 8).
We’ll check targets first:
>>> tree.body[0].targets[0].id
'x'
Just as we expected. Now let’s look at value:
>>> tree.body[0].value
<_ast.BinOp object at 0x1014e3128>
It’s a BinOp object - a binary operator, meaning an operator that takes two arguments. That must be our + operator!
We run dir again to see what it does, and it looks like we want to see the op attribute:
>>> tree.body[0].value.op
<_ast.Add object at 0x1014d3978>
Yep, just as we expected - Add is clearly the token representing the + operator. Where are the 4 and 8? They’re
in the BinOp, which has left and right attributes:
>>> tree.body[0].value.left.n
4
>>> tree.body[0].value.right.n
8
So we have the entire AST we sketched out before, represented by Python objects in a nested structure that reflects the structure of the tree!
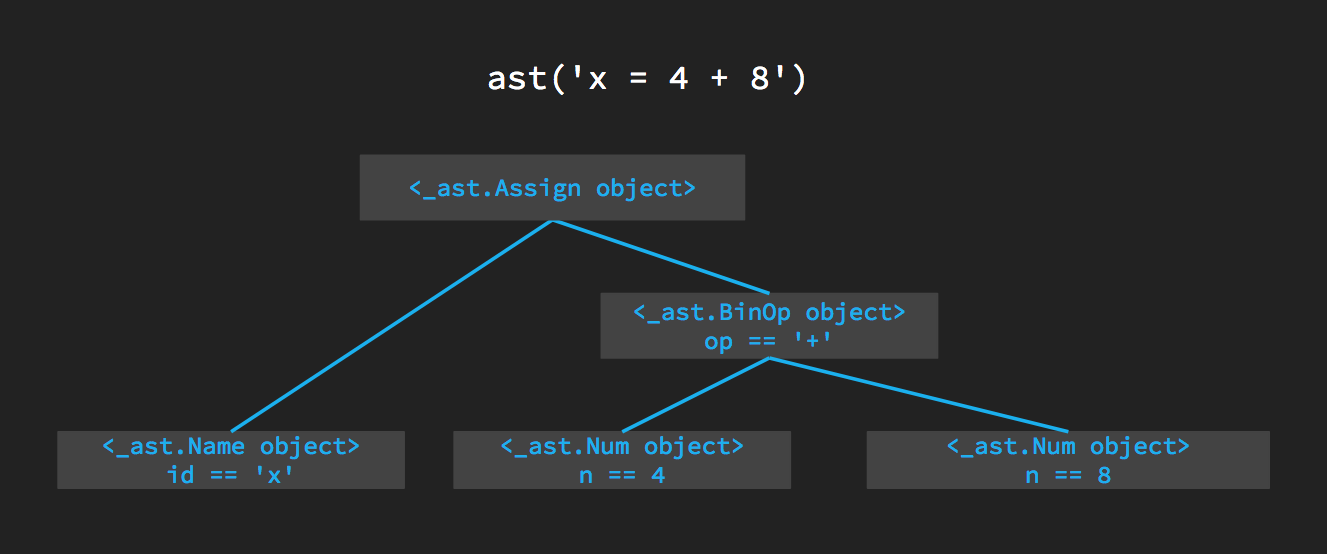
How ast expresses x = 4 + 8
How Python executes code
So Python turns the characters that make up our code into an AST representing the meaning of the code, and it gives
us the ast module to inspect that for ourselves. But there’s more to executing the code than this. The standard
Python implementation (CPython) compiles your lovingly hand-crafted Python
code into a form of assembly language - Python Bytecode - that runs on a virtual machine. This is how Python
can ‘write once, run anywhere’. The virtual machine is compiled for various different types of computer, and the
bytecode that runs on it is completely universal.
Just as with ast, Python has a standard library module called dis that can show you the bytecode generated
from a given Python program. You can pass in a Python object such as a function, or you can pass in a Python program as a string:
>>> from dis import dis
>>> dis('x = 4 + 8')
  1           0 LOAD_CONST               0 (12)
              2 STORE_NAME               0 (x)
              4 LOAD_CONST               1 (None)
              6 RETURN_VALUE
Since this is an extremely simple Python program, it’s not hard to understand the bytecode. The first line loads a constant onto the Python virtual machine’s memory stack:
1 0 LOAD_CONST 0 (12)The value of that constant is included in the actual
bytecode, and there’s a little optimisation here. The addition has already been carried out! The compiler has
converted the 4 + 8 into 12 so the VM doesn’t need to do that at runtime.
The next instruction is our assignment operator (the =). It instructs the VM to define a symbol x and store
the value at position 0 in it. This means it can refer to x later on in the code:
2 STORE_NAME 0 (x)The compiler appears to be a little stupid here. Doesn’t it realise that this is the end of the code, and there is no ’later on’?
In fact, our tiny program x = 4 + 8 is a Python module, so the bytecode keeps track of the label x in case any other modules want to import it.
There are two more instructions that we might not have expected to see. First, None is loaded onto the stack. Next,
the RETURN_VALUE instruction is called.
              4 LOAD_CONST               1 (None)
              6 RETURN_VALUE
We didn’t tell it to return None!? But all Python functions and modules do this by default, so these phantom instructions have appeared
in order to enforce that useful consistency.
The final stage
I said there were (at least) three stages to running a Python program. We’ve discussed the first two, and Python gives you absolutely precise introspection tools to pick them apart exactly.
If you inspect the ASTs and bytecode your hand-written code generates from time to time, you might develop a better intuition for writing your code in a more efficient way. As a wise man once said:
Everything is vague to a degree you do not realize till you have tried to make it precise.
(I’m sure I’ve read that somewhere before.)
We haven’t yet discussed the third stage of running a Python program. We’ve got as far as the bytecode, but how does it get executed? The Python VM interprets it, reading it line-by-line and executing equivalent instructions on the physical machine you’re running it on.
We saw how you can find out exactly how the first two steps of the process work. The third step is no different, but it’s not so easy! You would have to read the CPython source code and understand how the CPython VM works. I think I’ll leave that one for another time.
But seriously…
If you’re intersted in understanding the inner workings of Python, you could get involved with CPython development. It’s an extremely well-managed open-source project with a very comprehensive developer guide. A great way to get started is to try fixing something from the list of ’easy’ issues
- that’ll still be a challenge but they’re picked out to be possible to figure out as a beginner.
Another way to contribute to core Python is to work on a compiler other than the CPython reference implementation. These projects typically have more room to make your mark than something as giant as CPython. A good example is the Python-to-JavaScript compiler named Skuplt, used by Anvil to run Python in the web browser. Skulpt is an active open-source project that welcomes new contributors.
And if you want to see Skulpt in action, try building something in Anvil:
-
Incidentally, this code did not convert my object to a dictionary, the dictionary already exists and it’s where Python stores the object’s attributes. Retrieving values from Python dictionaries is really fast, so they are used as the mechanism for getting attributes from objects. ↩︎
-
The documentation of
requestsis actually very good, and therequestslibrary itself is a work of genius. In fact, API is so well-designed that it makes a neat example of learning by introspection, which is why I’ve used it here! ↩︎