
 By
By Automate the boring stuff
As a systems administrator, you need to save time wherever you can. You’ve got too much to do to be performing routine tasks on a regular basis.
Web apps can help in a big way. You can give your colleagues self-serve interfaces, allowing them to run routine processes themselves. That leaves you to do the hard stuff that you actually enjoy.
We’re going to show you how to build a self-serve web app with nothing but Python, that you can share with your colleagues. Starting from the initial idea, this took 30 minutes to build.
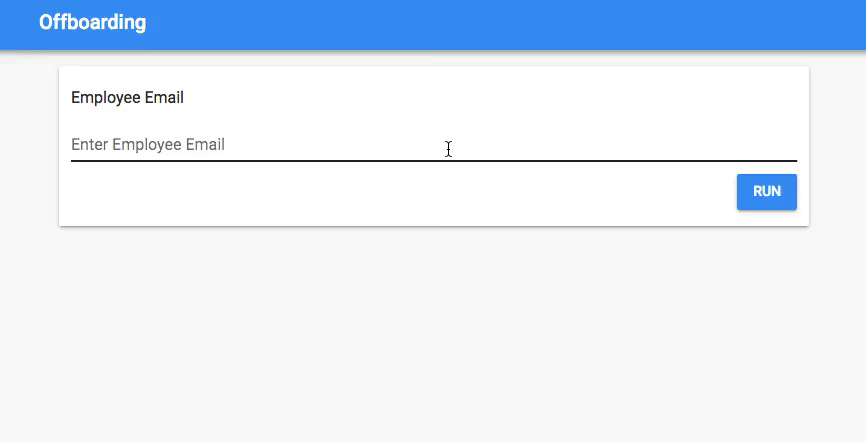
The app will automate the IT process you run when an employee leaves the company. It’s a portal you can give to HR: they enter the user’s email address, it runs your scripts and reports the status back to the user, all without any input from you.
You start with some scripts
We assume you already have a set of scripts that run each part of the process: deleting the employee’s user account, revoking their Github permissions, updating the Org Chart, etc.
For the sake of testing, we’ll create some dummy scripts:
~$ mkdir -p scripts/

~$ cat > scripts/remove_from_ldap.py <<EOF
#!/usr/bin/env python3
print('Removing user from LDAP...')
EOF

~$ cat > scripts/revoke_github_permisisons.py <<EOF
#!/usr/bin/env python3
import sys
sys.exit(1)
EOF

~$ cat > scripts/update_org_chart.sh <<EOF
#!/bin/sh
echo "Updating org chart for $1..."
EOF

~$ chmod +x scripts/*
Building the UI
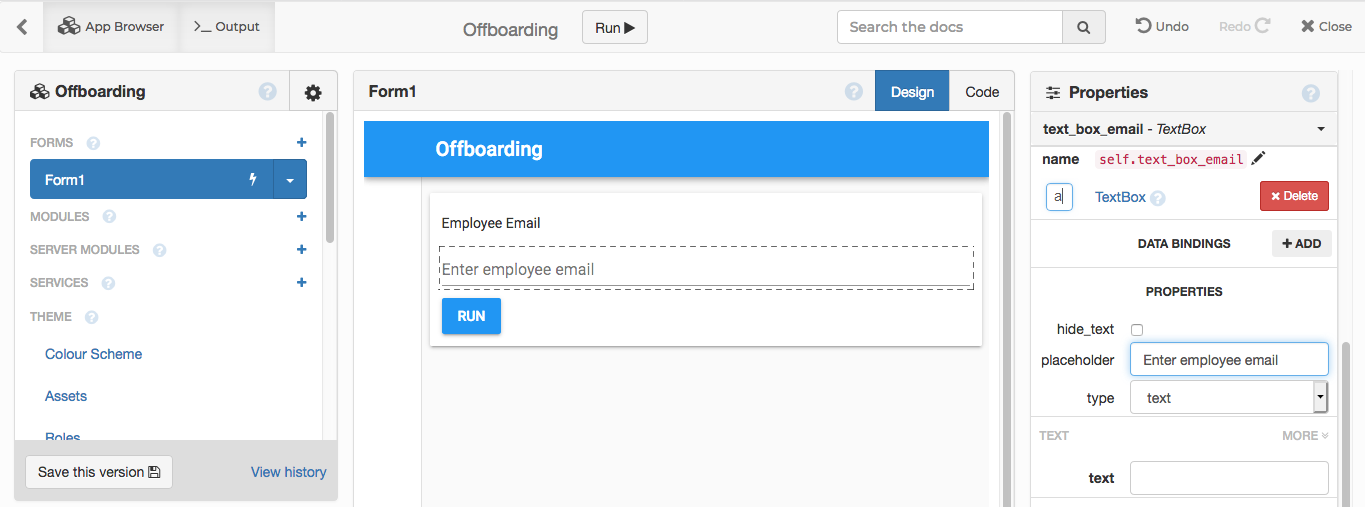
To build the User Interface, we open the Anvil Editor and drag-and-drop a Card, Label, TextBox and Button onto the page.
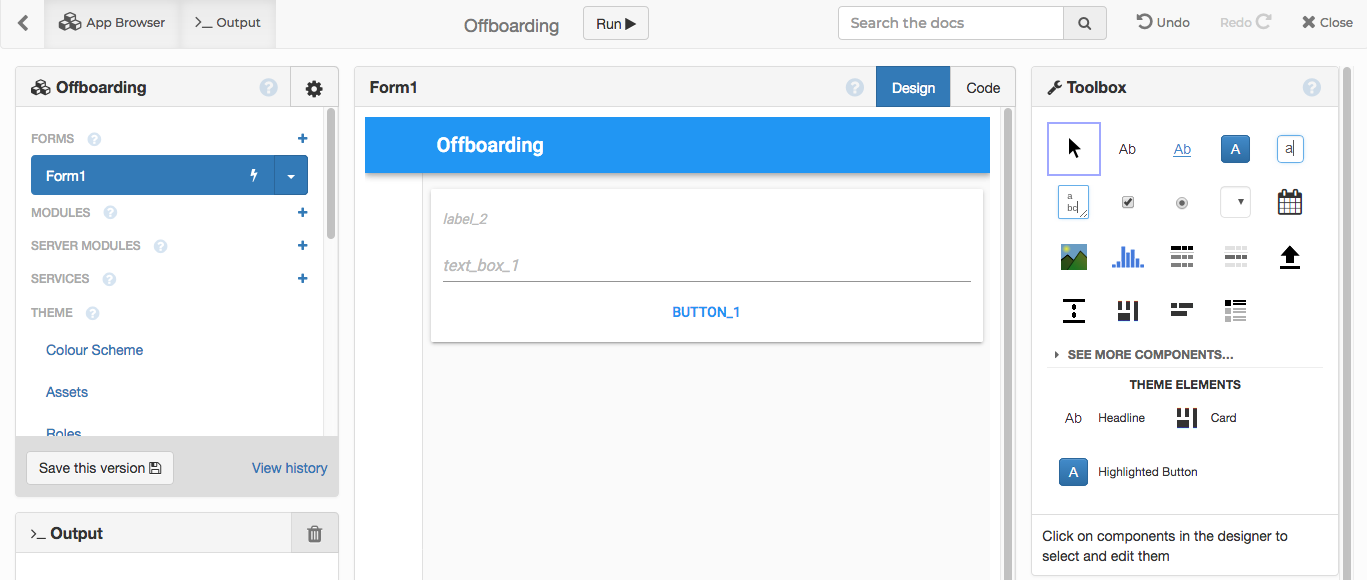
We can modify these components using the Properties Panel:
Now we can write a Python method to handle the button’s click event:
  def button_run_click(self, **event_args):
    """This method is called when the button is clicked"""
    print('Employee email is: ' + self.text_box_email.text)
Running scripts automatically
In the back-end, we’ll write a Python function that runs all the pre-existing offboarding scripts. We’ll make it run anything it finds in a particular directory, meaning you can change what gets run just by copying files into that directory.
We pass the employee’s email address into each of the scripts - later we’ll get this from the TextBox in the UI, so the HR team using the app can specify which employee to offboard.
#!/usr/bin/env python3
import os
import sys
import subprocess
from pathlib import Path

# The directory that contains the offboarding scripts
SCRIPTS_DIR = 'scripts'

def offboard(employee_email):
    print("Running offboarding for employee {} ...".format(employee_email))

    # Iterate over all files in this directory
    statuses = {}
    for script in os.listdir(SCRIPTS_DIR):

        # Construct the script path
        path = Path(SCRIPTS_DIR) / script

        # Run the script
        print('  Running {}'.format(path))
        statuses[script] = subprocess.run([str(path), employee_email]).returncode

    return statuses


if __name__ == "__main__":
    # The first argument to this file is the employee_email
    employee_email = sys.argv[1]
    statuses = offboard(employee_email)
    print(statuses)
When we run this, we see our offboarding scripts running:
~$ python3 offboard.py shaun@anvil.works
Running offboarding for employee shaun@anvil.works ...
  Running scripts/remove_from_ldap.py
  Running scripts/revoke_github_permissions.py
  Running scripts/update_org_chart.sh
{"remove_from_ldap.py":0,"revoke_github_permissions.py":1,"update_org_chart.sh":0}
Connecting front-end to back-end
To run this code from our Anvil app, we simply enable the Uplink:
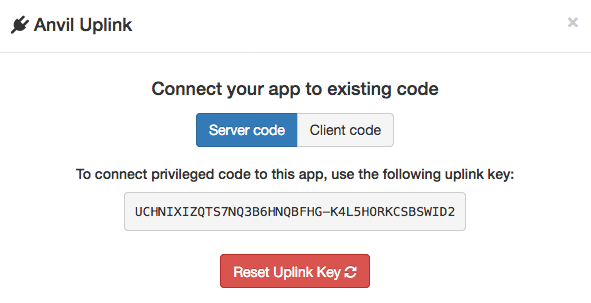
Install the Anvil Uplink library :
~$ pip3 install anvil-uplink
Collecting anvil-uplink
  Downloading
 ...
Then modify the Python script to connect to the Anvil app and make the function callable from the front-end code:
# Import the Uplink library
import anvil.server

# Make the function callable from client-side code
@anvil.server.callable
def offboard(employee_email):
    # ...

# Connect to Anvil and wait for function calls
if __name__ == "__main__":
    app_key = 'UCHNIXIZQTS7NQ3B6HNQBFHG-K4L5HORKCSBSWID2'
    anvil.server.connect(app_key)
    anvil.server.wait_forever()
When we run this script, it connects to Anvil and waits for the app to call the offboard function:
~$ python3 offboard.py
Connecting to wss://anvil.works/uplink
Anvil websocket open
Authenticated OK
Making the Button call the function
Back in the Anvil Editor, we can modify the front-end code to make the Button call offboard when
it is clicked.
  # In Anvil, when the button is clicked:

  def button_run_click(self, **event_args):
    """This method is called when the button is clicked"""
    statuses = anvil.server.call('offboard', self.text_box_email.text)
Displaying the results
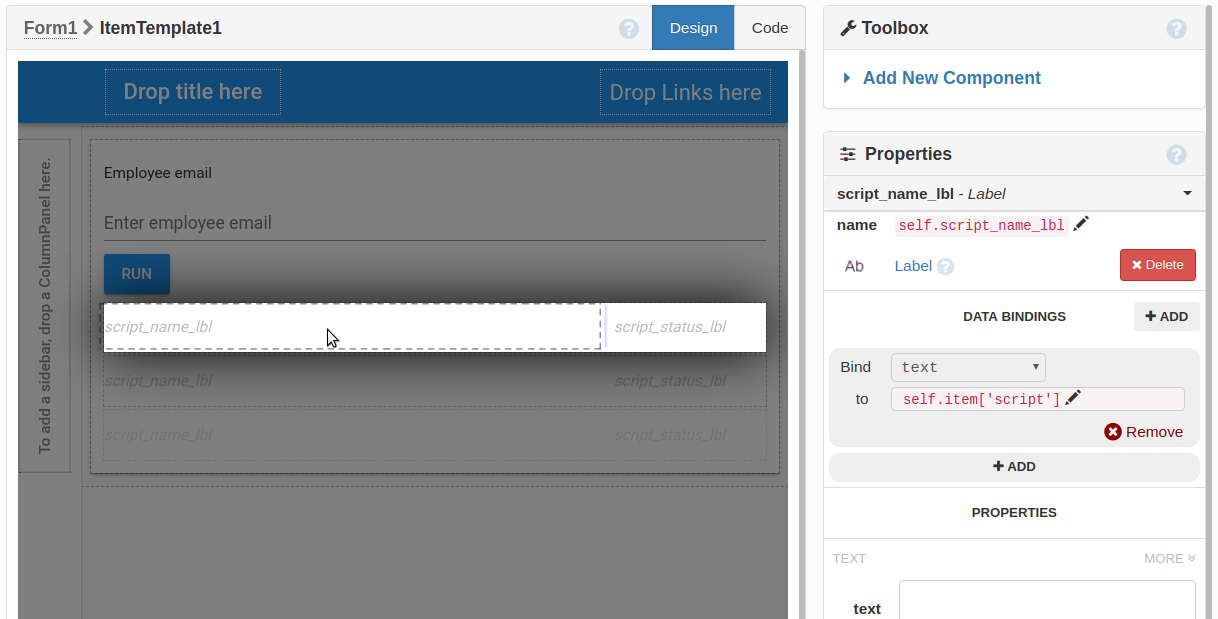
To display the results, we’ll add a Repeating Panel to the page. This will use a template to show the same UI for each script that gets run.
We’ll edit its template so that each item shows two Labels – one for the name of the script, one to display the exit code:
We’ll add the following statement to the click handler to pass the data to the Repeating Panel:
    self.repeating_panel_1.items = [
      {'script': script, 'status': status} for script, status in statuses.items()
    ]
And we’ll create some Data Bindings to display the script name and status in the Labels:

Displaying the script name.
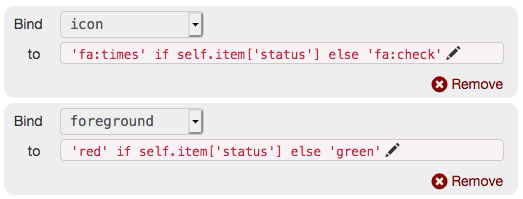
Displaying the status as a green check or red x.
And we’re done! Let’s run it:
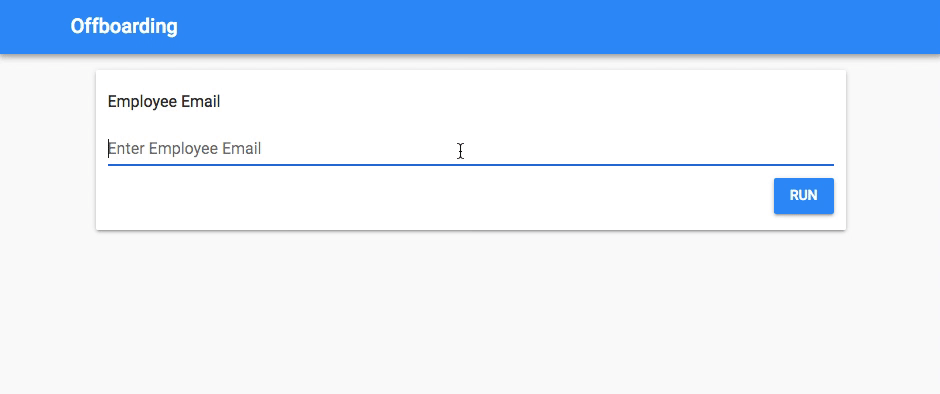
The final app in Anvil.
User management
At this point, we’ve still got 10 minutes left, and we need to do user authentication. Let’s integrate it with our Office 365 authentication (also known as Azure AD)!
We add Anvil’s Users Service to our app. Then we:
- Uncheck the “Email and Password” login option
- Check the “Microsoft (Office 365)” login option
- Uncheck “Allow visitors users to sign up” (we only want specified people using this service)
- Enter the email addresses of authorised users, and enable them
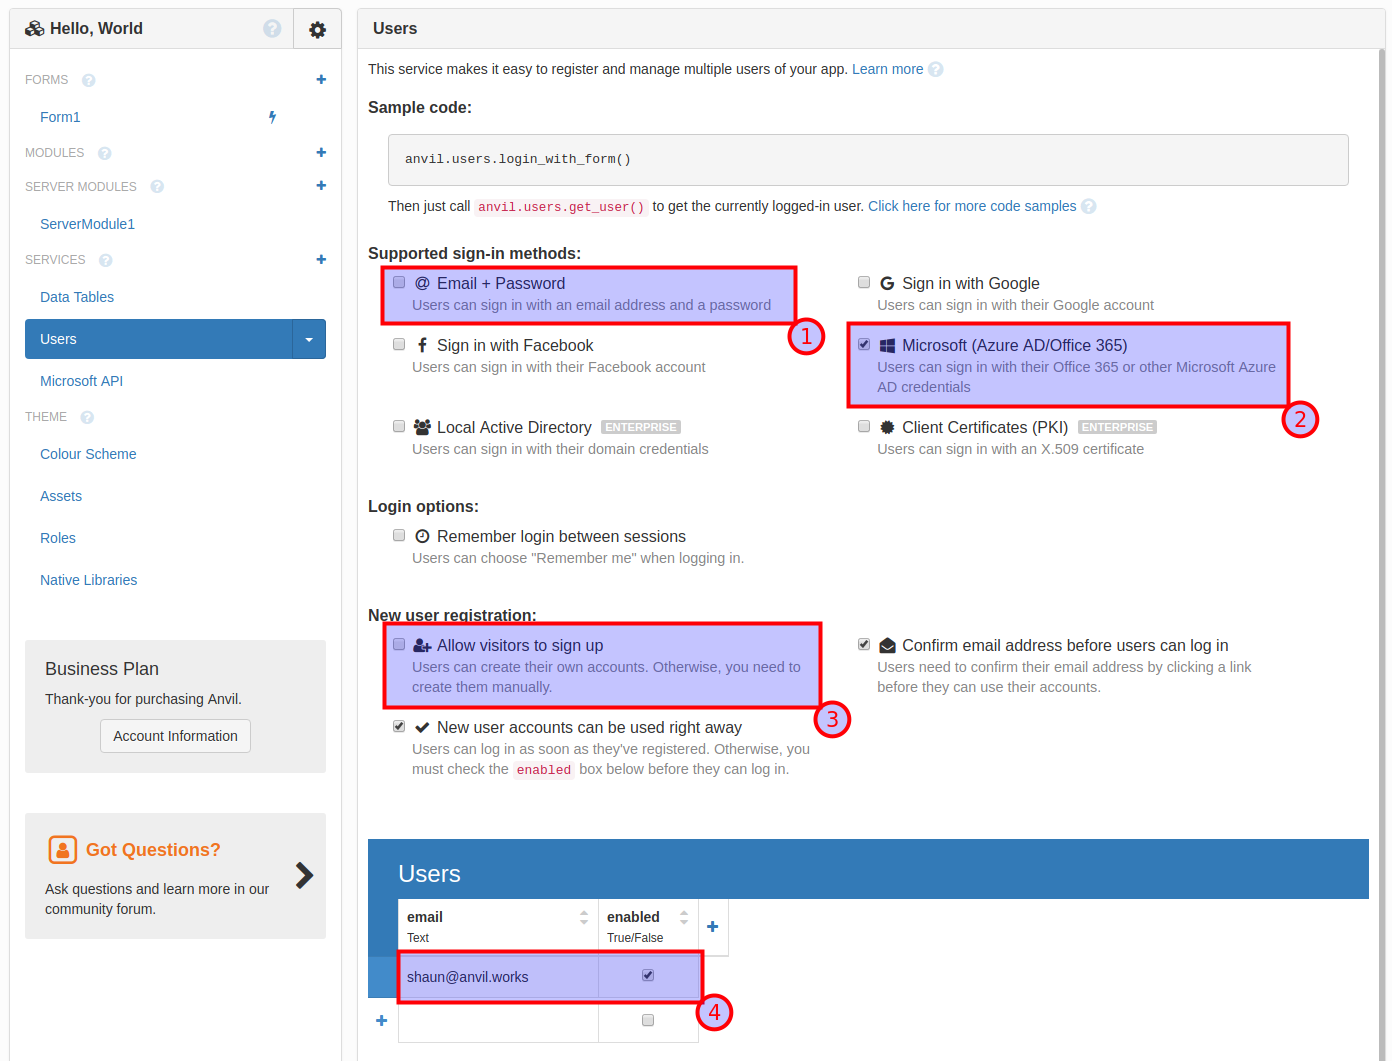
Setting up Azure AD login with Anvil.
We need to show the login prompt when you open the app:
  def __init__(self, **properties):
    # Set Form properties and Data Bindings.
    super().__init__(**properties)

    # Any code you write here will run before the form opens.
    anvil.users.login_with_form()
And now, in our Uplink script, we modify our function to raise an exception if you’re not logged in:
@anvil.server.callable
def offboard():
    if anvil.users.get_user() is None:
        raise Exception("Not logged in")
That’s it – we’ve secured our app, and integrated it with our corporate sign-on system!
It’s already online
There’s no need to set up a web server; it’s already online! (There’s no need to deploy your Uplink script on a public server, either – as long as it’s running somewhere, that offboard() function is available for your app.)
You can hit Publish to see your app’s URL:

Publishing your Anvil app.
Automate something of yours
Do you have a task you’d like to automate? Anvil is free to use, so click here to get started and see what you can build in 30 minutes: