 By
By Turn Drawings into Photos with OpenAI and Anvil
In this tutorial, we’re going to build a web application that uses OpenAI’s Images API to turn drawings into photorealistic images. We’ll build the entire app using Python with Anvil.
When the app is finished, we’ll be able to upload an image and click a button to call the Images API. When the model has finished generating a new image, it will be displayed on the screen, and we can download it.
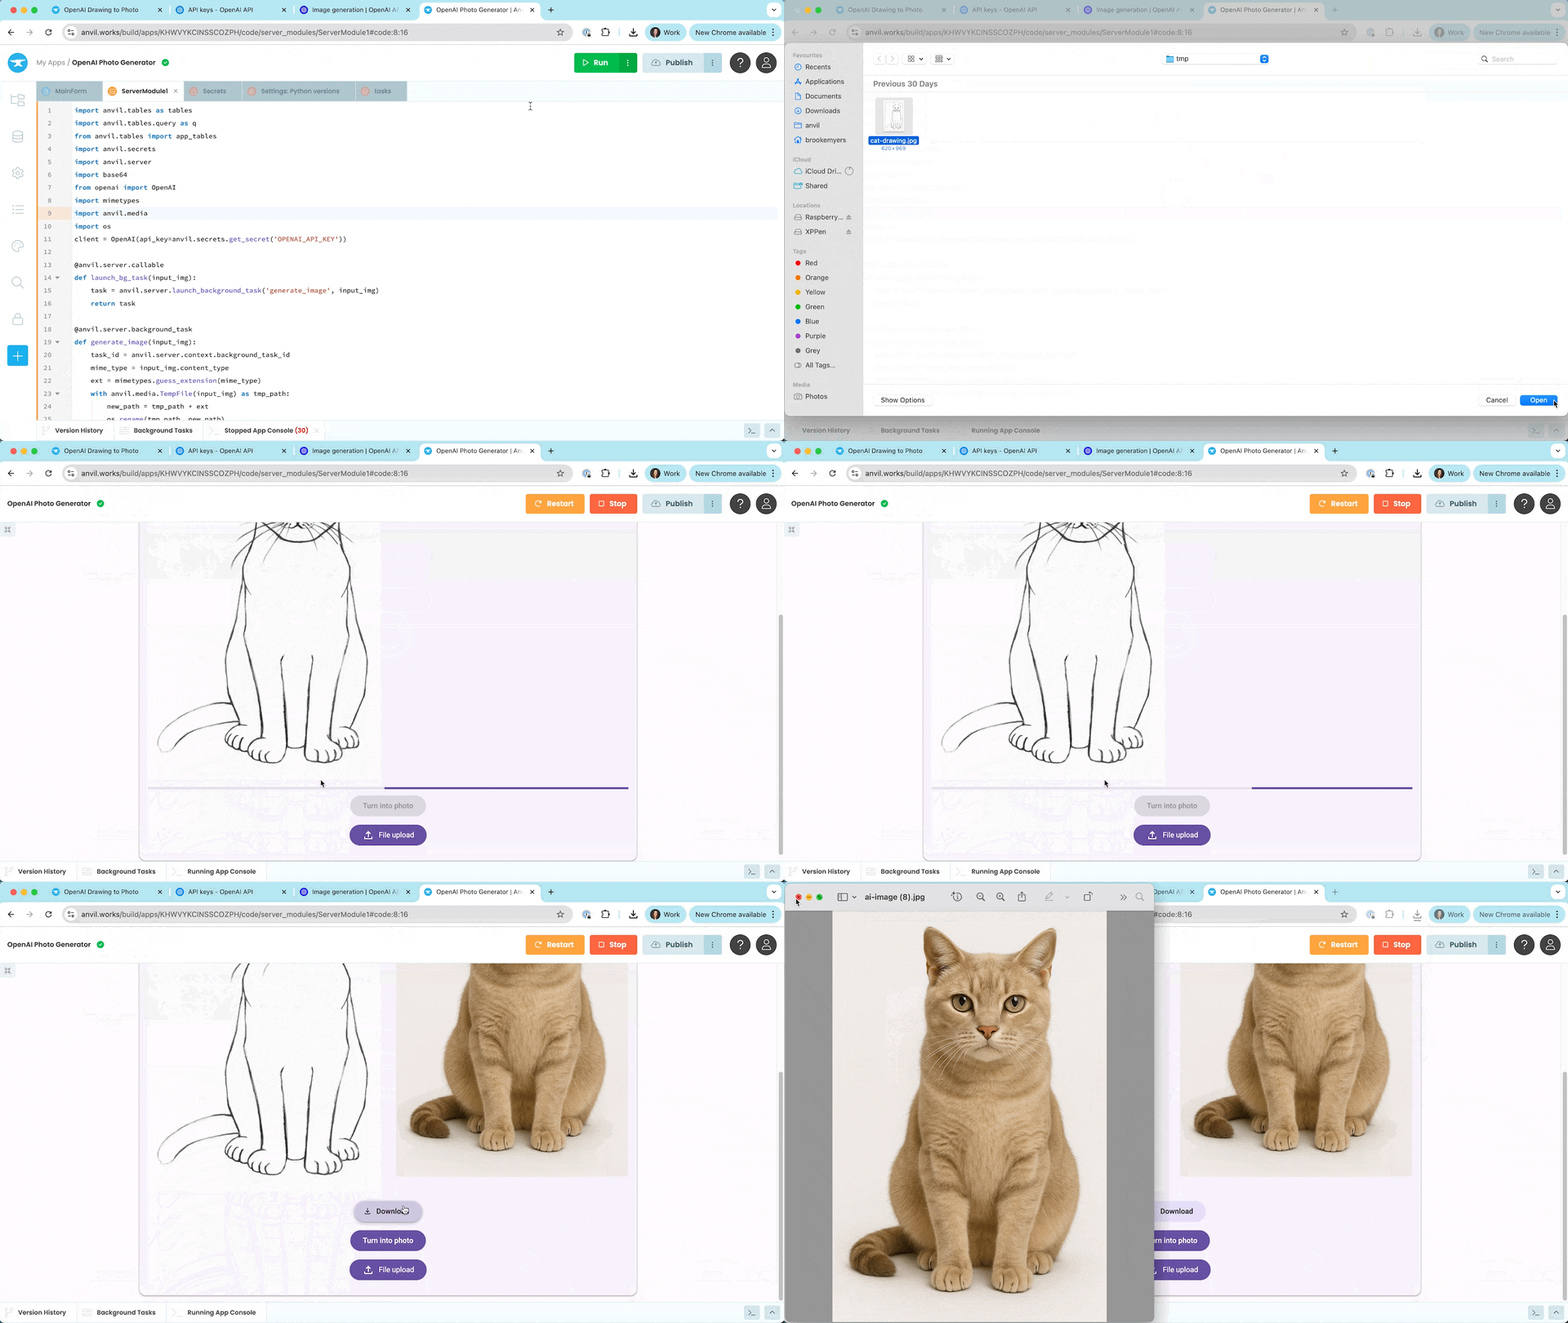
To build the app, we will:
- Create an Anvil app
- Drag and drop components to build the UI
- Get an API key from OpenAI
- Write backend logic to call the OpenAI Images API
- Call the API in a background task
- Generate the image and update the UI
- Add the ability to download the image
- Publish our app to the web
For this tutorial, you will need basic Python knowledge and an OpenAI account with API credits.
Let’s get started!
Step 1 - Create an Anvil app
Log in to Anvil and click ‘Create a new app’. Choose the New M3 theme and select ‘Blank Panel Form’.
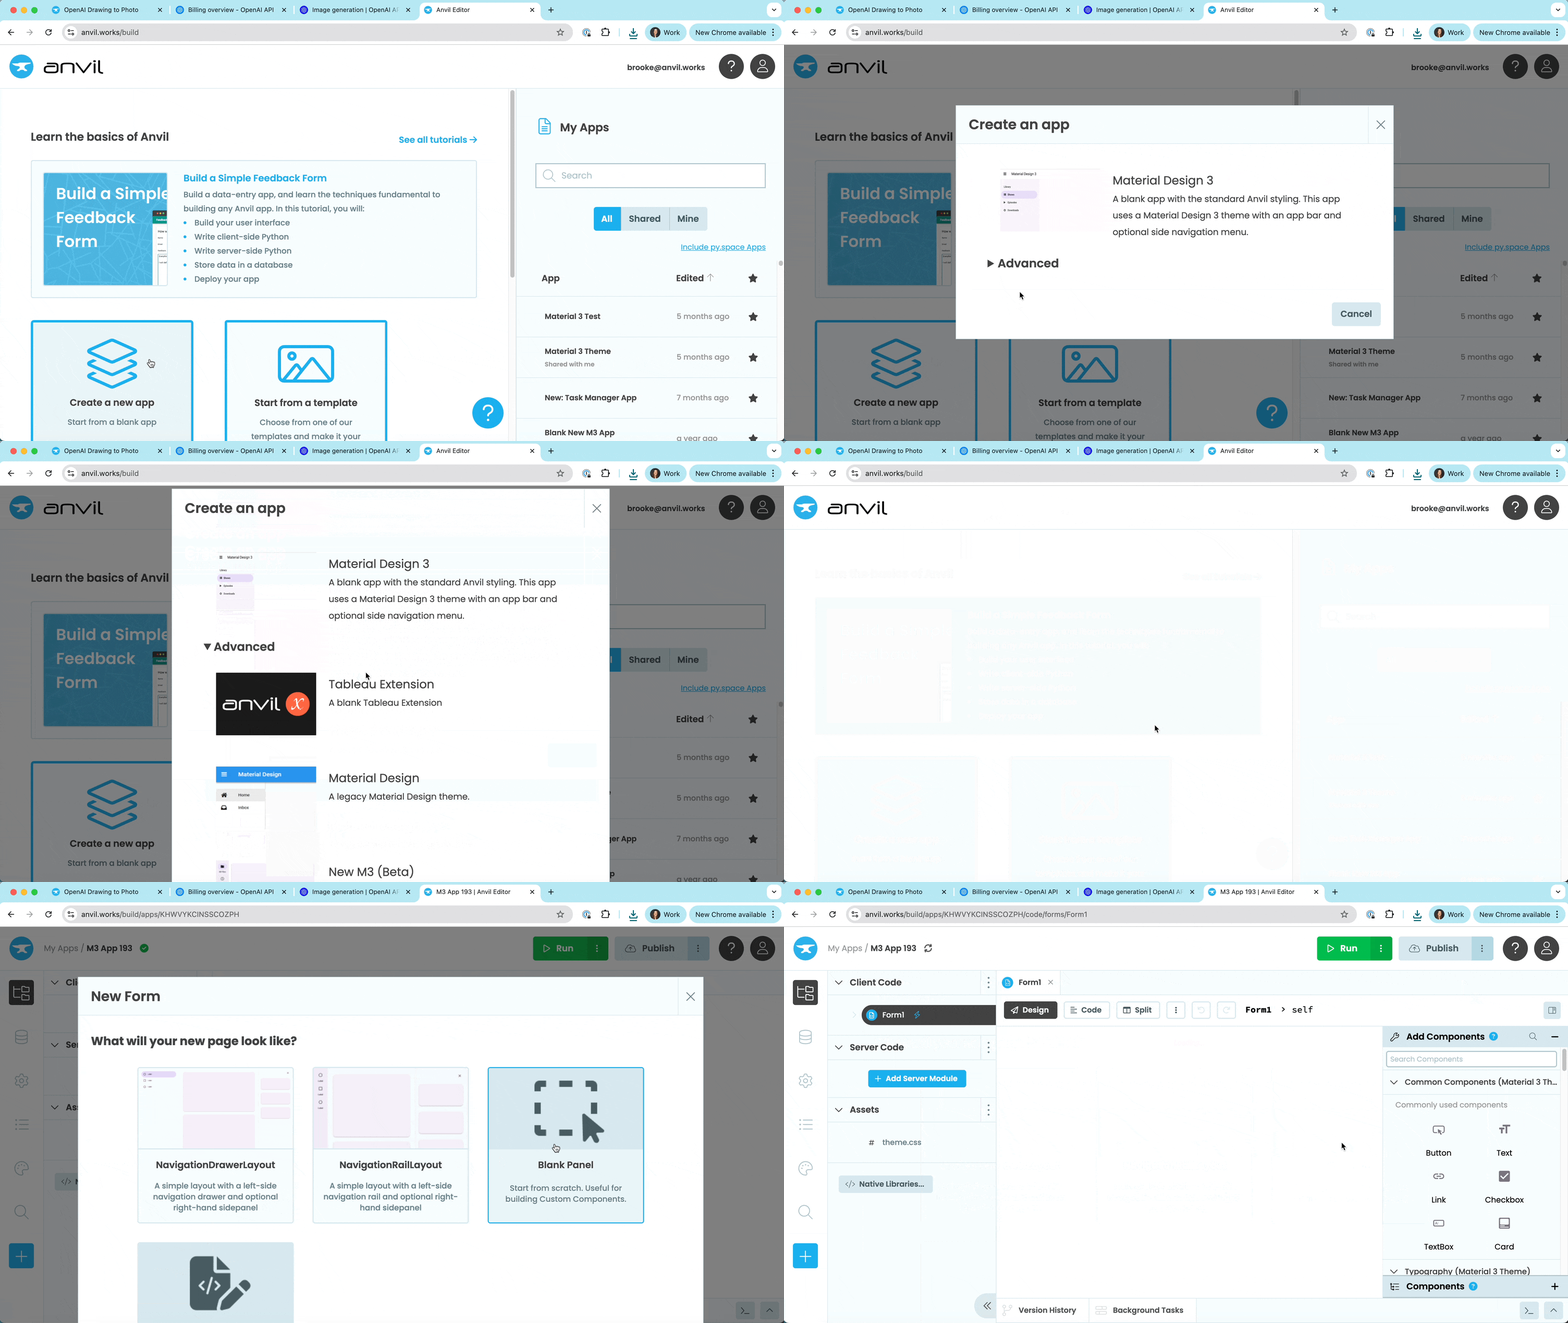
Create a new app and choose the ‘New M3’ theme
First, rename the Form to “MainForm” by right-clicking on it in the App Browser, then rename the app. Click on the name at the top of the screen and give it a name like “OpenAI Image Generator”.
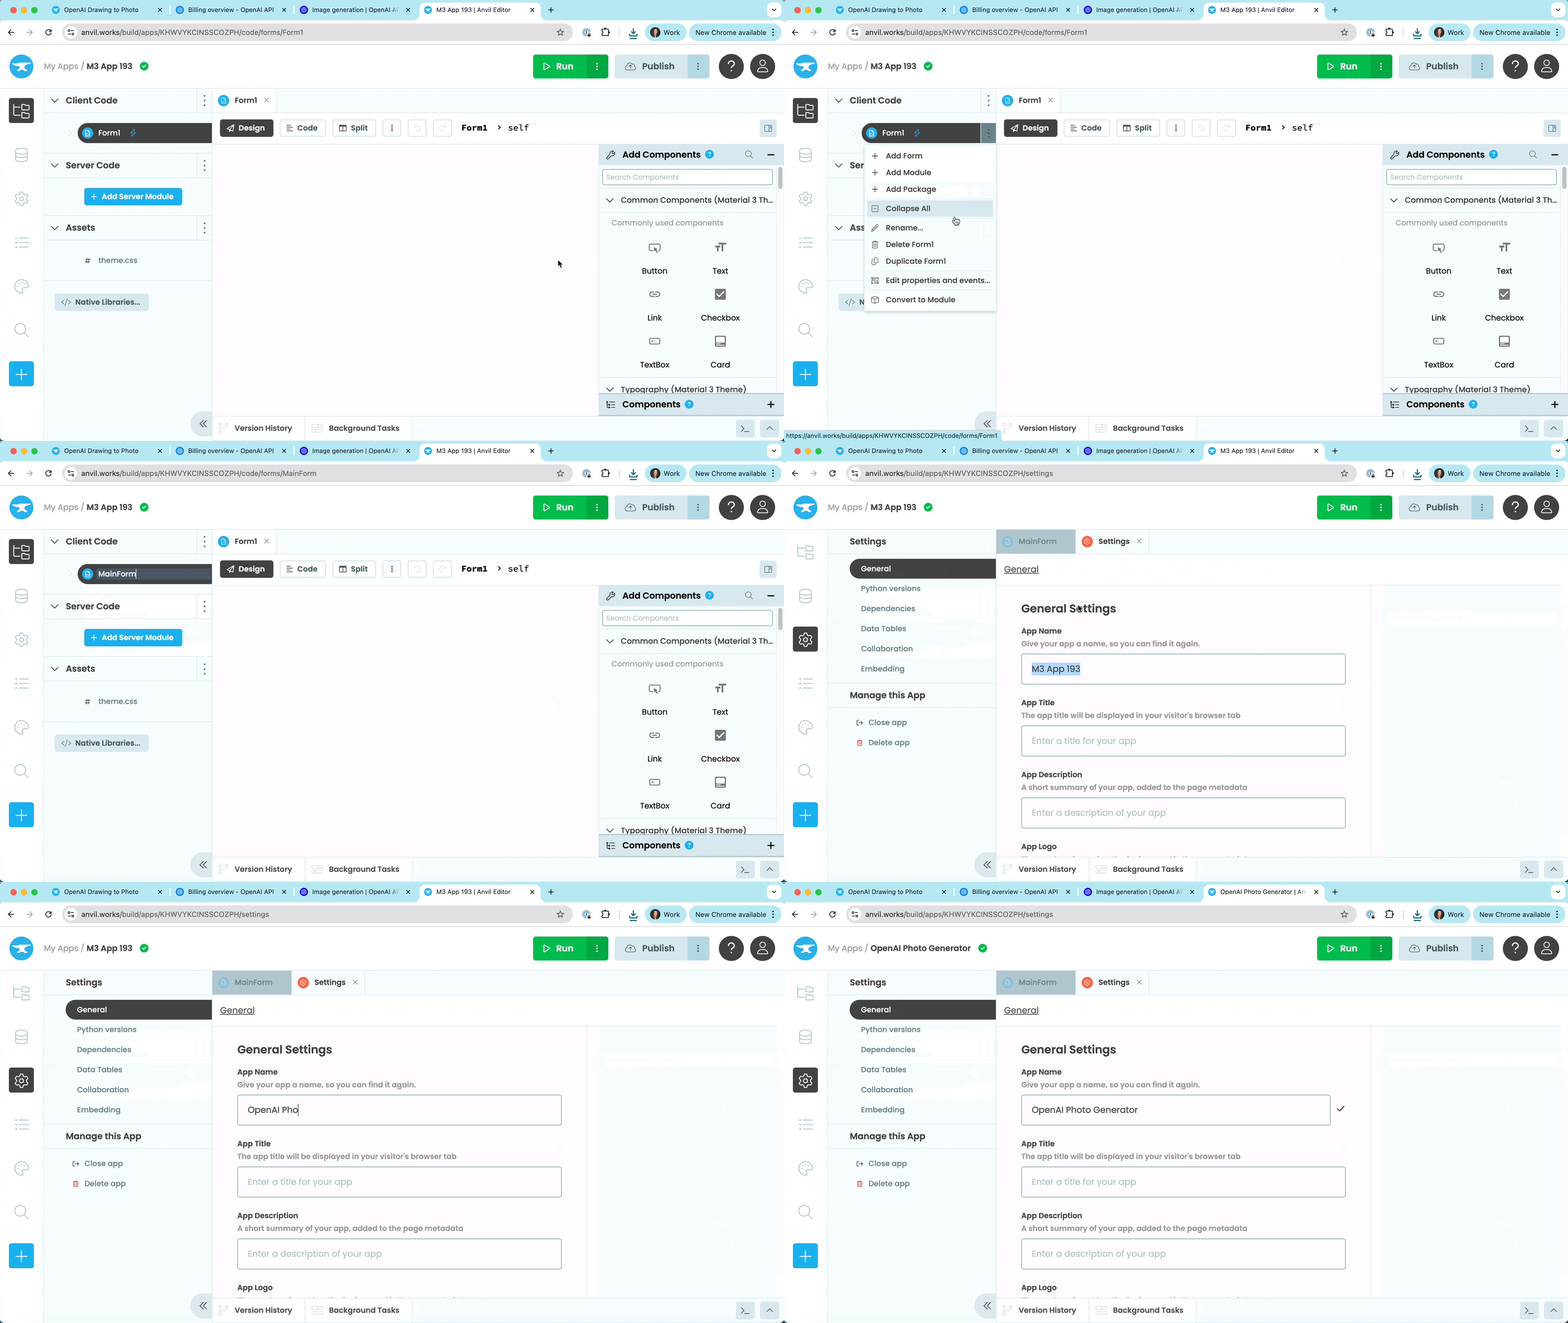
Rename the MainForm and app
Step 2 - Build the UI
We’re now looking at the Form Editor, where we can drag and drop components from the Toolbox to build our app’s UI.
Let’s start by adding a Card  to the Form to hold our images and buttons. Drop a ColumnPanel inside the Card to make it easier to lay out the components.
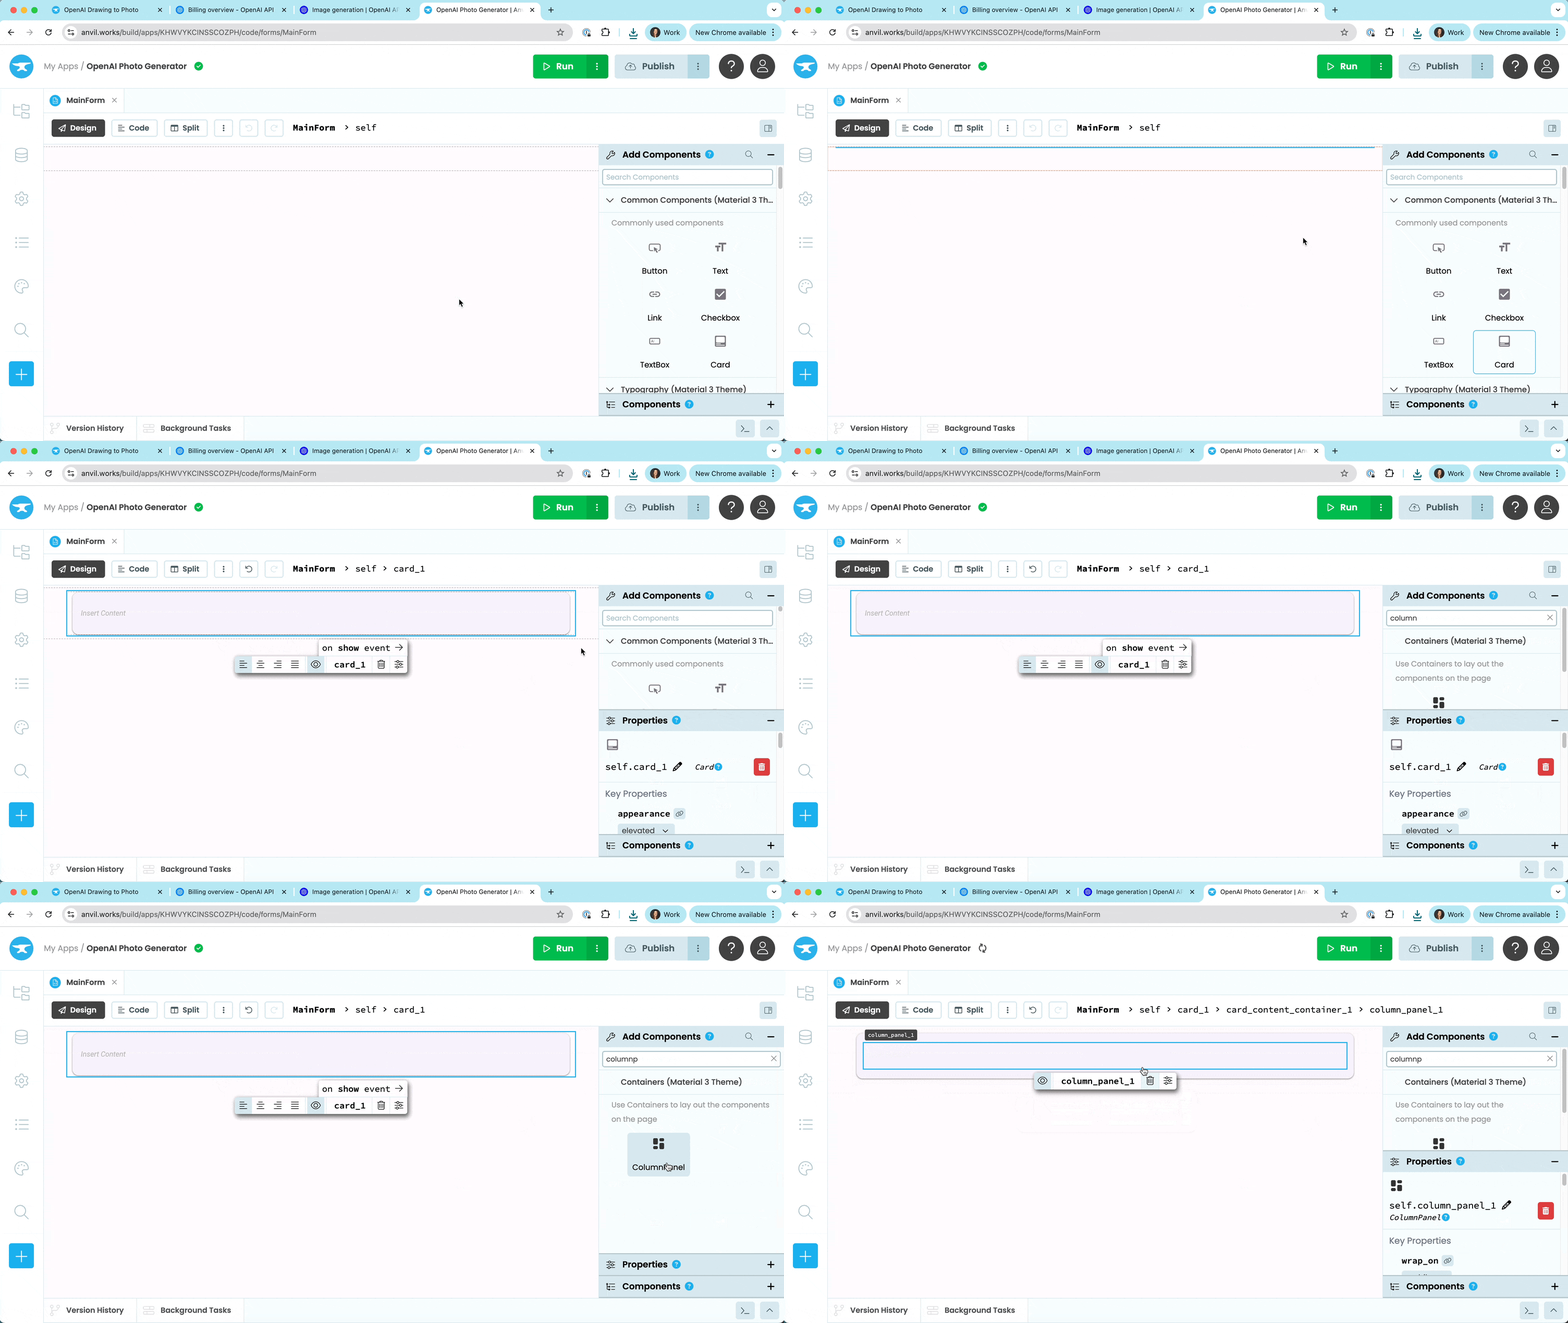
Add a Card component to the Form
Add a FileLoader
We need a button to upload an image - that’s what the FileLoader component is for. Drag and drop a FileLoader into the ColumnPanel.
Centre-align the FileLoader using the floating Object Palette. From the Properties Panel, change its appearance property to filled. We only want to upload images, so set the file_types property to image/*.
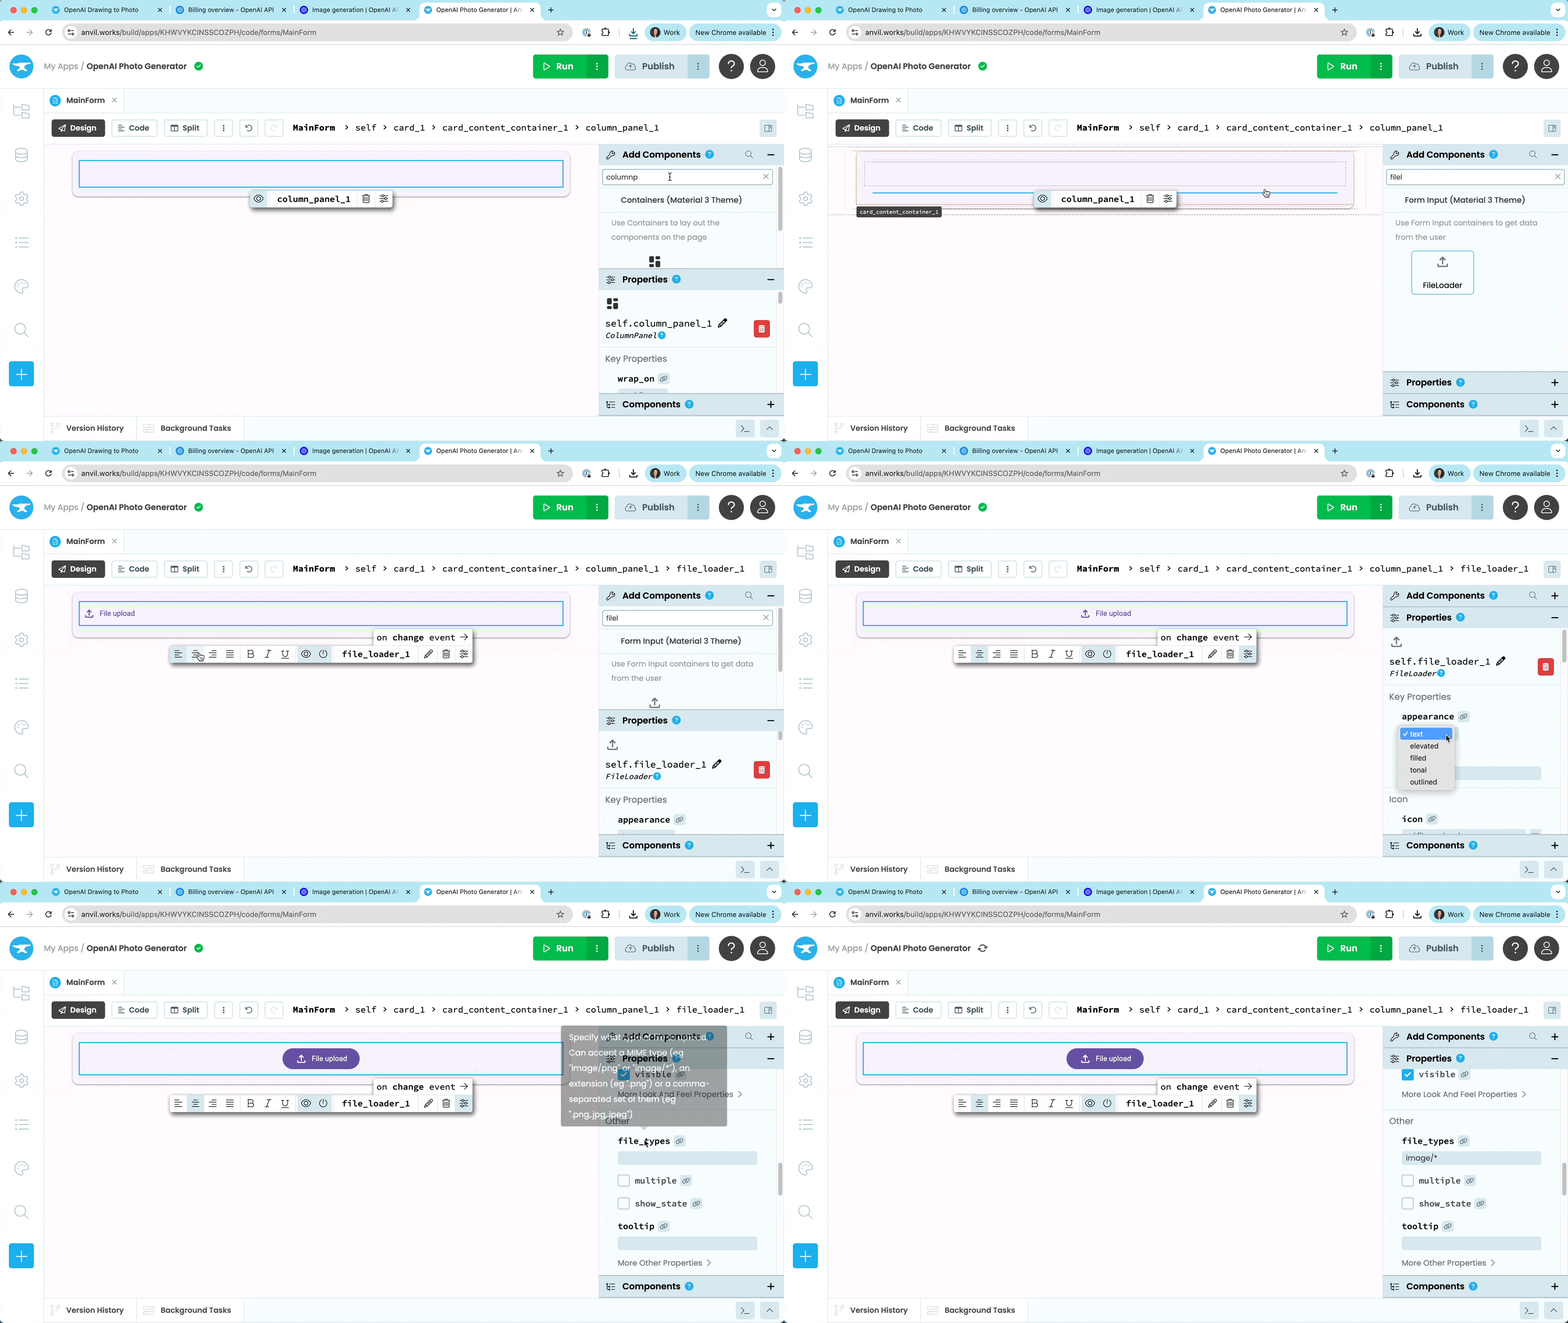
Add a FileLoader inside the ColumnPanel
Add Image components
We need an Image component to display the uploaded image. Drag and drop an Image component above the FileLoader. Change its name to uploaded_img.
We don’t want it visible until an image is uploaded, so click the eye icon on the Object Palette to make it invisible. Also set its display_mode property to fill_width.
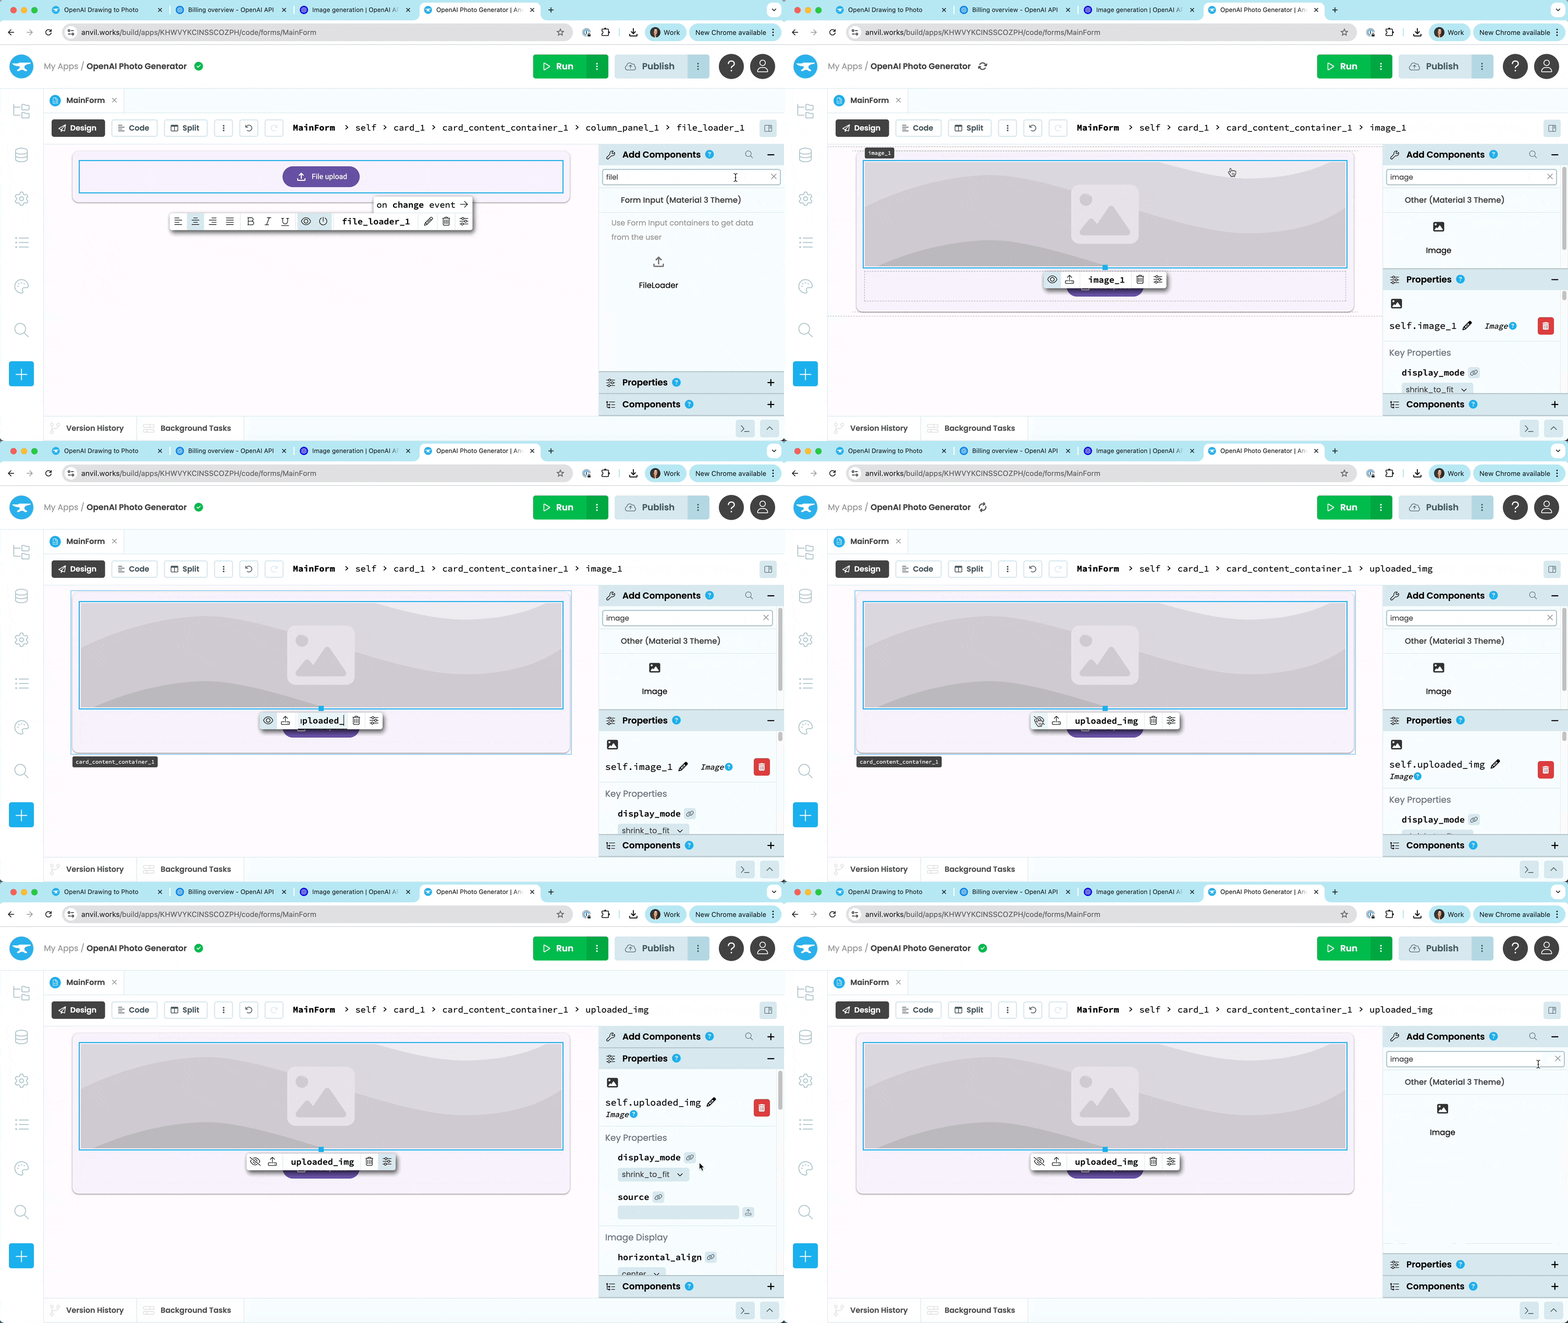
Add an Image component to display the uploaded image
Add another Image component next to the first one to display our generated image. Name it output_img and make it invisible too.
Add the Generate button
We now need a button that, when clicked, will call the OpenAI API. Add a Button component to the page and name it generate_button. Centre it, change the text to “Turn into photo”, and make it invisible to start. We’ll make the Button visible once a file is uploaded.
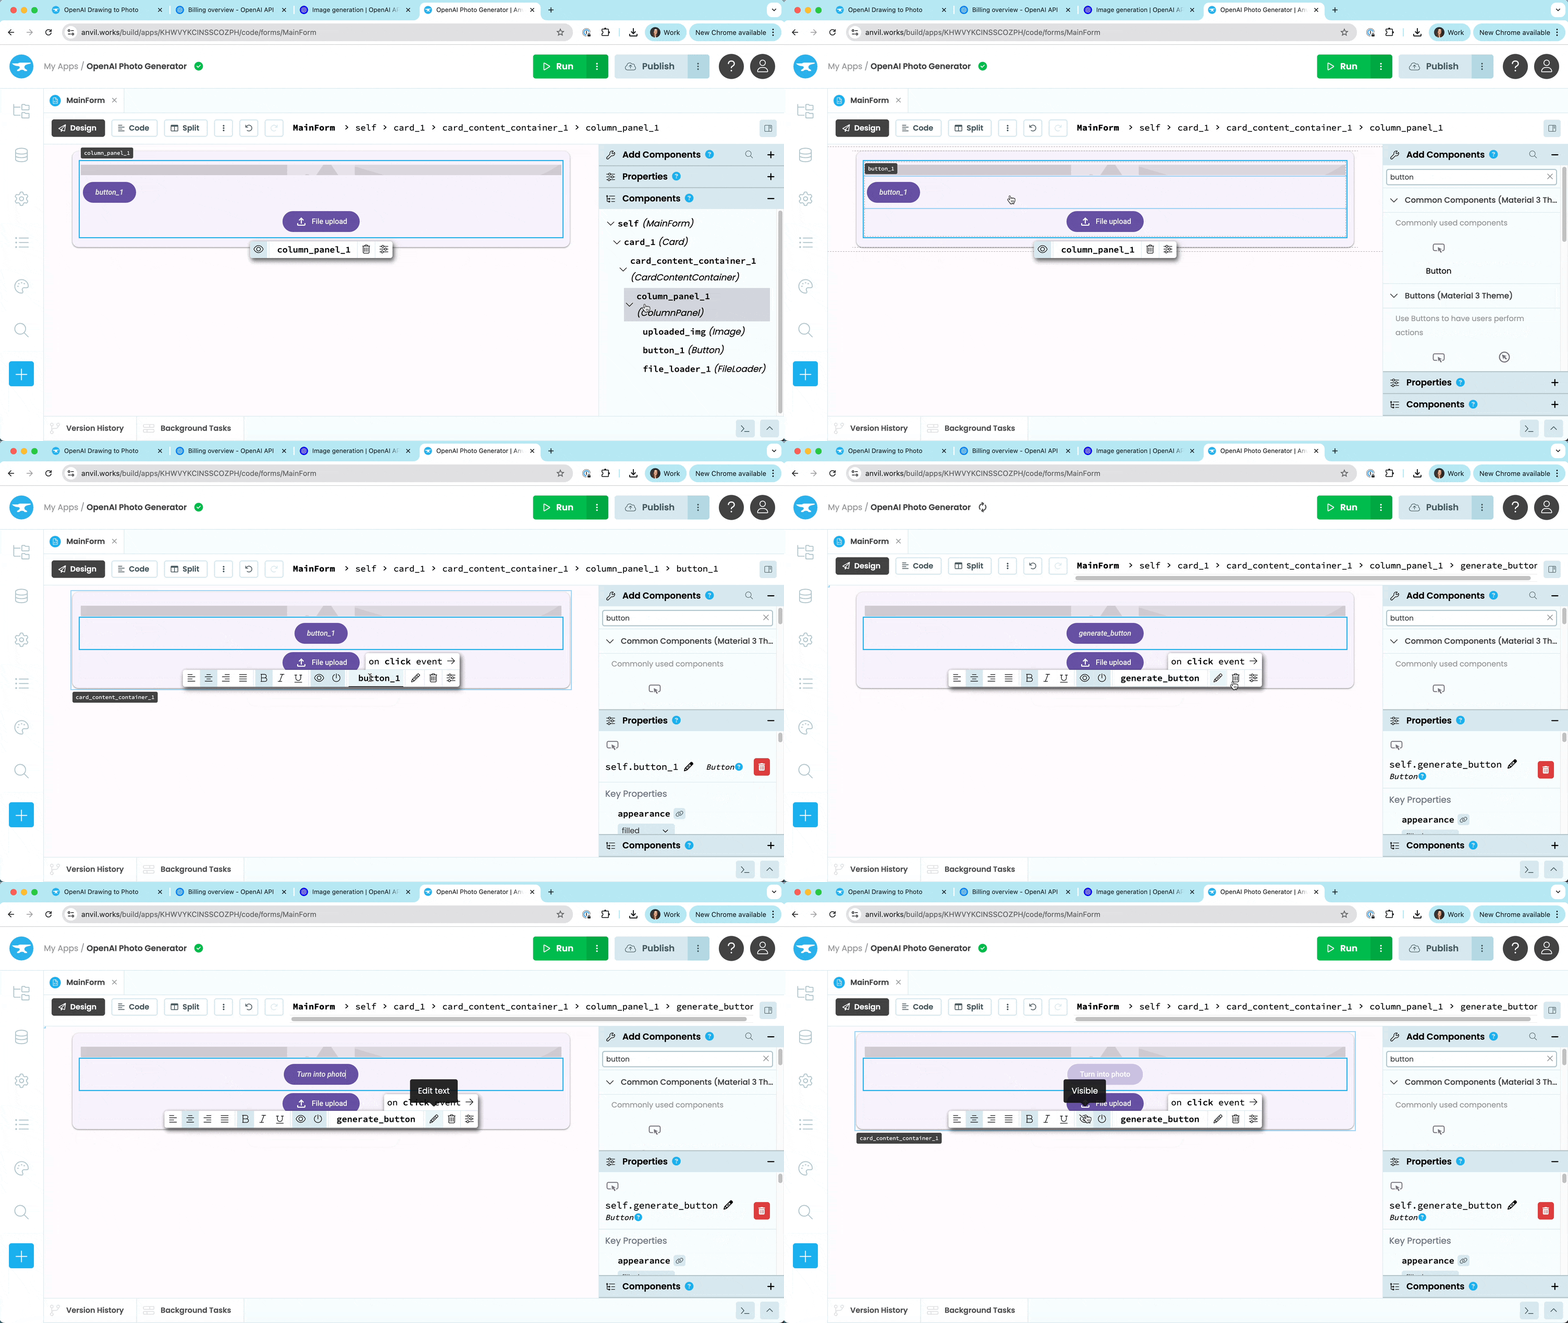
Add a Button to start the image generation process
Handle the file upload
Let’s write some code that will make the uploaded_img and generate_button components visible when an image is uploaded.
Select the FileLoader and click on change event from the Object Palette. This opens the code view and automatically creates a method that runs when a file is uploaded.
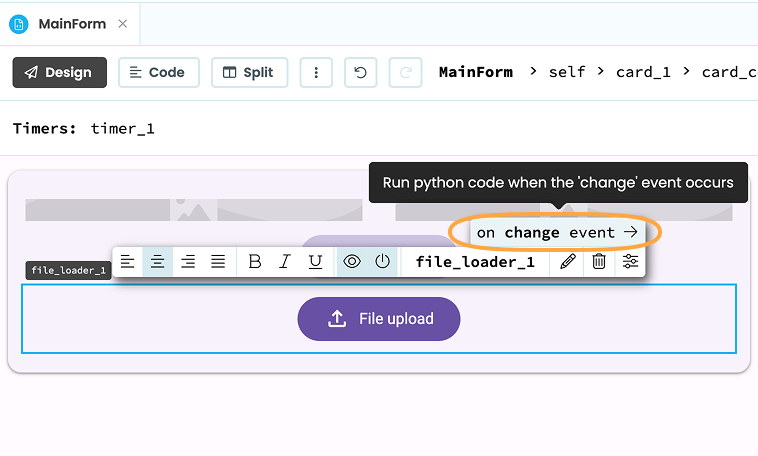
Add the following code:
@handle("file_loader_1", "change")
def self.file_loader_1_change(self, file, **event_args):
    """This method is called when a new file is loaded into this FileLoader"""
    if file:
        self.uploaded_img.source = file
        self.uploaded_img.visible = True
        self.generate_button.visible = True
Test out the app
Let’s test out our UI and the code we just wrote. At the top right of the Anvil Editor, click the green Run button. Upload an image and you should see it appear along with the “Turn into photo” button.
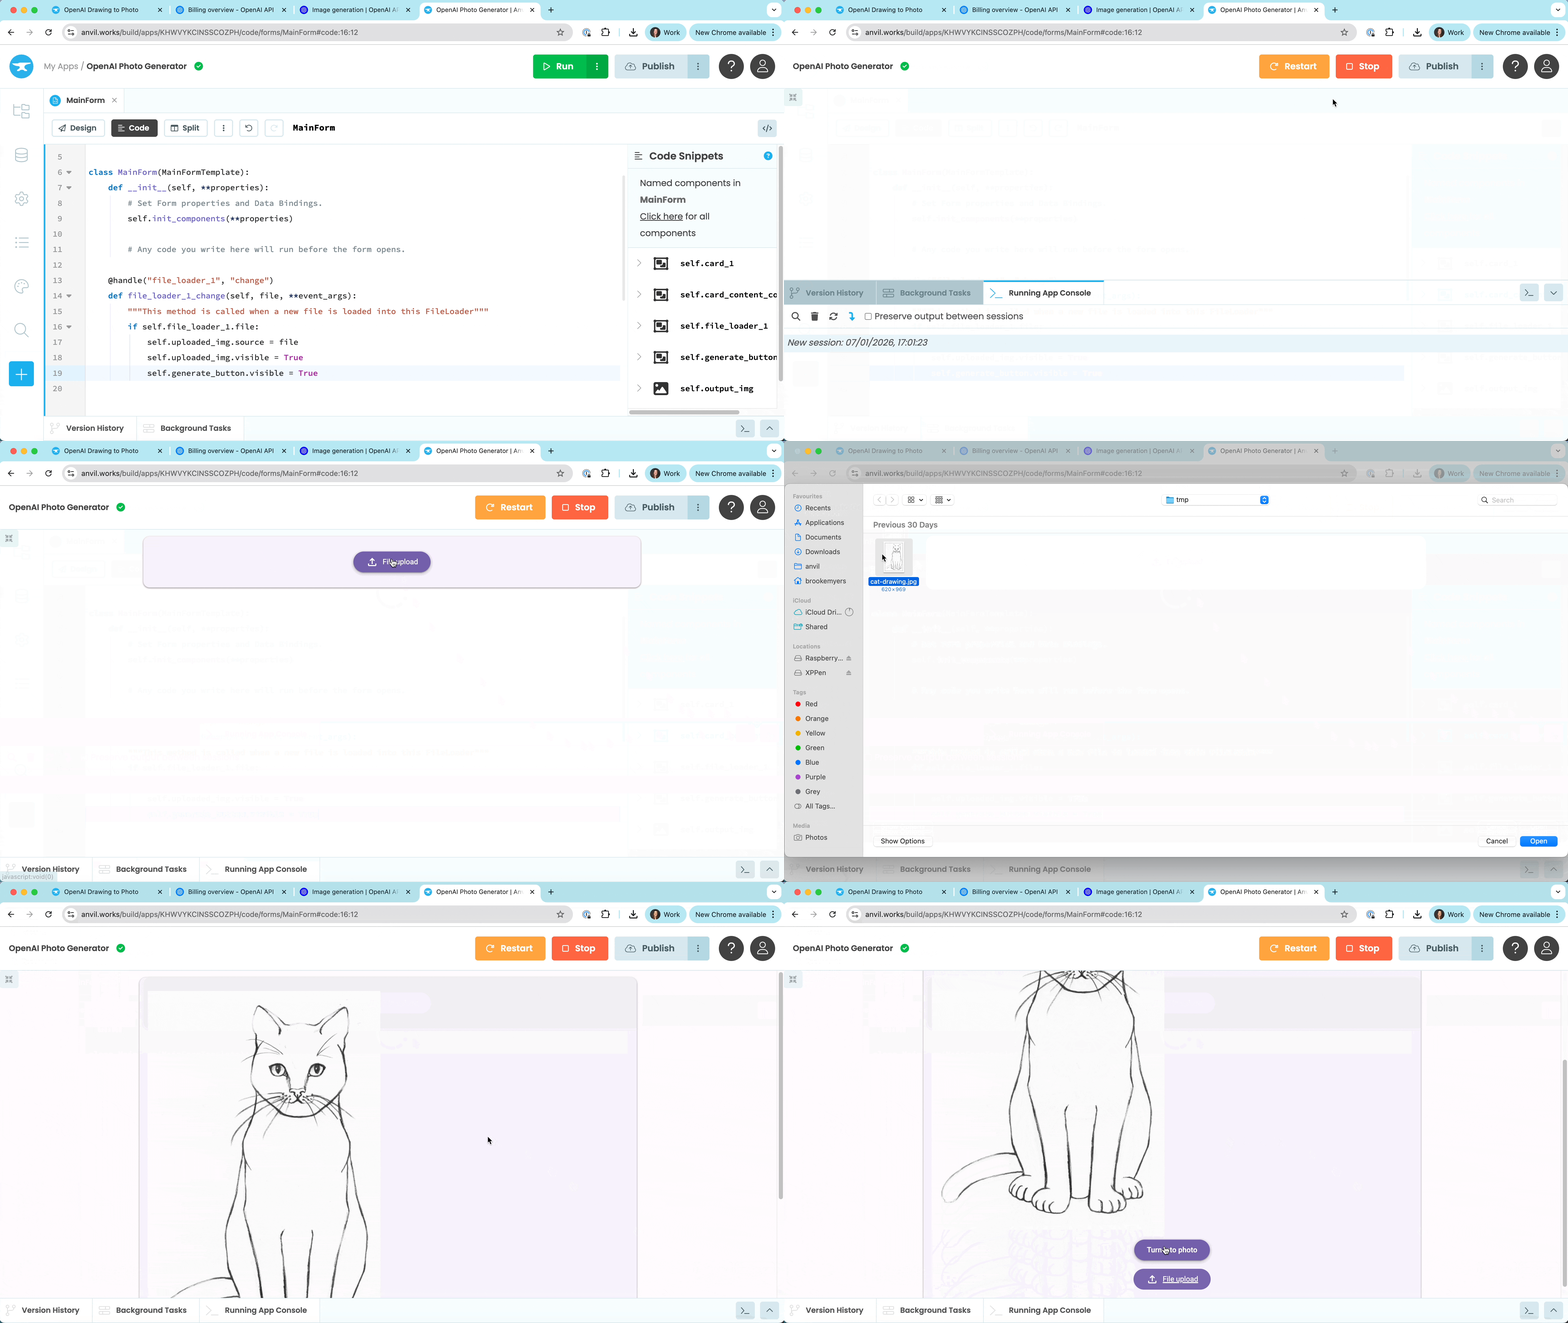
Test the app to make sure uploading a file works
Step 3 - Set up OpenAI
We’re going to use the Images API from OpenAI to turn our drawings into photorealistic images. In order to use this API, we need to get an API key from OpenAI.
Create an account and add credits
If you don’t already have an OpenAI account, create one at platform.openai.com.
Once logged in, go to the Billing page and add credits to your account. The minimum amount that you can add is typically $5, which is plenty for building and testing this app.
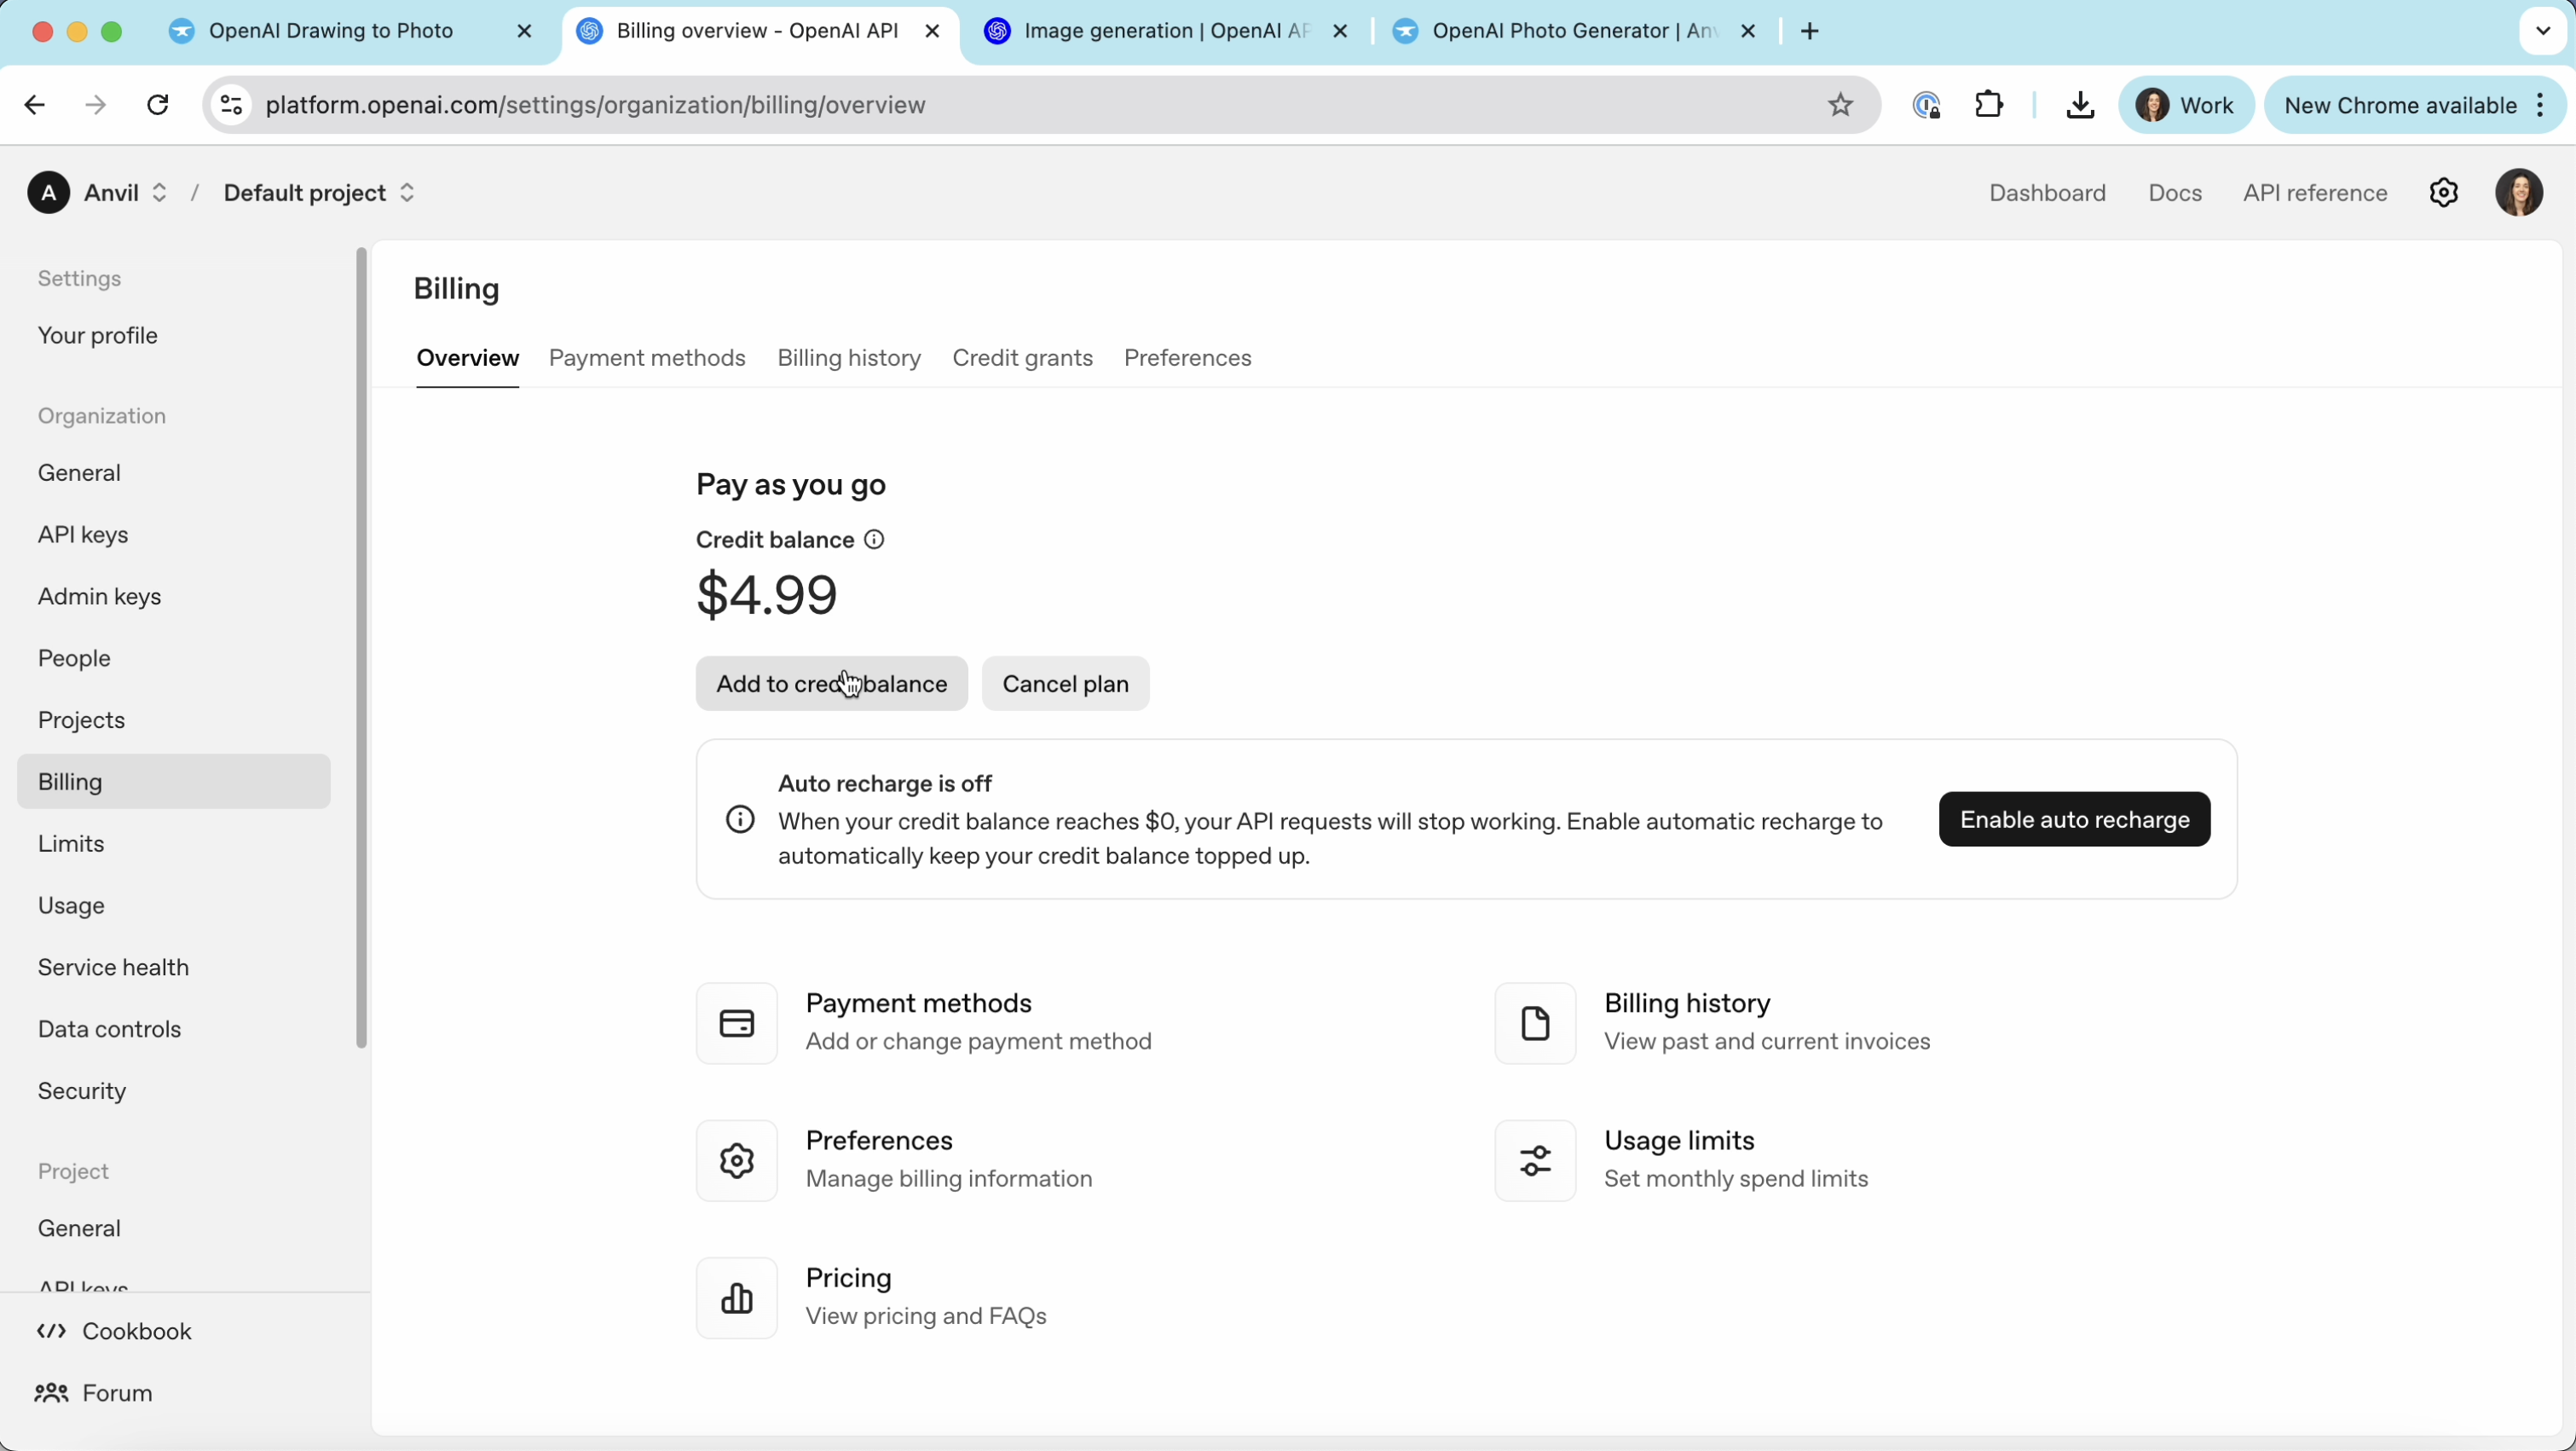
Verify your account
You’ll need to verify your account to use the Images API. In the “General” tab, look for a “Verify Organization” button.
Get your API key
Navigate to “API keys” and click “Create new secret key”. Give it a name and copy the key that appears. You won’t be able to see the key again after navigating away.
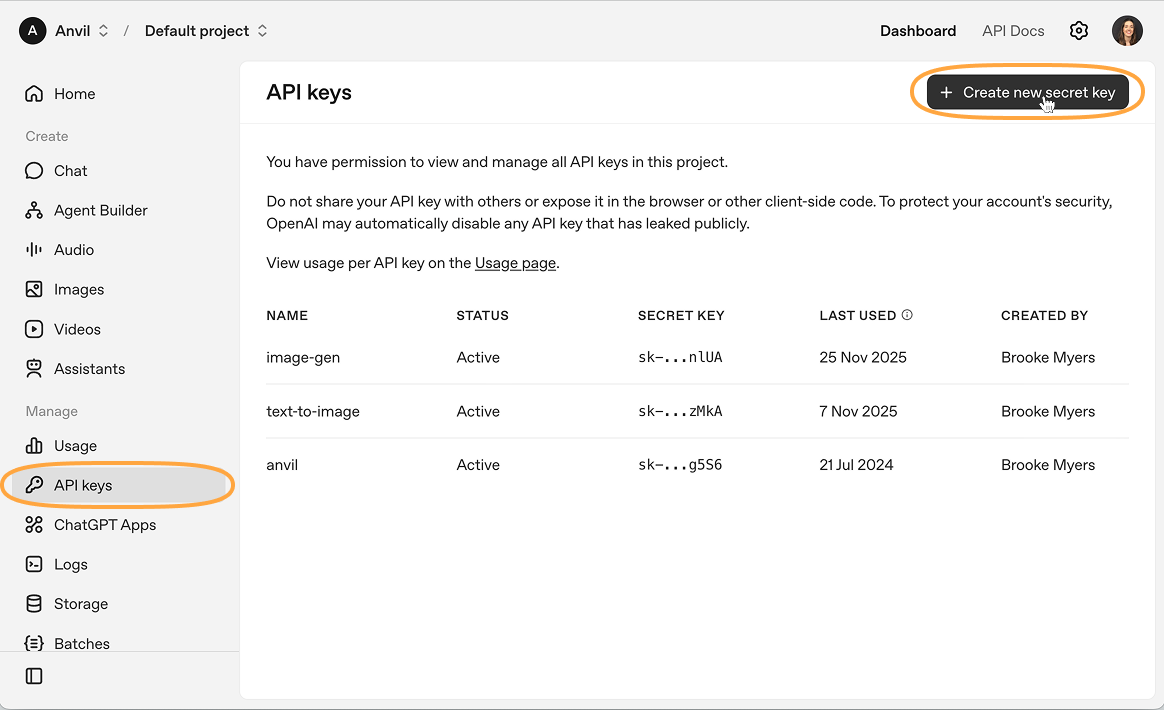
Create an OpenAI secret key
Store your API key securely
We can now store the key securely in our Anvil app. Back in the app, click the blue ‘+’ button in the Sidebar Menu and choose “App Secrets”.
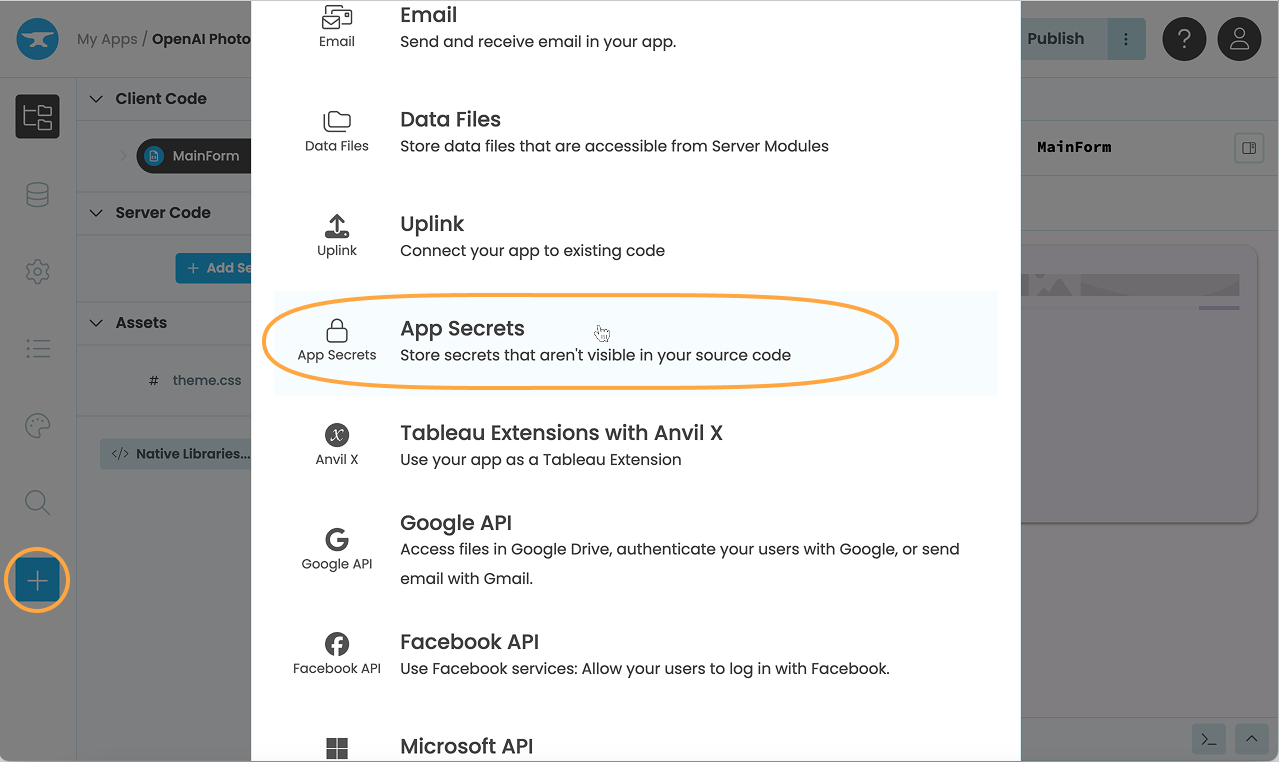
Click “Create new secret” and name it OPEN_AI_API_KEY. Click “Set value” and paste in your API key from OpenAI. This key is now encrypted and stored securely.
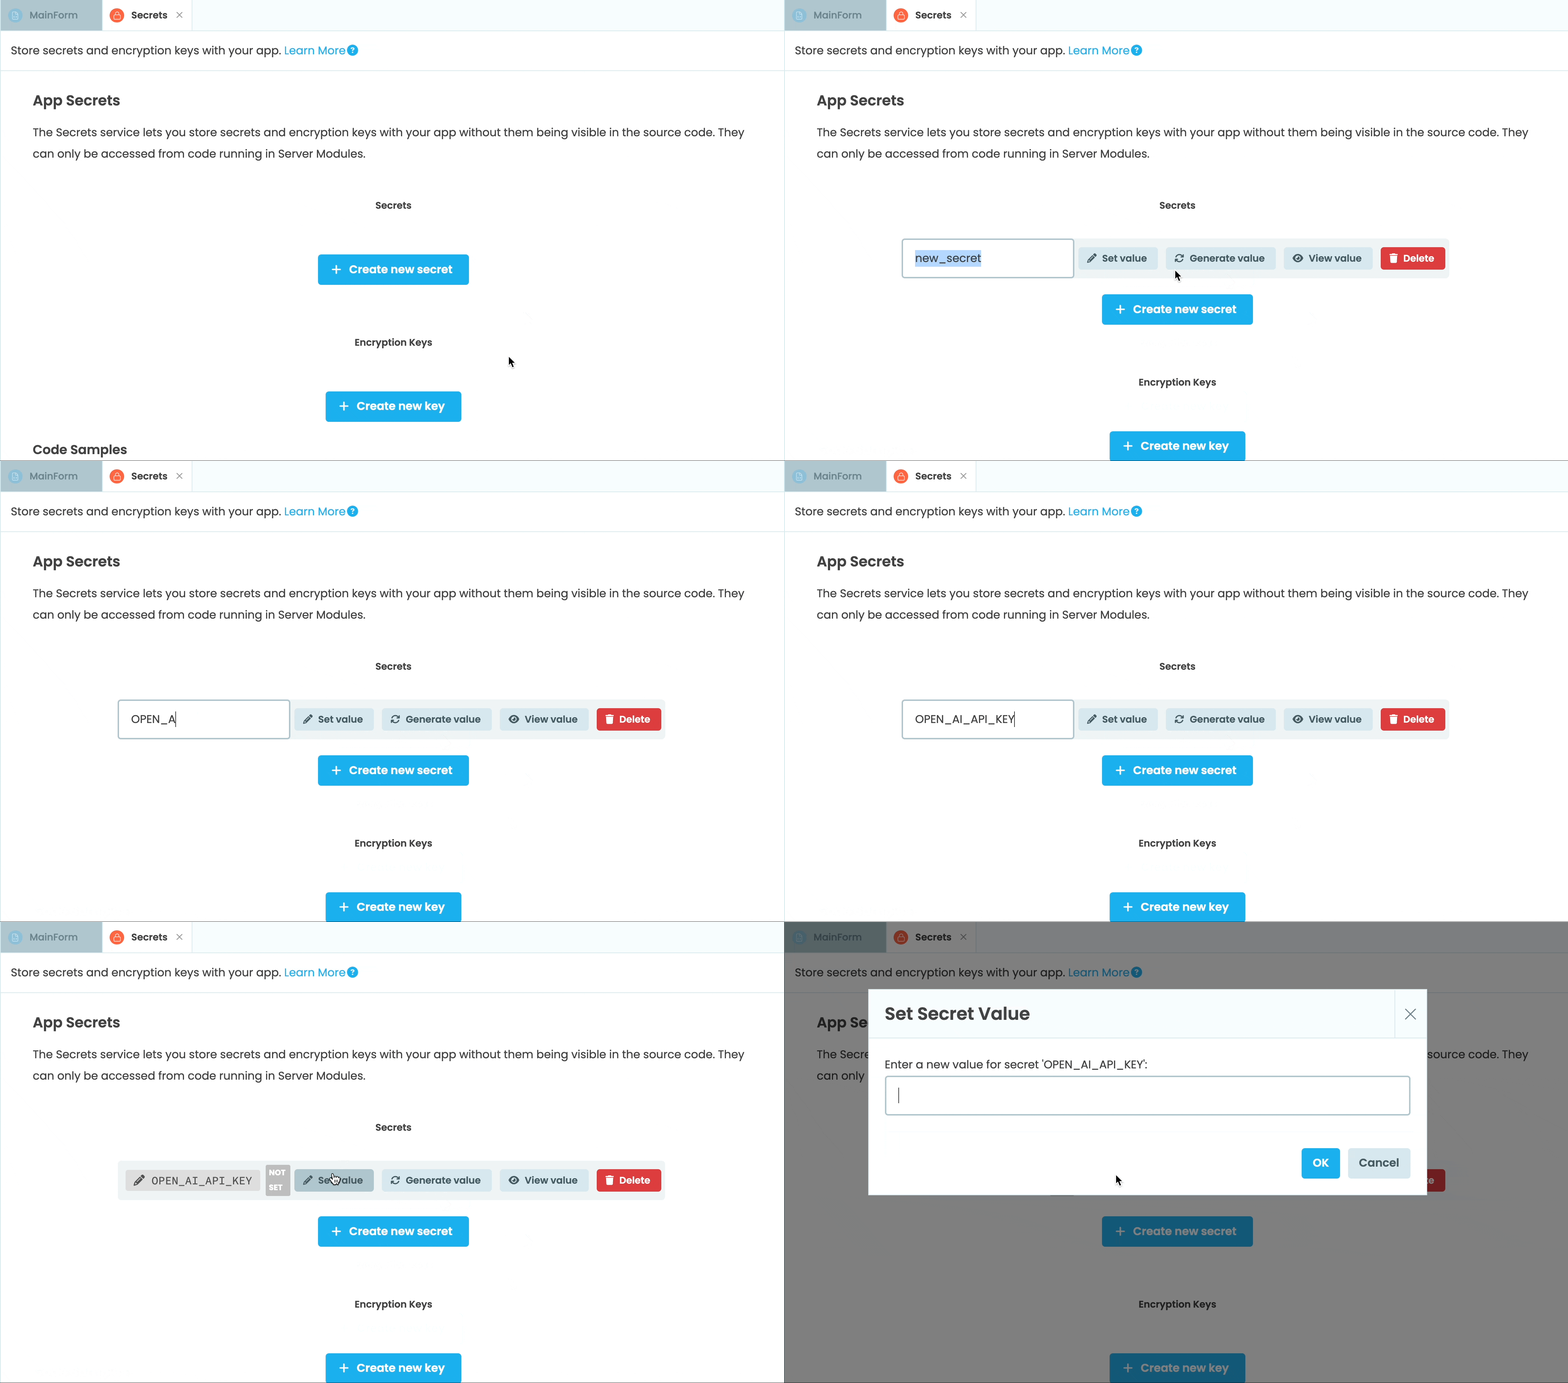
Create an App Secret and set your OpenAI API key as the value
Step 4 - Write backend code to call the API
We can now set up our backend to call the API and get a generated image.
Install the openai pacakage
First, we need to install the OpenAI Python package in our app’s server environment.
In the Sidebar Menu, navigate to Settings and select “Python versions”. Switch the base package to “Machine Learning”, and in the packages section, add openai. You can leave the version box blank.
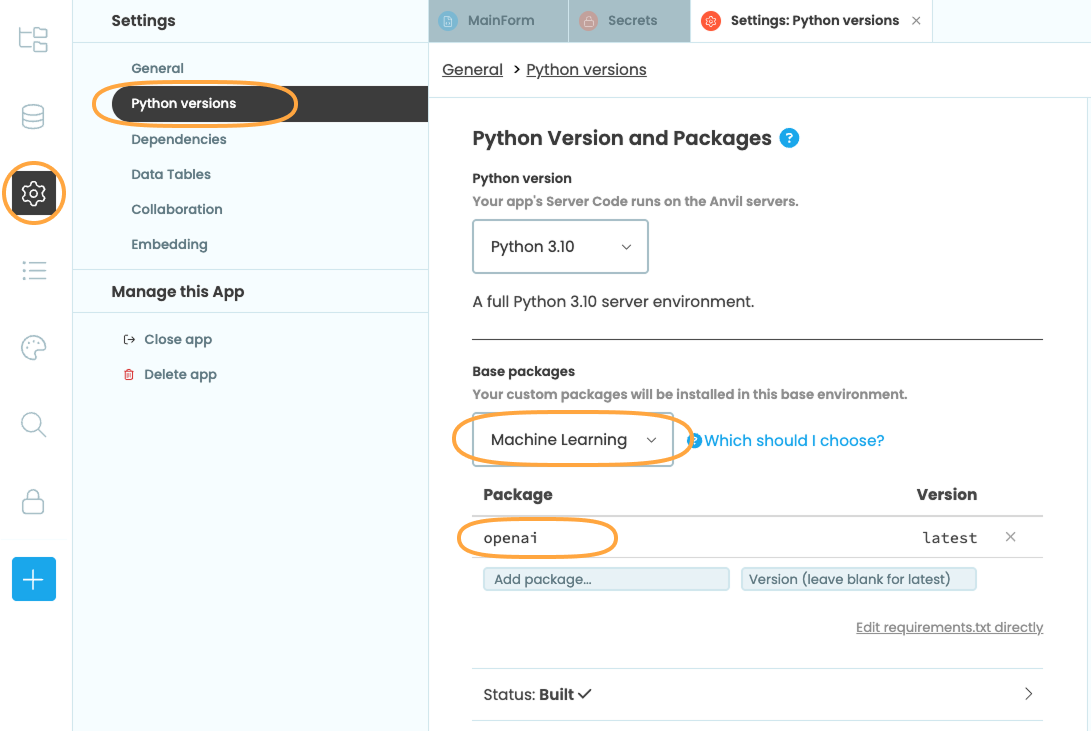
Install the openai package in your app’s Settings.
Copy the OpenAI code
Back in the App Browser, click “Add Server Module” to add a server environment to your app. This is a Python environment running on Anvil’s secure cloud servers.
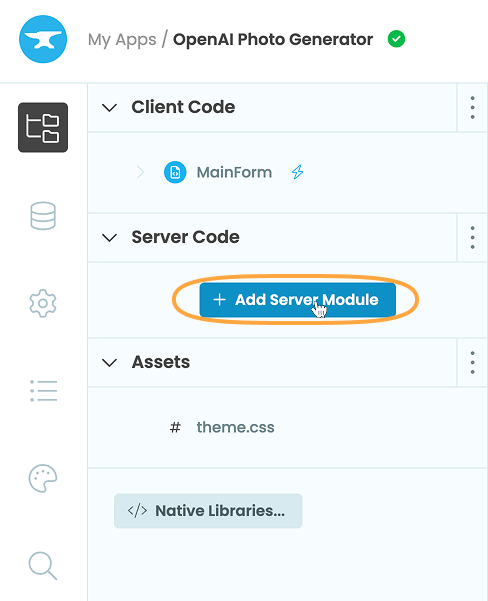
Add a Server Module
Let’s first copy and paste the code from the Images API documentation that can be found here. Add your API key that’s stored in App Secrets to the OpenAI client:
client = OpenAI(api_key=anvil.secrets.get_secret('OPEN_AI_API_KEY'))We’ll need to modify this code so that it works in Anvil but for now, your server code should look like this:
import anvil.secrets
import anvil.server
import base64
from openai import OpenAI
client = OpenAI(api_key=anvil.secrets.get_secret('OPEN_AI_API_KEY'))

prompt = """
Generate a photorealistic image of a gift basket on a white background
labeled 'Relax & Unwind' with a ribbon and handwriting-like font,
containing all the items in the reference pictures.
"""

result = client.images.edit(
    model="gpt-image-1",
    image=[
        open("body-lotion.png", "rb"),
        open("bath-bomb.png", "rb"),
        open("incense-kit.png", "rb"),
        open("soap.png", "rb"),
    ],
    prompt=prompt
)

image_base64 = result.data[0].b64_json
image_bytes = base64.b64decode(image_base64)
Create a function
An Anvil server module doesn’t run top to bottom like a normal Python script. Any code we write here will run when it’s called, so we need to turn this code into a function. We’ll then call that function when the generate_button is clicked.
Create a function called generate_image that takes in input_img as an argument. Indent the code we copied into this function and change the prompt to say “Turn the drawing into a photorealistic image”. Your server code should now look something like this:
import anvil.secrets
import anvil.server
import base64
from openai import OpenAI
client = OpenAI(api_key=anvil.secrets.get_secret('OPEN_AI_API_KEY'))


def generate_image(input_img):
    result = client.images.edit(
        model="gpt-image-1",
        image=[
            open("body-lotion.png", "rb"),
            open("bath-bomb.png", "rb"),
            open("incense-kit.png", "rb"),
            open("soap.png", "rb"),
        ],
        prompt="Turn the drawing into a photorealistic image"
    )

    image_base64 = result.data[0].b64_json
    image_bytes = base64.b64decode(image_base64)

    # Save the image to a file
    with open("gift-basket.png", "wb") as f:
        f.write(image_bytes)
Pass in the input image
We need to pass in a file path for our input image into the OpenAI API. We can get a temporary file path using anvil.media.TempFile.
OpenAI checks the MIME type of images based on the file extension, not the actual content, so we also need to append the proper file extension to our temporary file path.
Add the following import statements to your server code:
import anvil.media
import mimetypes
import os
Then, inside generate_image, we’ll get the MIME type of input_img and use mimetypes to find the corresponding file extension. We then need to create a TempFile and rename the filepath so that it includes this extension:
def generate_image(input_img):
    #get the MIME type and extension from the input_img
    mime_type = input_img.content_type
    ext = mimetypes.guess_extension(mime_type)
    #create a temporary file path
    with anvil.media.TempFile(input_img) as tmp_path:
        #add the extension to the temporary path
        new_path = tmp_path + ext
        result = client.images.edit(
            model="gpt-image-1",
            image=[
                #pass the path to the model
                open(new_path, "rb"),
            ],
            prompt="Turn the drawing into a photorealistic image"
        )

        image_base64 = result.data[0].b64_json
        image_bytes = base64.b64decode(image_base64)

        # Save the image to a file
        with open("gift-basket.png", "wb") as f:
            f.write(image_bytes)
Create a media object
When the model finishes generating an image, we can create an Anvil Media Object instead of writing to a file. Replace the with statement at the end of the server function with:
output_img = anvil.BlobMedia(content_type="text/jpeg", content=image_bytes, name="ai-image.jpg")The name argument will be the name of your file when downloaded. You can change this name to anything you’d like.
Your server code should now look like this:
import anvil.secrets
import anvil.server
import base64
from openai import OpenAI
import anvil.media
import mimetypes
import os

client = OpenAI(api_key=anvil.secrets.get_secret('OPEN_AI_API_KEY'))


def generate_image(input_img):
    #get the MIME type and extension from the input_img
    mime_type = input_img.content_type
    ext = mimetypes.guess_extension(mime_type)
    #create a temporary file path
    with anvil.media.TempFile(input_img) as tmp_path:
        #add the extension to the temporary path
        new_path = tmp_path + ext
        result = client.images.edit(
            model="gpt-image-1",
            image=[
                #pass the path to the model
                open(new_path, "rb"),
            ],
            prompt="Turn the drawing into a photorealistic image"
        )

    image_base64 = result.data[0].b64_json
    image_bytes = base64.b64decode(image_base64)

    # Save the image to a file
    output_img =  anvil.BlobMedia(content_type="text/jpeg", content=image_bytes, name="ai-image.jpg")
Step 5 - Run the function in the background
The image generation request may take some time, so we don’t want our server to hang while waiting. To prevent this, we can run the function in the background using Background Tasks.
Create the background task
To turn the function into a background task, we just need to decorate it with @anvil.server.background_task.
@anvil.server.background_task
def generate_image(input_img):
    ...
Launch the background task
We want to be able to launch the background task when the generate_button is clicked. To do that, we need to create a client-callable function that launches the background task.
In the ServerModule, add the following function
@anvil.server.callable
def launch_bg_task(input_img):
    task = anvil.server.launch_background_task('generate_image', input_img)
    return task
The @anvil.server.callable decorator makes this function callable from our frontend code.
anvil.server.launch_background_task returns a Task object, which we can use to check when the background task is finished and get the return value.
Store the generated image in a Data Table
We can’t return a Media object directly from a background task, so we’ll store the generated image in a Data Table.
Choose Data from the Sidebar Menu and click “Add Table” to create a new Data Table. Call this table tasks and add the following columns:
image(Media column) - for the generated imagetask_id(Text column) - for the background task ID
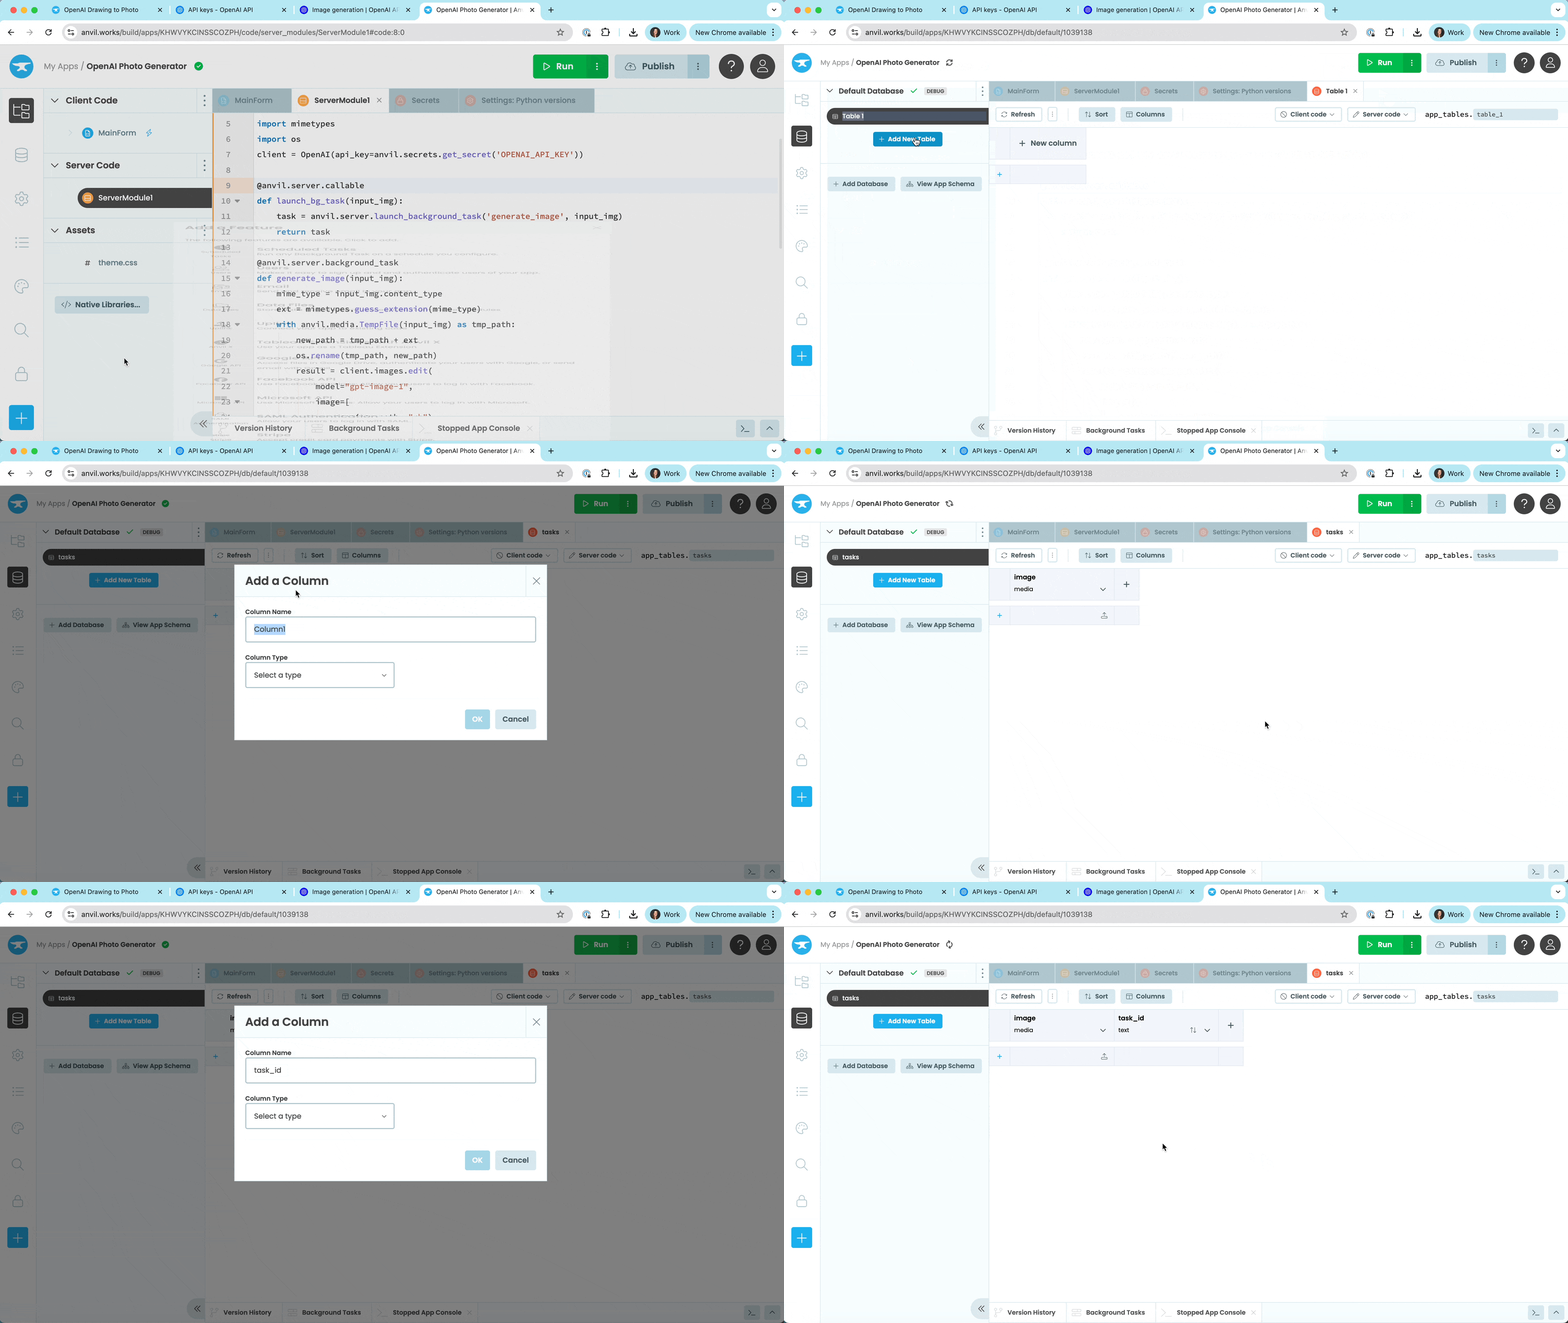
Add a Data Table with a column for the image and a column for the task ID
Add the generated image to the Data Table
When the image has finished generating, we need to add a row to the Data Table and return the row. Add the following lines of code to the bottom of the generate_image function:
task_id = anvil.server.context.background_task_id
row = app_tables.tasks.add_row(image=output_img, task_id=task_id)
return row
Your finished ServerModule should now look something like this:
import anvil.secrets
import anvil.server
import base64
from openai import OpenAI
import anvil.media
import mimetypes
import os

client = OpenAI(api_key=anvil.secrets.get_secret('OPEN_AI_API_KEY'))

@anvil.server.callable
def launch_bg_task(input_img):
    task = anvil.server.launch_background_task('generate_image', input_img)
    return task

@anvil.server.background_task
def generate_image(input_img):
    #get the MIME type and extension from the input_img
    mime_type = input_img.content_type
    ext = mimetypes.guess_extension(mime_type)
    #create a temporary file path
    with anvil.media.TempFile(input_img) as tmp_path:
        #add the extension to the temporary path
        new_path = tmp_path + ext
        result = client.images.edit(
            model="gpt-image-1",
            image=[
                #pass the path to the model
                open(new_path, "rb"),
            ],
            prompt="Turn the drawing into a photorealistic image"
        )

    image_base64 = result.data[0].b64_json
    image_bytes = base64.b64decode(image_base64)

    # Save the image to a file
    output_img =  anvil.BlobMedia(content_type="text/jpeg", content=image_bytes, name="ai-image.jpg")
    task_id = anvil.server.context.background_task_id
    row = app_tables.tasks.add_row(image=output_img, task_id=task_id)
    return row
Step 6 - Generate the image and update the UI
Now that our server code is finished, we can launch the background task from the generate_button.
Launch the background task when the button is clicked
Switch back to the Design view of MainForm and select the generate_button. Click on click event from the Object Palette to set up a function that will run when the Button is clicked.
From this function, we want to call launch_bg_task, passing in the uploaded file. We also want to disable the generate_button while the background task is running:
    @handle("generate_button", "click")
    def generate_button_click(self, **event_args):
        """This method is called when the button is clicked"""
        self.task = anvil.server.call('launch_bg_task', self.file_loader_1.file)
        self.generate_button.enabled = False
Add a progress indicator
Switch back to Design view, and add a LinearProgressIndicator component underneath the Image components. We’ll use this to indicate to the user that the image is being generated.
Click on the eye icon from the Object Palette to make the component invisible to start. We’ll make it visible while the image is being generated.
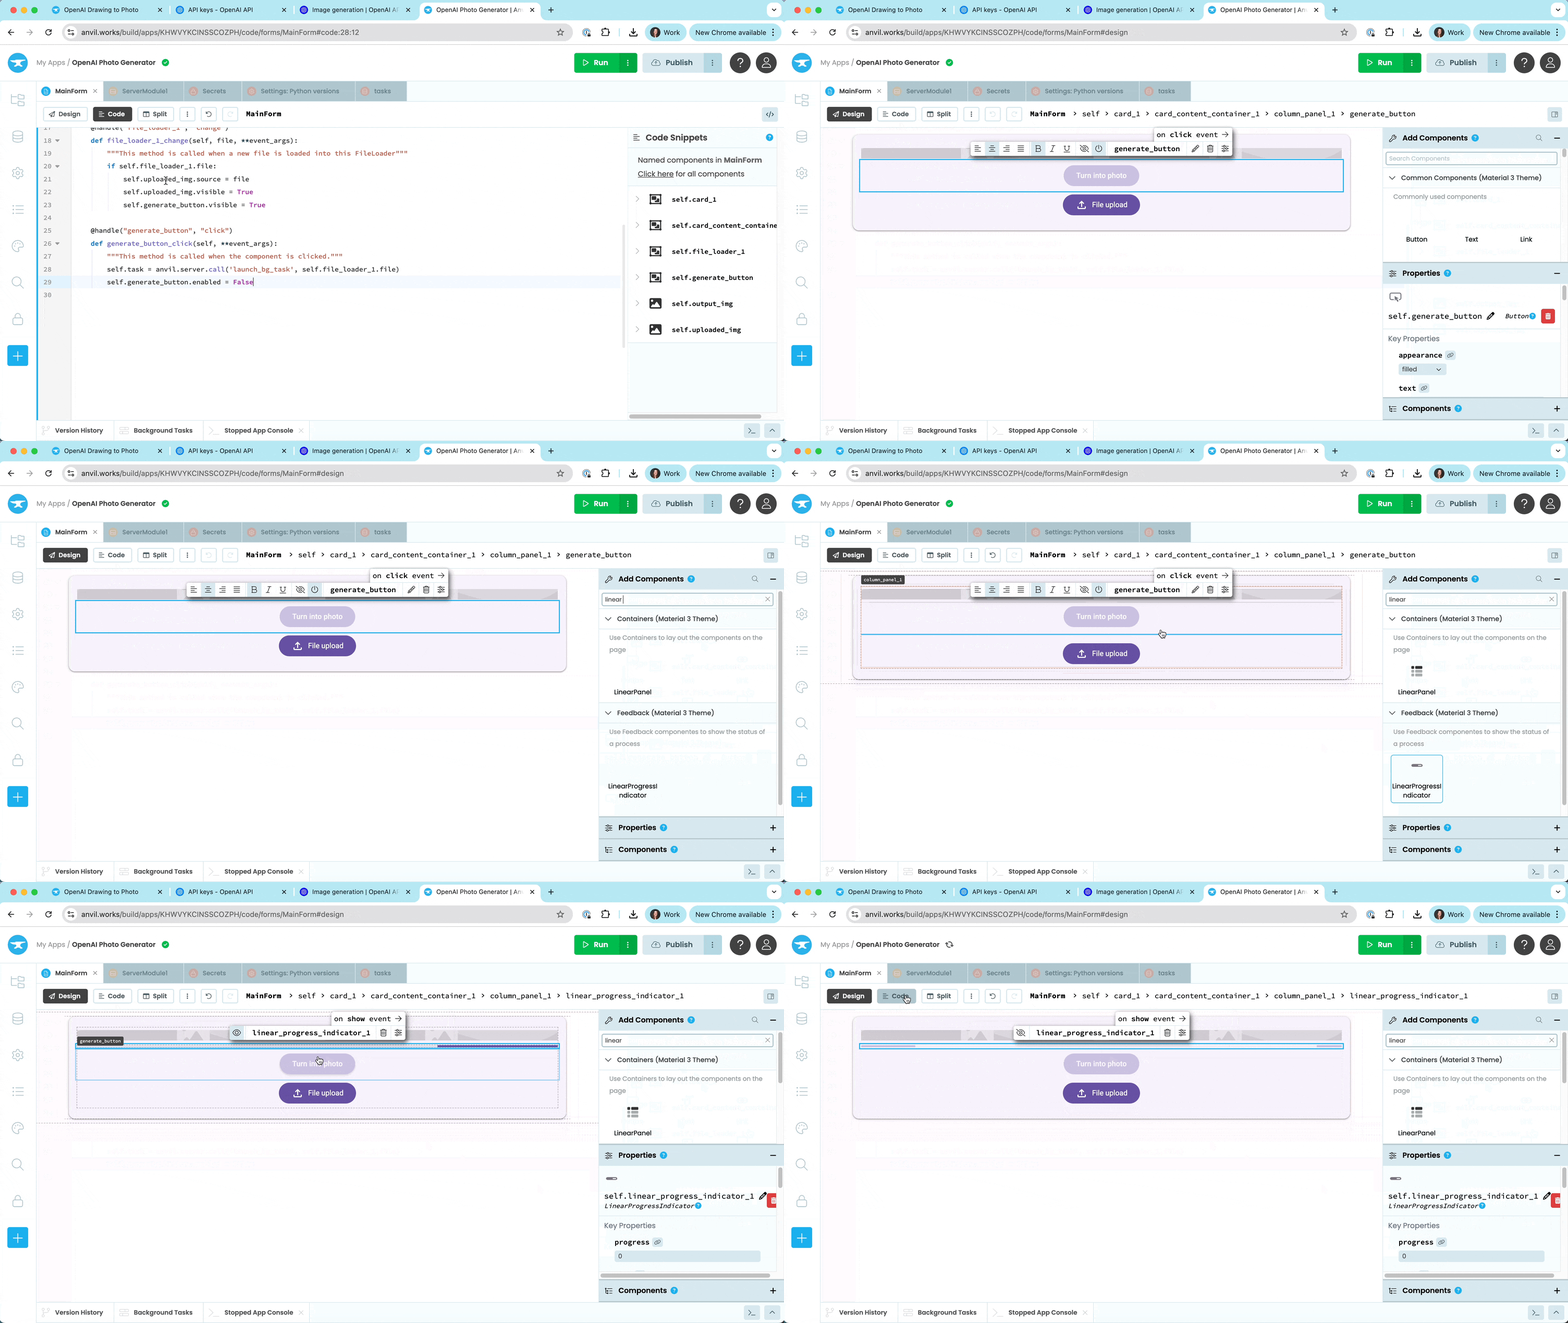
Add a LinearProgressIndicator to show that the image is generating
Update the generate_button_click event to make the linear_progress_indicator visible when clicked:
    @handle("generate_button", "click")
    def generate_button_click(self, **event_args):
        """This method is called when the button is clicked"""
        self.task = anvil.server.call('launch_bg_task', self.file_loader_1.file)
        self.generate_button.enabled = False
        #indicate that the task is running
        self.linear_progress_indicator_1.visible = True
Update the UI when the image has been generated
We need to poll the server to check if the background task has finished running and our image has been generated.
Drag and drop a Timer component onto the Form. It will appear at the top because it’s an invisible component. Timers have an interval property that determines how frequently they raise a tick event. We can then write a function that runs every time the Timer “ticks”.
From the Properties Panel, set the Timer’s interval to 0. We don’t want it to start ticking until we tell it to.
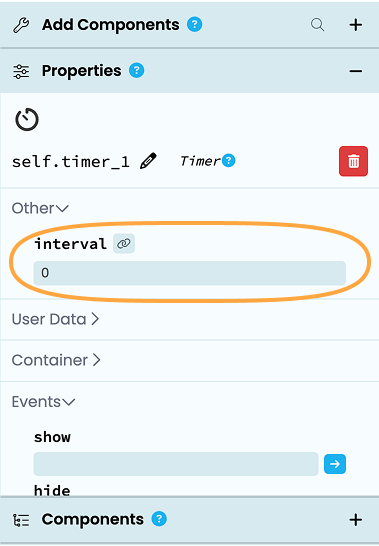
From the Properties Panel,
set the interval of the Timer to 0
From the Object Palette, set up a tick event handler for the Timer. In here, we want to check if the background task has finished, and if so, we’ll update the UI accordingly. We can also use with anvil.server.no_loading_indicator to stop Anvil’s loading spinner from appearing every time we poll the server.
Your timer_1_tick function should look like this:
    @handle("timer_1", "tick")
    def timer_1_tick(self, **event_args):
        """This method is called Every [interval] seconds. Does not trigger if [interval] is 0."""
        with anvil.server.no_loading_indicator:
            #check if the background task has finished
            if self.task.is_completed():
                #get the image from the Data Table row
                self.generated_img = self.task.get_return_value()['image']
                #display the generated image
                self.output_img.source = self.generated_image
                self.linear_progress_indicator_1.visible = False
                self.output_img.visible = True
                self.generate_button.enabled = True
                #stop the timer from ticking
                self.timer_1.interval = 0
Step 7 - Make the generated image downloadable
Finally, we can add the ability to download the generated image.
Back in Design view, add a Button to the page and name it download_button. Centre align the Button and make it invisible. Change it’s appearance to tonal and set its icon to mi:downlaod.
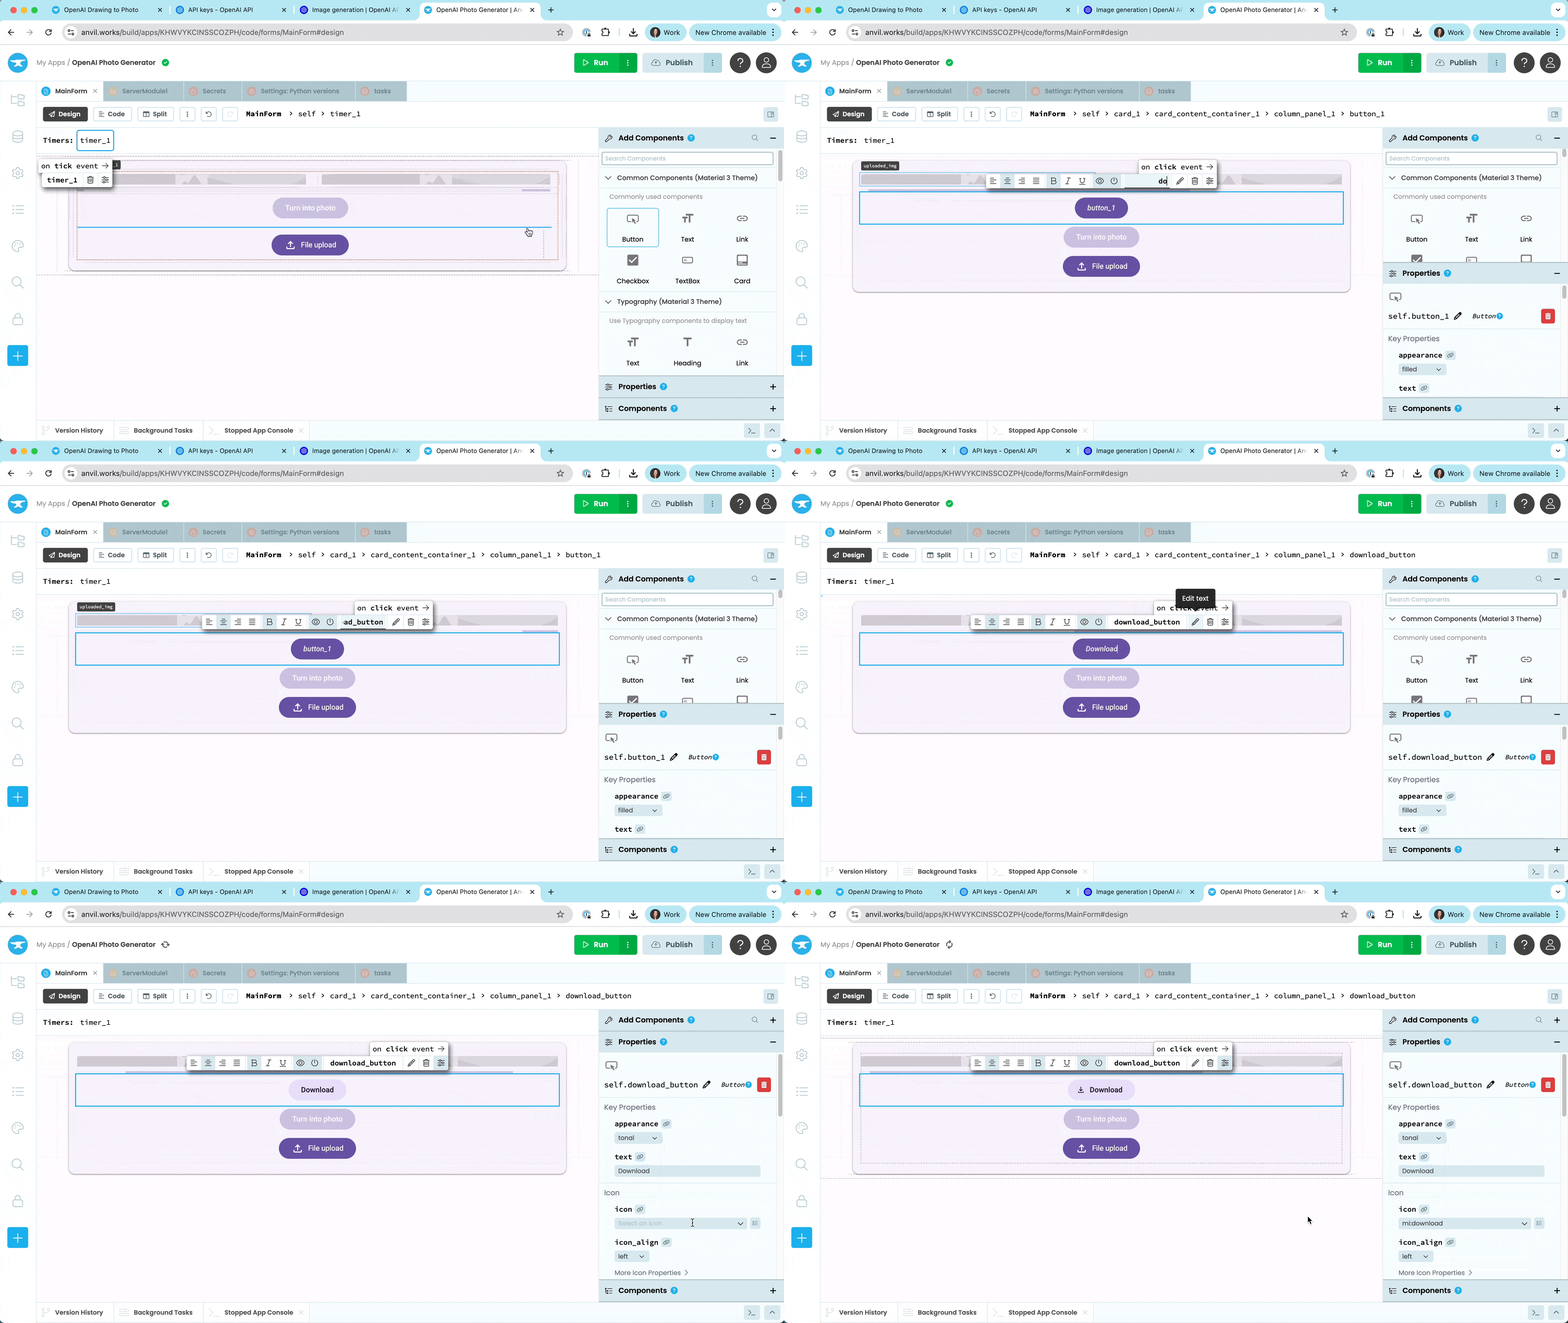
Add a Button to download the generated image
Set up a click event handler for the download_button, and inside that function, call anvil.media.download(self.generated_image).
    @handle("download_button", "click")
    def download_button_click(self, **event_args):
        """This method is called when the component is clicked."""
        anvil.media.download(self.generated_img)
At the top of the Form code, make sure to import anvil.media:
import anvil.mediaStep 8 - Test and publish
It’s now time to test out the app! Click the green Run button, upload a drawing and click “Turn into photo”. Wait for the AI to generate a photorealistic image and then try downloading it.
To publish your app to the web, click “Publish” at the top right of the editor, then “Publish this app”. You’ll get a URL you can share with others.
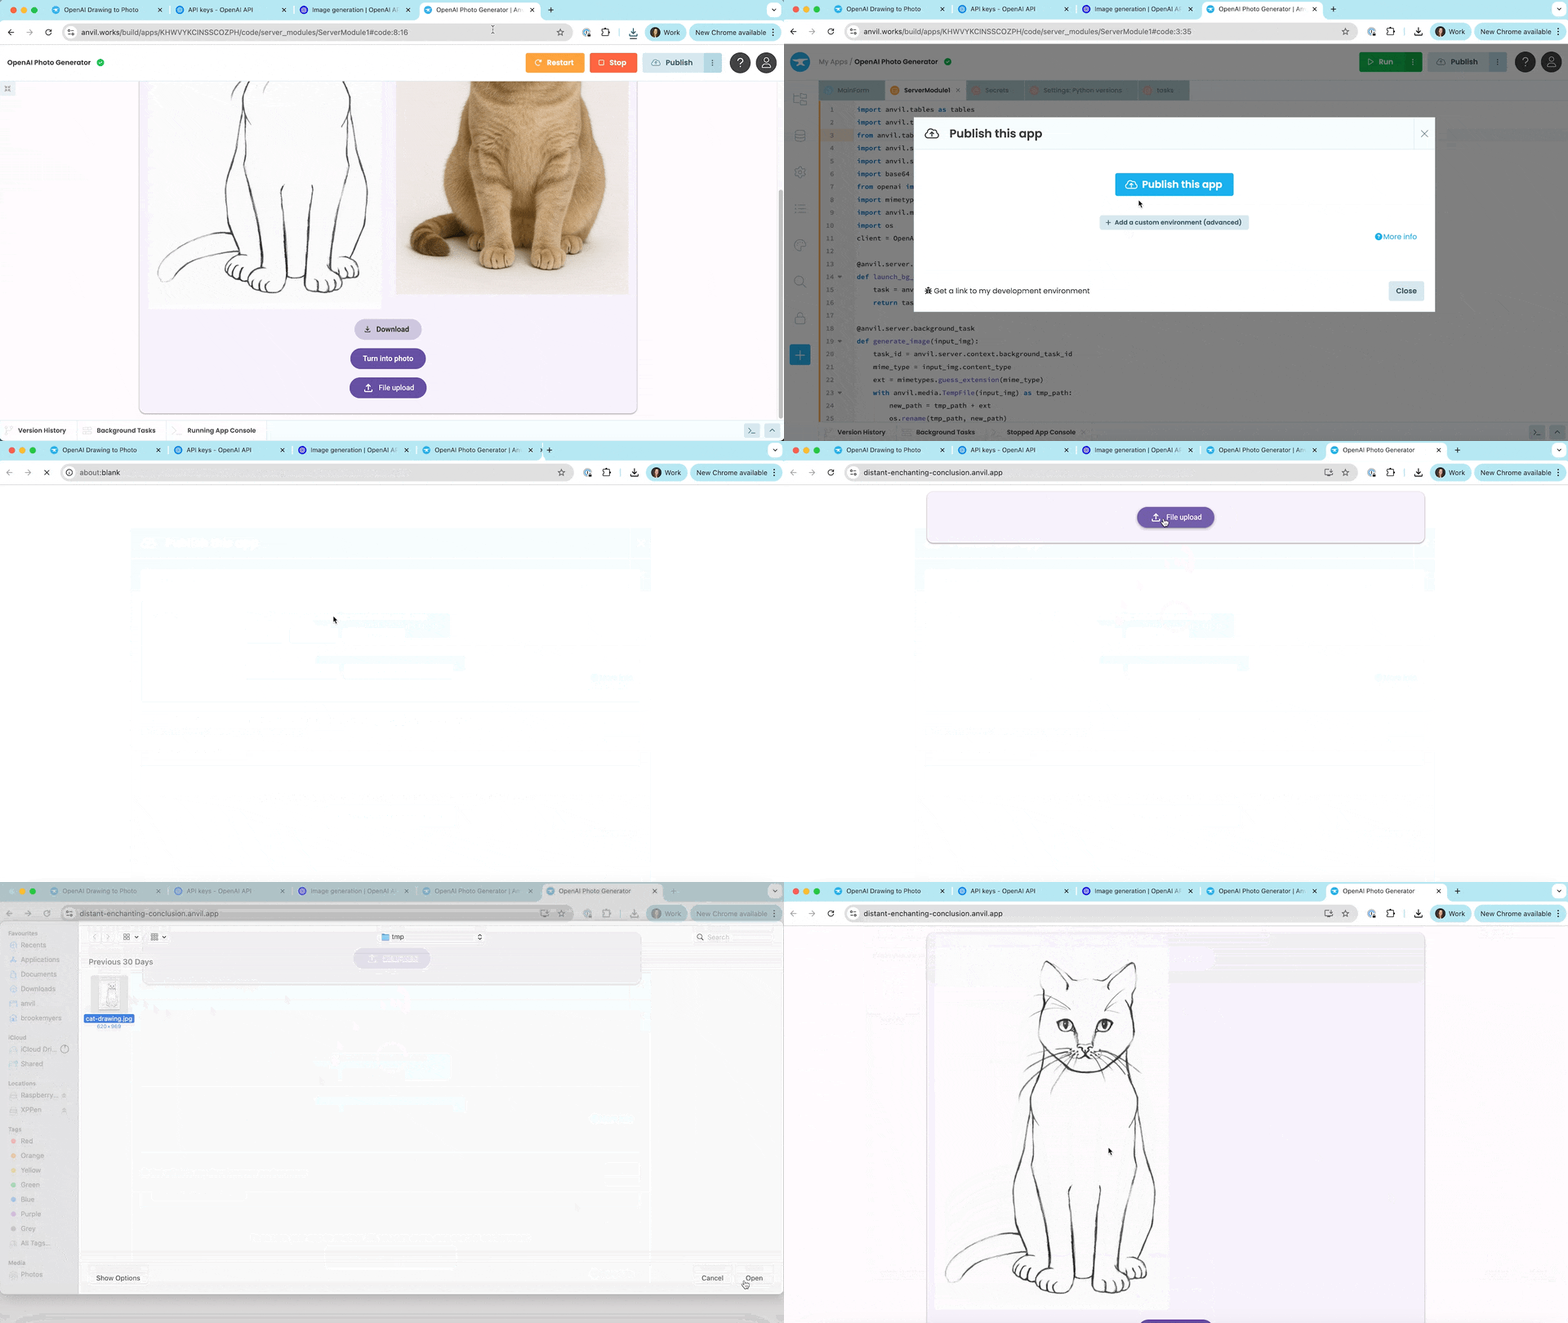
What we built
We built a complete web app that:
- Let’s you upload an image
- Connects to OpenAI’s Images API
- Uses a background task to call the API and generate an image
- Stores generated images in a Data Table
- Displays the generated image on the UI
- Allows users to download their results
We did it all in Python and deployed it instantly to the web!
Next steps
There’s a lot you can do to extend this app:
- Error handling: Catch errors from OpenAI and display helpful messages to users
- User accounts: Add login functionality so users can see their previously generated images
- Payments: Use Anvil’s Stripe integration to charge for API usage
- Different models: Let users choose between different OpenAI image models or prompts
New to Anvil?
If you’re new here, welcome! Anvil is a platform for building full-stack web apps with nothing but Python. No need to wrestle with JS, HTML, CSS, Python, SQL and all their frameworks - just build it all in Python.
Yes - Python that runs in the browser. Python that runs on the server. Python that builds your UI. A drag-and-drop UI editor. We even have a built-in Python database, in case you don’t have your own.
Why not have a play with the app builder? It’s free! Click here to get started: