Drag and Drop Trello Clone

Hi there,

here is a slimmed down version of our internal drag and drop engine to enable “trello style” applications.
trello_clone
https://anvil.works/build#clone:5I3EVYP5L7INSP4S=G7MTSAS2623I7ZUBYHDNHNZN

Something like that was also requested in this post, which is in fact the basis for this code.

This custom component is much more flexible and you should be able to build all kinds of drag and drop applications with this component without ever touching css, js or alike.

For some parts of the code @uat Ninja Style is used - thanks for that!

Disclaimer:
We are not actively maintaining this component and it should not be considered production ready code!

Love to see what you guys build with this :ok_hand: :rocket: :rocket:

-Mark

19 Likes

Well this looks amazing! I have a few ideas on where I can use this!!
Thanks @mark.breuss

2 Likes

That’s sick man! Good work!

1 Like

This may be a basic question, but I’m trying to use this in my own app, and I have a few issues:

  1. I have included both apps as a dependency as well as the Native Library script, then copied over the roles, CSS classes, forms (including code) - but when I run the app on my page I don’t get the same result - I see nothing.

In the cloned app, which works, I have tried this code on the Form page:

  def form_show(self, **event_args):
    self.this = self
    self.update_ui()
    print(self)

Which returns this object

<Drag_Grid.Form.Form object>

When I add the print(self) line to my own app, nothing is printed to the UI. If I change that to:

  def form_show(self, **event_args):
    self.this = self
    self.update_ui()
    print('hello')

There’s still nothing printing to the output panel - so it seems that form_show is not firing on the form loading.

I do notice the name of my form_panel is different - in the original app it is shown as:

form:drag_grid

Whereas mine is shown as:

form:BHXTUGQCVWIP6HQA:drag_grid

Is there a guide on best practices to copy code from a cloned app to my app, as I’m almost certainly doing this wrong. If not, can anyone spot my error and point me on a path to fixing it, please?

Here’s a link to my version, in case it helps: JTBD app

  • the form page is set to “Cluster_Pushes” with only a Header and Item form included (no need for the footer)
  • I’ve commented out the setup for itemlist and headerlist whilst I wait for someone to help me here, so I can try my hand at pulling the data I want from the server to display in the app

Verrrrrrrrrrry cool!

1 Like

Hi @neil,

actually there should be only 3 simple steps needed to use this custom component.

  1. Clone the app above.
  2. Go to your Application where you would like to use it.
  3. Add your local clone as a Dependency
  4. you should see a “drag-grid” custom component in your Toolbox
  5. use the drag grid component

Generally speaking, I personally think that the third party dependencys are the future of sharing packages an components in anvil - but thats another story.

Mark

1 Like

Thanks, Mark - I have that drag_grid, but thought I’d need to copy the initialisation code you have in order to populate the items onto the client page? Given there was nothing showing, I thought I’d copy your other code over, but had no luck.

If I drop a drag_grid onto a blank page following the steps you’ve outlined, how to I set the number of columns and the items, if I’m not re-using the other client-side code from your example app?

Sorry if this is a dumb question, I guess the challenge of re-using apps like this is that I probably lack the python skills to understand your working and use them properly.

Yes exactly - step 5 above means you use the methods, and attributes of the custom component to make it behave like you want it to.

An example for that ist shown in this form in the clone link:

Specificially you can set the headers and footers like this (always pass over anvil compents, column panels, Links, Labels etc.

    self.drag_grid.footer_components = list<component>
    self.drag_grid.header_components = list<component>
    self.drag_grid.items = list<list<component>>

Thanks - so in my instance it seems the:

def form_show(self, **event_args):
    self.this = self
    self.update_ui()

code is not firing - have you any idea what I might have done incorrectly to cause that? I copied that across completely, trying to see whether I could emulate your app before tweaking it, but I’ve broken something in the process.

I understand - to copy the code entirely and not use it as a dependency is possible, but can be a bit tricky at time.

Have you set the event handler?

Also “self.this = self” looks a bit odd - might want to check on that :sweat_smile:
“self” refers to the form itself.

2 Likes

Thanks - I had to look carefully to find that event handler, and no, I hadn’t set it! D’oh!

the self.this=self line was copied over from the example app, I don’t think I changed it.

I’ve got everything working now, EXCEPT for the appearance of the items themselves. I can’t seem to find the code that’s not working in my app vs your example.

If I type:

    #3. set grid data
    self.drag_grid.items = self.itemlist
    print(self.itemlist)

The output shows:

[[{'name': 'one', 'description': 'this is the first card'}, {'name': 'two'}], [{'name': 'three'}, {'name': 'four', 'description': 'this is the fourth card\nthis is the fourth card\nthis is the fourth card'}, {'name': 'five', 'description': 'this is the fifth card'}], [], [{'name': 'six', 'description': 'this is the sixth card'}], []]

But the view looks like this:

Can you suggest which part of the code I may have broken, or where to look to fix this, please?

For anyone struggling with the same issue - there’s a height component to set for the drag_grid column, and the default was 100, whereas the example app has a height of 800
image

I’m unsure if this places a limitation on the number of cards that can be stacked in one column, as it appears they won’t show unless there is enough space to land a card in.

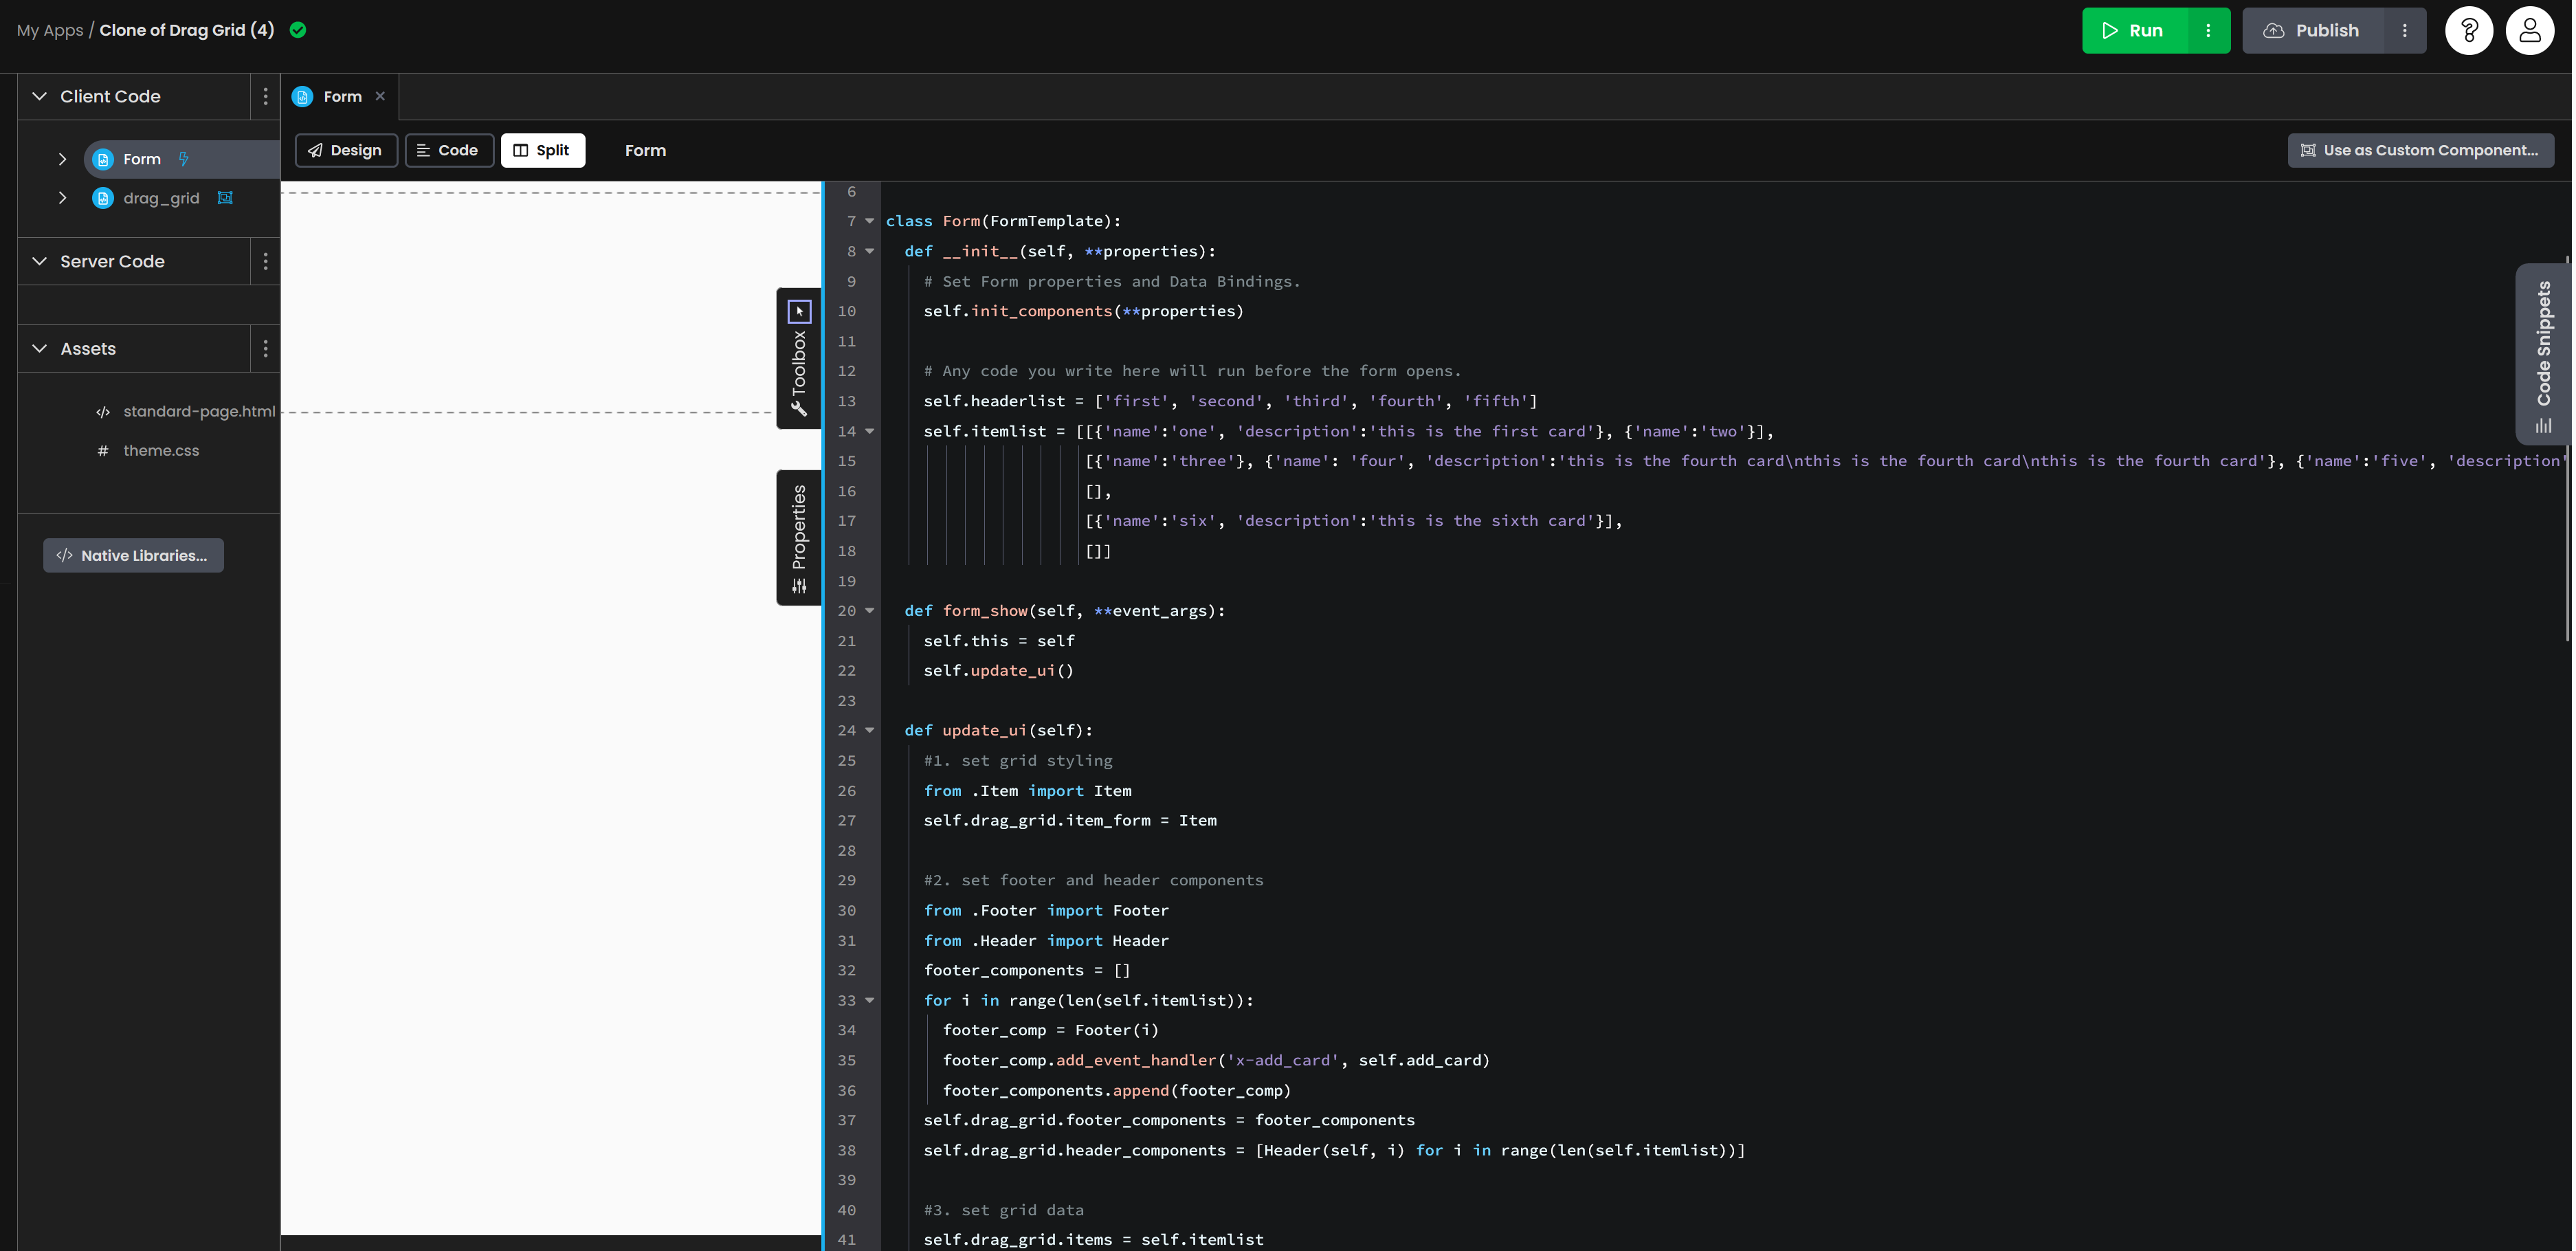
Hey @mark.breuss - I’ve managed to get this working now with items pulled from my server:

  • Headerlist is a list of rows in a table
  • Itemlist is a list of key, value pairs that are linked to each row

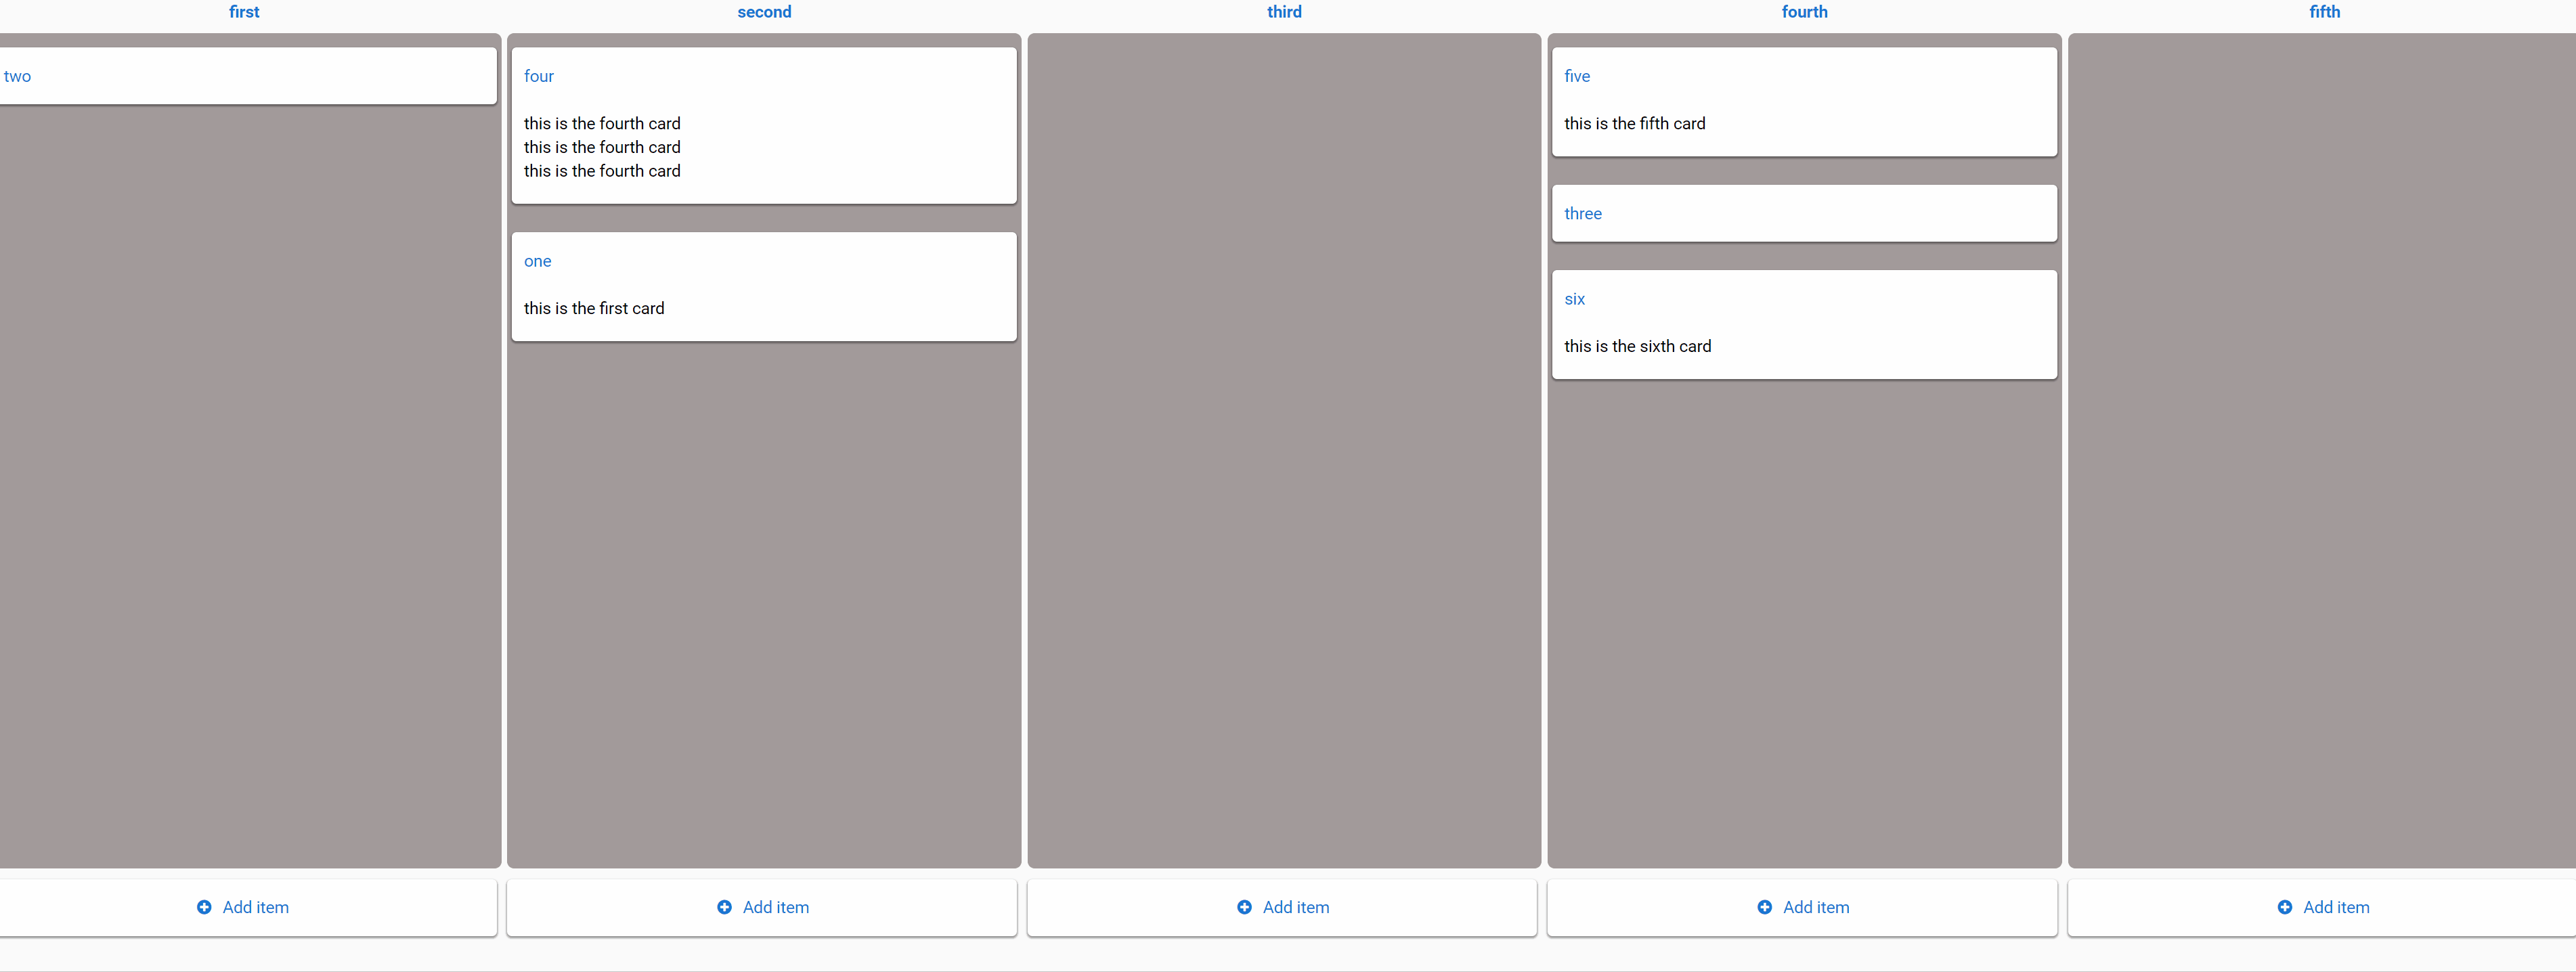
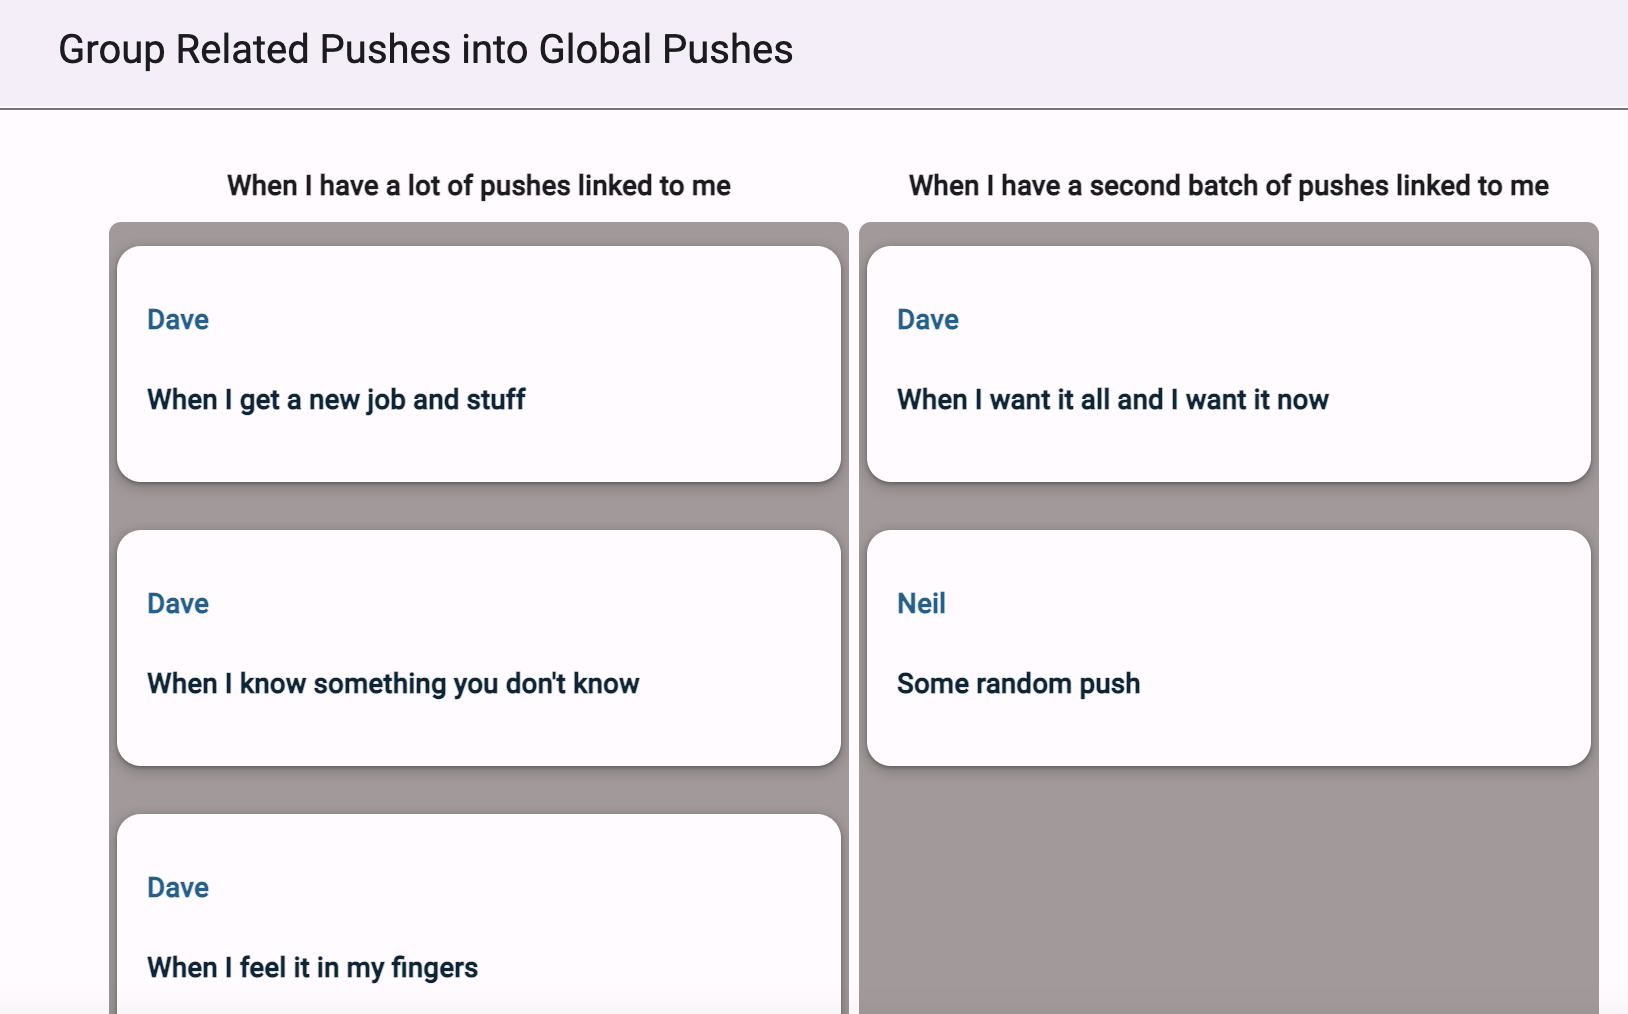
As a result, the grid now displays like this:

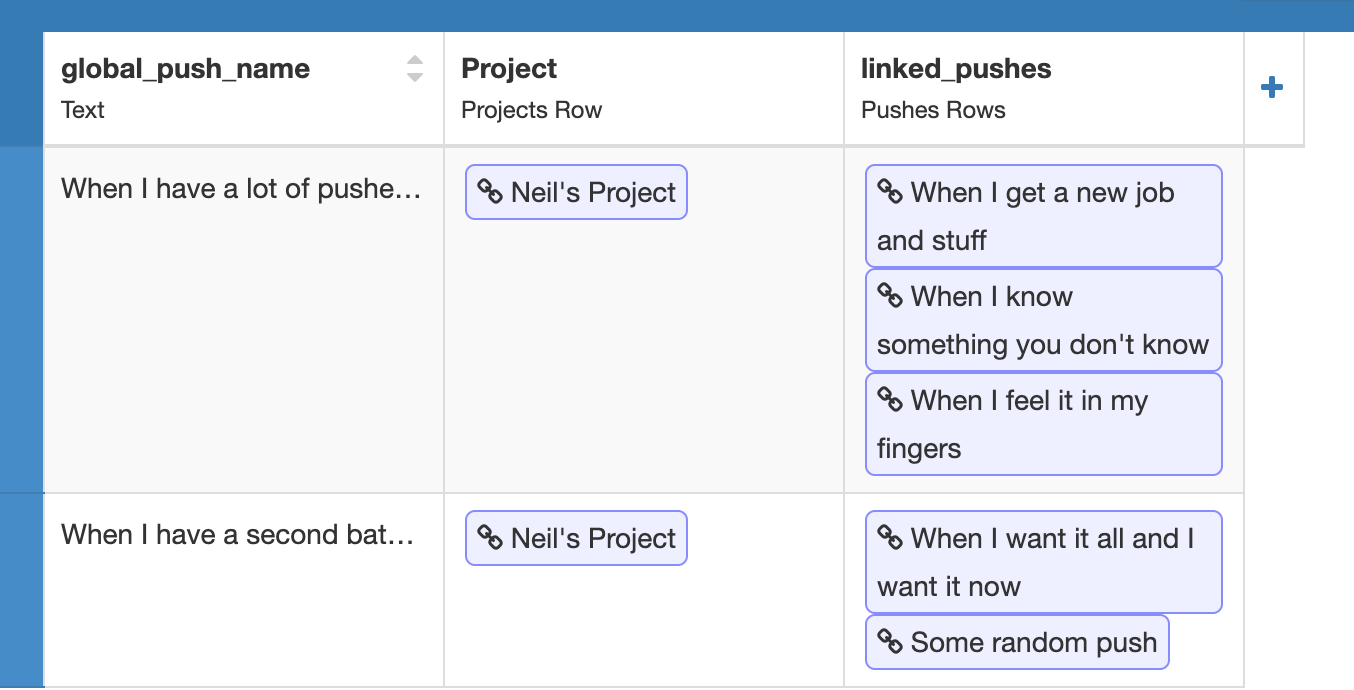
Representing the contents of the Global_Pushes table, which looks like this:

What I’m now trying to do is update the server table when the item is moved from one column to another. I can see the code:

  def get_item_from_muuri(self,muuri_element):
    item_id = muuri_element.getElement().getAttribute('item_id')
    if not item_id in self.item_id_items:
      print('item uid is not in items',item_id,self.item_id_items)
    return self.item_id_items.get(item_id)

Pulls out the details of the item that has been moved, and I’m trying to get the details of the column that the item landed in (so I can find the item in the table and update which row it’s linked to).

I updated the create_col function and I think it’s adding a UID to the column, too:

 def create_col(self,grid_column,items):
    #create new muuri grid column 
    from anvil.js.window import Muuri
    '''trying to add a column id '''
    col_id = self.get_uid()
    js.get_dom_node(grid_column).setAttribute("col_id", col_id)

However, I can’t seem to find a way to find the col_id using Muuri:

def drag_resease_end(self,muuri_element):
    item = self.get_item_from_muuri(muuri_element)
    '''Add a column finding code line'''
    col = self.get_column_from_muuri(muuri_element)
    self.raise_event('items_changed',item=item)

def get_column_from_muuri(self, muuri_element):
    '''get the col_id, too'''
    muuri_col = self.grid_panel
    col_id = muuri_element.getElement().getAttribute('col_id')

With the last function returning “None”.

How can I identify the column that the item was dropped into, so I can pass that back to the server?

Here’s where I’ve been playing with this code:
https://anvil.works/build#clone:QCTVZS4RTZNZ7XVU=P7OVF4MUPHHWDGI3KSKOYYQZ

You can always use:
self.drag_grid.get_items()
to get all colums with their items. That way you should be able to update your data tables.

1 Like

Thanks Mark - that was the second route I’m exploring. I don’t really want to update all the items after only one of them moves, as that feels inefficient, though. Is there an efficient way of filtering the new list from the old list so I’m only sending the change event?

Scratch that, I’ve worked this out:

 def drag_grid_items_changed(self, item, **event_args):
    """This method is called Order of the items changed"""
    old_itemlist = self.itemlist
    new_itemlist = self.drag_grid.get_items()
    old_pos = [(i, pos.index(item))
    for i, pos in enumerate(old_itemlist)
    if item in pos]
    new_pos = [(i, pos.index(item))
    for i, pos in enumerate(new_itemlist)
    if item in pos]
    #we only give a shit if the column has changed, not the row
    if new_pos[0][0] != old_pos[0][0]:
      #update the itemlist to reflect the change
      self.itemlist = new_itemlist
      #find the header from the headerlist that matches the position in the itemlist
      header = self.headerlist[new_pos[0][0]]
      print(header)
      anvil.server.call(
      'update_global_push_list',
      header,
      item,
    )

My only challenge is that the items I’m passing back have relatively generic names, so I’ll have to update all my server functions to send over row ids as well as the row text/description to ensure I can find the right unique row on the return update function.

Hi @neil,

looks like a good solution once you added row_ids to the mix.
I understand of course that such a mechanism would be nice if it was build in to the component.

If I’ll get to it or someone is willing to fund further development I’ll definetly look into developing this further.

Hi Mark,
excellent work, thanks alot. Will use it for our Kanban.
Cheers
Aaron

Hi @mark.breuss - if I wanted to play with the layout of the grid, where’s the best place for me to learn how to configure the column positions?

In my case I’d like to have Column 1 permanently visible on the left, and I seed the database with 9 other columns - but this gets quite wide and seeing the column headers is hard. So I’d like to have Column 1 occupy ~30% of the view width, then use the 70% of the view on the right to have rows of columns (like a repeating panel) perhaps 2 columns wide.

I took a look at the Muuri site, but it looks to me that you’ve set the view using Python on the client side:

 def build_grid(self):
    """Rebuilds the complete grid after setting the items property"""
    #Destroy old grid
    self.item_id_items = {}
    for g in self.grids:
      g.destroy(True);
    self.grids = []

    self.grid_panel.clear()

    #create grid
    for col_idx,list_of_items in enumerate(self._items):
      x_value = (self.column_width+self.column_spacing)*col_idx
      width_value = self.column_width
      y_value = 0
      #Header
      if self.header_components:
        self.grid_panel.add_component(self.header_components[col_idx],width=width_value,x=x_value,y=y_value)
        y_value = self.header_height
      
      #Column Body & Footer   
      grid_column = column(self) #form component
      grid_column.background = self.column_background_color
      h = str(self.height-95) + 'px'
      ninja_style.style(grid_column, {'min-height': h, 'max-height': h})
      self.grid_panel.add_component(grid_column,width=width_value,x=x_value,y=y_value)
      muuri_col = self.create_col(grid_column,list_of_items)
      self.grids.append(muuri_col)
      
      footer_comp = None
      if self.footer_components:
        footer_comp = self.footer_components[col_idx]
        footer_comp.role = 'drag-grid-footer'
        self.grid_panel.add_component(footer_comp, width=width_value,x=x_value,y=self.height - 50)
      

Is there anywhere I can read up on how you’ve done this, so I can tweak the look and feel of my grid?

Generally Speaking this is only a wrapper for the Muuri JS Library:https://muuri.dev/
So checking their documentation and the wrapper source code of the package is the best way.

In your case, you should be able to do that by tweaking the existing code.

I would start by trying to modify the width_value of the build_grid method.

1 Like

Thanks @mark.breuss - I can get the column width quite easily, and land the first column on the left. For the right hand side I’m trying to get the columns to stack on top of one another with gaps between them, but they all seem to land in the same place, even when I adjust their y_value.

#create grid
    for col_idx,list_of_items in enumerate(self._items):
      if col_idx == 0:
         x_value = 0
         width_value = 200
         y_value = 0
      else:
        x_value = 200 + self.column_spacing
        width_value = 600
        y_value = (0 + self.height)*col_idx
      #x_value = (self.column_width+self.column_spacing)*col_idx
      #print(x_value)
      #width_value = self.column_width
      #y_value = 0
      #Header
      if self.header_components:
        self.grid_panel.add_component(self.header_components[col_idx],width=width_value,x=x_value,y=y_value)
        y_value = (self.header_height + 200 )*col_idx

Do you know if there’s a way to:

  • Force the columns to sit underneath one another
  • Ensure even empty columns have height
  • create a gap between the “rows” of columns, and;
  • allow the height to auto-adjust depending on how many items have been dropped into the column?

FYI this is what the outcome looks like from the code above:

I presume I’m moving the y_value down (hence column 2 starts at 240px) but the column height is overlapping to the next column that’s supposed to start at 480px

–edit—
I seem to have managed to get these items to start behaving:

    #create grid
    for col_idx,list_of_items in enumerate(self._items):
      if col_idx == 0:
         x_value = 0
         width_value = 300
         y_value = 0
         if self.header_components:
          self.grid_panel.add_component(self.header_components[col_idx],width=width_value,x=x_value,y=y_value)
          y_value = self.header_height
      elif col_idx == 1:
        x_value = 300 + self.column_spacing
        width_value = 1000
        y_value = 0
        self.height = 250
        if self.header_components:
          self.grid_panel.add_component(self.header_components[col_idx],width=width_value,x=x_value,y=y_value)
          y_value = self.header_height
      else:
        x_value = 300 + self.column_spacing
        width_value = 1000
        self.height = 250
        y_value = (self.header_height + self.height)*(col_idx - 1)
        if self.header_components:
          self.grid_panel.add_component(self.header_components[col_idx],width=width_value,x=x_value,y=y_value)
          y_value = (self.header_height + self.height)*(col_idx - 1)
          print(y_value)

Although for some reason the Header disappears when I use the line:

y_value = (self.header_height + self.height)*(col_idx - 1)

To try and land the header itself in the white space between the column rows for putting the items

I also needed to tweak the Form settings to give us more space (it would be great if this would auto-resize depending on the content):
image

1 Like