Alternate row colors & add timestamp on check event

Hi, I have 2 very simple questions.
I have followed the To Do’s tutorial here: https://anvil.works/learn/workshops/todo-list
all working ok, however I would like to do the following:

  • I want the rows to be separated by a line, or have alternated colors, so users can differentiate them. Is any way to do it?
  • I have been trying to save a “Done date” every time I check the box, so I know when the task was finished…but there is no way I can make it work, can you help?
    Thanks!

Hello,

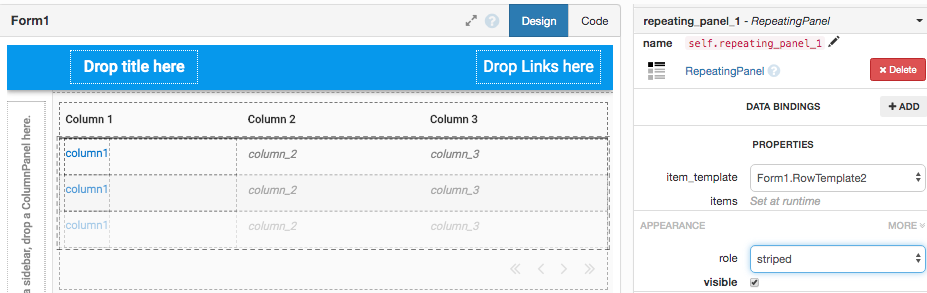
One approach I use to alternate the color of rows in a repeating panel is as follows:

# in init
self.color_rows(self.repeating_panel_1)

def color_rows(self, rep):
  for i, r in enumerate(rep.get_components()):
    if not i%2:
      r.background='theme:Gray 200'

This function goes in the form which holds your repeating panel. See the discussion here for more
details.

Please see the documentation on events here. You will want to use the datetime module to send a timestamp to your DataTables whenever the check event is triggered.

In the to-do tutorial you referenced, the author sets up a button click event that sends data to the DataTable. This is very similar to what you are attempting in terms of handling the event.

The timestamp can be returned as follows from the datetime module:

import datetime

datetime.datetime.now() # returns current date and time

Let us know how this goes and please share a code example if anything is unclear with these suggestions.

1 Like

for the odd rows - one approach you could take would be to add this to your theme.css

.anvil-data-row-panel:nth-child(even) {
    background:  %color:Gray 200%;;
}

this would make all even rows gray for all anvil-row-panels


more advanced…
If you only wanted anvil-row-panels for some data grids gray - you could create an anvil role for the repeating panel called striped

https://anvil.works/docs/client/themes-and-styling#roles

.anvil-role-striped .anvil-data-row-panel:nth-child(even) {
    background:  %color:Gray 200%;;
}

6 Likes

Hi, thanks for the quick answer!

I did:

# in init
self.color_rows(self.repeating_panel_1)

def color_rows(self, rep):
  for i, r in enumerate(rep.get_components()):
    if not i%2:
      r.background='theme:Gray 200'

and worked ok, however I needed to add a spacer to have some padding around the row.

I have read the documentation you link…will do some more experiments today.
Thanks!

Glad to hear it!

Also, if you want code to look nice on the forum, you can wrap it in backticks.

For example,

```python

print('this will be syntax highlighted')

```

have you tried adding spacing above and below to the row panels?

Yes, I did, the problem was right and left lack of spacing.

It depends - do you want padding around the whole table or just the rows

here’s a css option:

if it’s just the rows you could do the following in theme.css:

.anvil-data-row-panel .data-row-col:first-child {
padding-left: 20px;
}
.anvil-data-row-panel .data-row-col:last-child {
padding-right: 20px;
}

if it’s the whole table you could do

.anvil-data-grid {
padding: 0 20px;
}

Someone will hopefully chime in with a non-css option - I can’t think of a nice one right now…

1 Like

How can I do this for a repeating panel? I don’t understand css but following your example, i tried

.anvil-panel-col:nth-child(even) {
background: %color:Gray 200%;;
}

works

but

.anvil-panel-row:nth-child(even) {
background: %color:Gray 200%;;
}

does not work

hi @ananth.krishnamoorth,

good news, you don’t need to customize Anvil’s theme.css to achieve this if it’s something you’re not comfortable with.

You might want to do this in python and adjust @jose.manuel.ilinchet suggestion above:

Perhaps you could include an index for each item in the repeating_panel items
e.g. the items might look like

[{'name': 'John',  'i': 0},
 {'name': 'Sally', 'i': 1}, 
 {'name': 'Ben',   'i': 2}]

And your ItemTemplate might have a databinding for background or something in the init method like:

class ItemTemplate1(ItemTemplate1Template):
    def __init__(self, **properties):
        self.init_components(**properties)
        if self.item['i'] % 2:
            self.background = 'theme:Gray 200'

the databinding could be similar: 'theme:Gray 200' if self.item['i'] % 2 else ''
Screen Shot 2020-12-09 at 22.05.41


If you do want to play with CSS, something like this should work for repeating panels:
.repeating-panel > div > div:nth-child(even) {
  background: %color:Gray 200%;
}

Be sure to check out the anvil docs if you want to learn more about including css
https://anvil.works/docs/client/themes-and-styling

2 Likes

I’m using the CSS version of this to create a role (see below).

.anvil-role-striped > .anvil-data-row-panel:nth-child(even) {
    background:  %color:Gray 200%;
}

.anvil-role-striped > .repeating-panel > div > div:nth-child(even) {
  background: %color:Gray 200%;
}

Everything works great in the designer, but when I run the app, no alternating colors? What am I missing?

does using this version help?

.anvil-role-striped .repeating-panel > div > div:nth-child(even) {
  background: %color:Gray 200%;
}
1 Like

That doesn’t seem to work either?

Can you share a clone (just enough to show what you’re trying to achieve)? It’s easier to dig around the css and send it back that way.

Here is a sample app I put together showing my issue. Thanks for your help!

https://anvil.works/build#clone:PY7ZNBU6D6K3K3MP=OTNPAKKETLNEWMS3WL5BOTJB

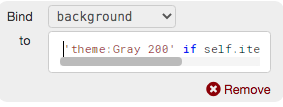
I was anticipating you put the role on the datagrid.
With the role on the repeating panel then the following should work
(it won’t work in the designer but it will in the live app)

.anvil-role-striped > div > div:nth-child(even) {
  background: %color:Gray 200%;
}
2 Likes

That did do the trick! Thanks for the help Stu

For more information on how to add a role for striped Repeating Panels. I figured out how to make this work in both the designer and while running. First, I made a role just for Data Grids and another just for Repeating Panels. Second, I added some JavaScript to the HTML to add one of two classes to the body depending on whether it was in designer mode or not.

Here is the HTML:

<script>
  if (document.querySelector('.designer')) {
      document.querySelector('body').classList.add('in-designer');
  } else {
      document.querySelector('body').classList.add('not-in-designer');
  }
</script>

Here is the CSS:

/* ##### STRIPPED REPEATING PANEL ##### */
.anvil-role-striped-dg .anvil-data-row-panel:nth-child(even) {
  background: var(--primary-overlay-3);
}

body.in-designer .anvil-role-striped-rp > div:nth-child(even) {
  background: var(--primary-overlay-3);
}

body.not-in-designer .anvil-role-striped-rp > div > div:nth-child(even) {
  background: var(--primary-overlay-3);
}

Note: don’t forget to create the respective Roles.

Also, this technique could be used to apply separate CSS for anything you like.

1 Like