Thanks to everyone who’s helped me get up and running recently, especially @stucork @hjp @aldo.ercolani @bridget @meredydd . I’ve taken the trouble to write up my recent learnings as a Tutorial, taking as little for granted as possible, hence quite a verbose post I’m afraid. If you have any improvements, corrections, or comments to offer I think you can now contribute directly thanks to @stucork who turned this into a Wiki post!
OVERVIEW
This Tutorial assumes little or no prior knowledge of version control or environment management concepts, Git/Github, command line incantations or SSH. It’s divided into different ‘levels’ which build on each other and hopefully don’t pre-suppose any knowledge or defer to other tutorials apart from Level 1 which relates entirely to the Anvil workspace (or “IDE” - Integrated Development Environment) and is essential pre-reading.
What level you reach after that is totally up to you, and depends on how much control and sophistication you think you’ll need to achieve your goals as an Anvil developer.
Levels 1-5 deal with organic Anvil features and functions. If you want to jump to version control
using Git then please scroll straight to Level 6. If you’re comfortable with Git but not SSH then Level 7 is for you. Levels 9-10 deal with sharing multiple versions with multiple developers (through Github) while keeping in sync with the Anvil IDE.
LEVEL 1: Anvil's Organic Version Control
Basic incremental version control is covered very nicely already in the Anvil docs. Start by reading these two pages if you haven’t already:
i) Anvil Docs | Version Control
ii) Anvil Docs | Version Control
Where I first ran into confusion was with the third article about Git (Anvil Docs | Git). It assumed knowledge I didn’t have, and the rest of this Tutorial is basically an attempt to fill that gap now that I’ve been through the learning curve, nudged along by other kind souls on this Forum.
LEVEL 2: The Dev-Test-Prod concept
One of the most simple but helpful concepts for software development imho is the idea of organising your code and associated data into three similar but ring-fenced areas typically called Development (DEV), Testing (TEST), and Production (PROD or ‘master’). There are many different ways of implementing and refining this simple approach and not everyone even uses the same terminology, including Anvil. The underlying model is worth getting straight in your head though, since it often helps to understand what we’re trying to achieve and why before jumping into asking how…
So a Development environment is one where you can safely hack around and play with ideas and dummy data without upsetting anyone, except perhaps yourself (!). When you create your first Anvil app you’re effectively thrown into a Development environment right away. If you’re working with other developers you might want to give them a copy of your Development environment to play with, but you’ll need a way to compare notes later on and merge the best bits of your respective creations, without breaking each other’s work… but that’s Level 6+ later on.
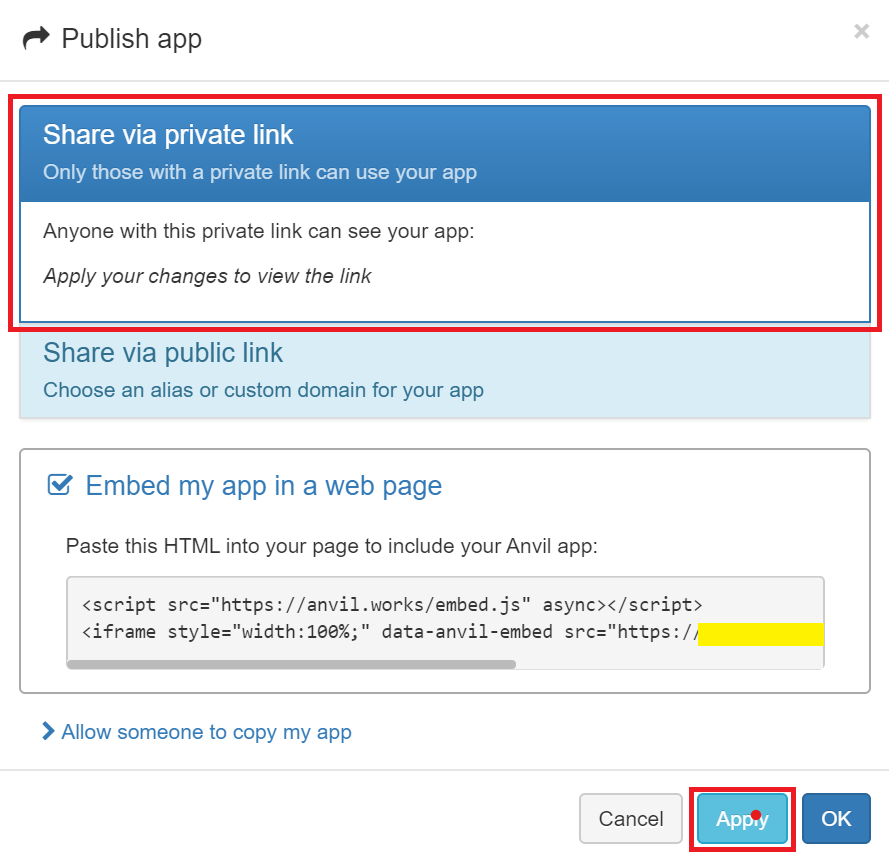
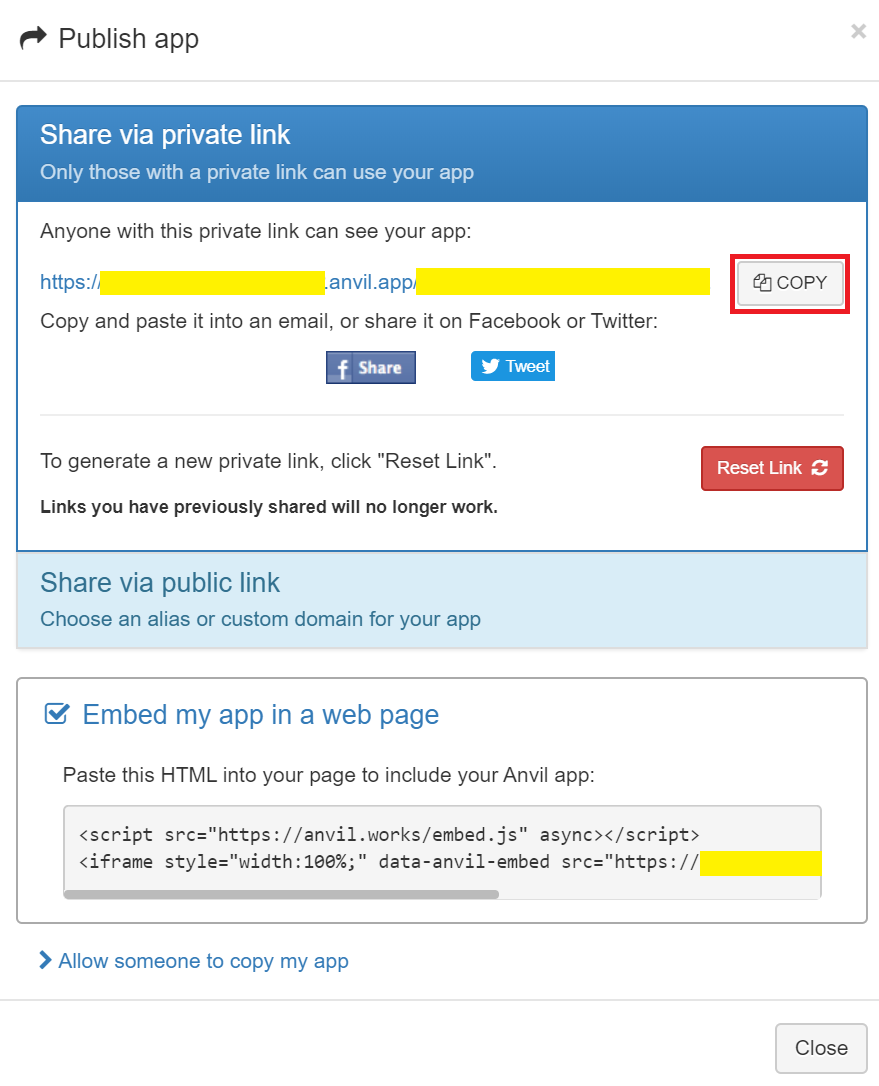
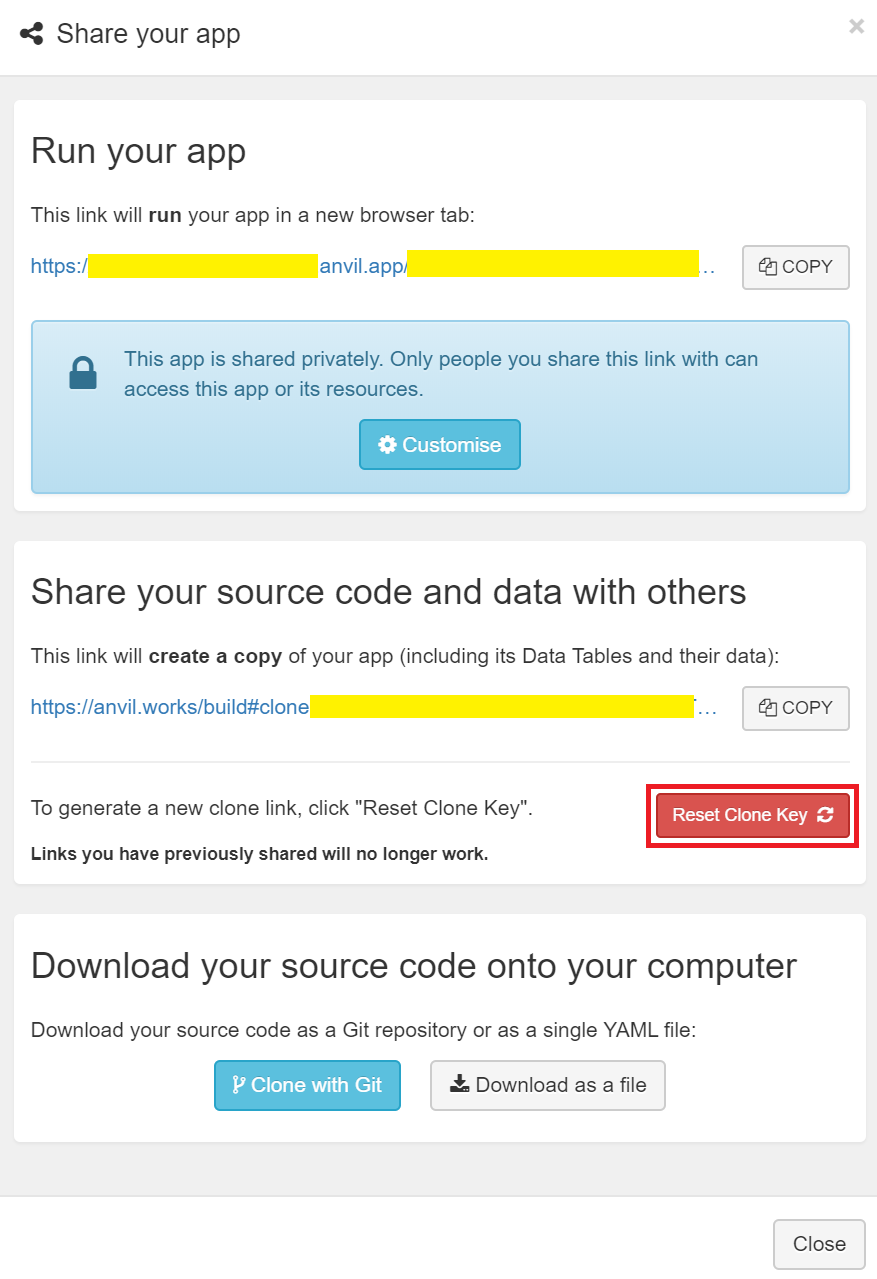
A Test environment is basically a copy of your Development environment, or typically an earlier version of your Development environment, which you’ve chosen to share with a select group of friendly Testers who create their own data, play around, and generally try to break things in the spirit of quality control and continuous improvement (and generally making you feel completely inadequate as a coder!). When you Publish your app in Anvil, presumably only sharing the link with a nice small group at first, you’re effectively creating a new stand-alone Test environment which other people can access while you continue to tinker with code and data changes in your Development environment. Anvil offers several methods for giving people access to your app, but a good option for Testers is sending a private link I’d suggest:
When you Publish an even better version of the code you’ve been working on in Development (sometimes called ‘promoting’ from DEV to TEST), you’ll replace the Test environment with the latest version of Development and this cycle goes round and round until eventually you’ve created a masterpiece that your Testers simply can’t find fault with. At that point you’re ready to go live and share with the general public, or in other words, create a Production environment.
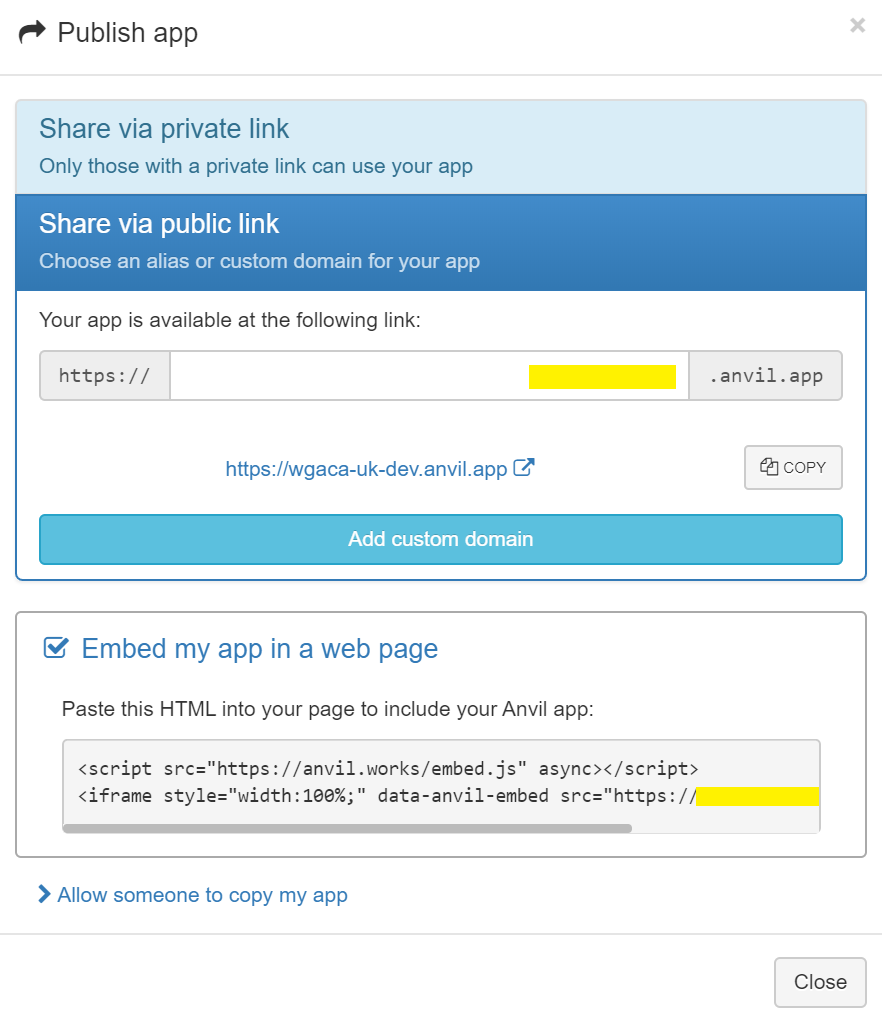
So a Production environment is a fully public and ‘live’ version of your app which you’ve chosen to share with the world. Real users, real passwords, real credit card details, real data, and real legal obligations such as data privacy. Scary but exciting stuff. The usual way of giving general access to your Production environment is simply by sharing the public link. In Anvil you can do this either in the Publish app menu or Share your app menu.
LEVEL 3: Getting a little more organised
When you create a single app in Anvil you have a good number of choices for Publishing , Sharing , Cloning , and Downloading your app as well as going back through your Version History to revert changes or Publish from a particular version previous version. If you have a Business Account you can even invite other people to join your organisation and share your app that way too - although presently I don’t recommend this method because a) Only one person can work on your app at a time; b) there’s no active notification system, so you won’t know someone else has been tinkering unless they tell you separately or you diligently check the Version History before starting your own work; c) even if you know someone has made changes, it’s not obvious where or what those changes are.
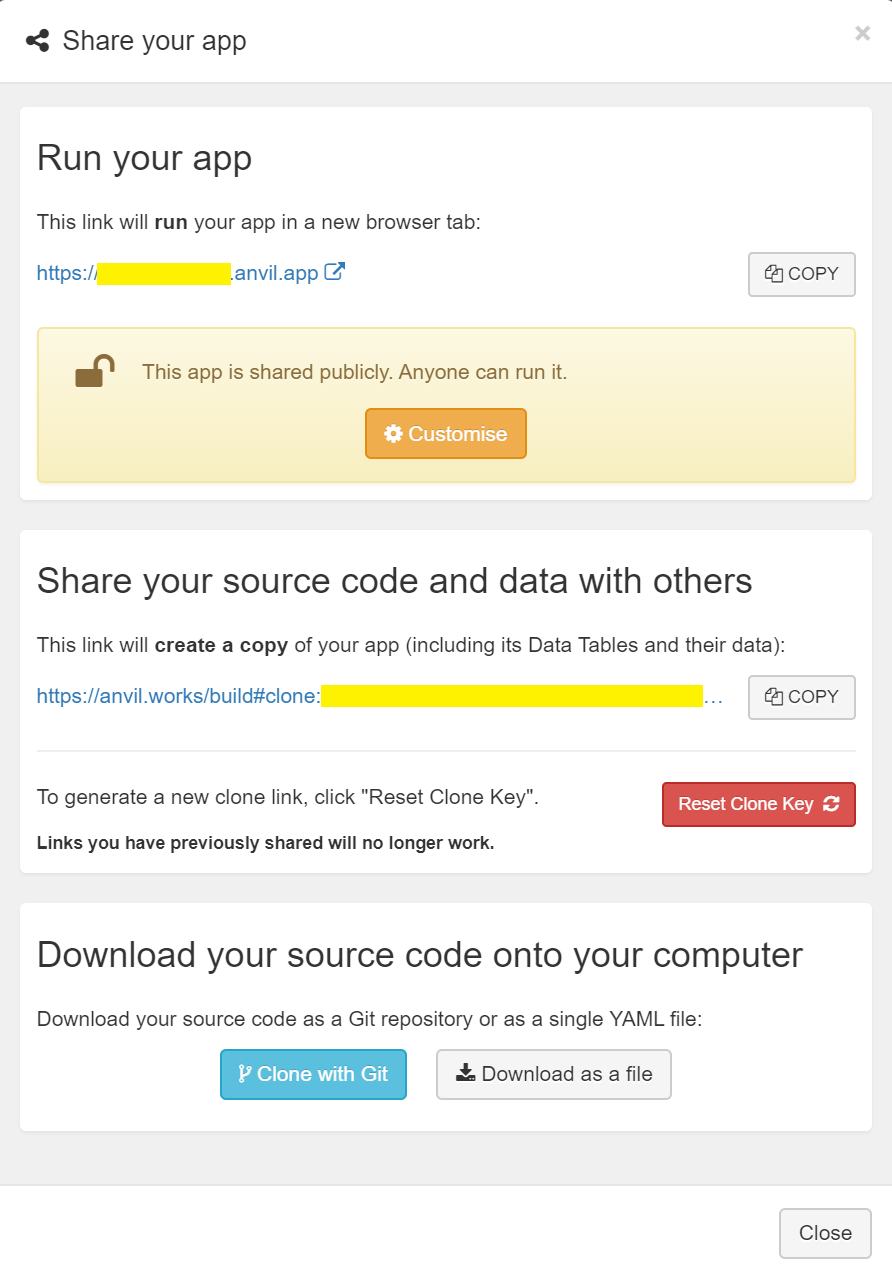
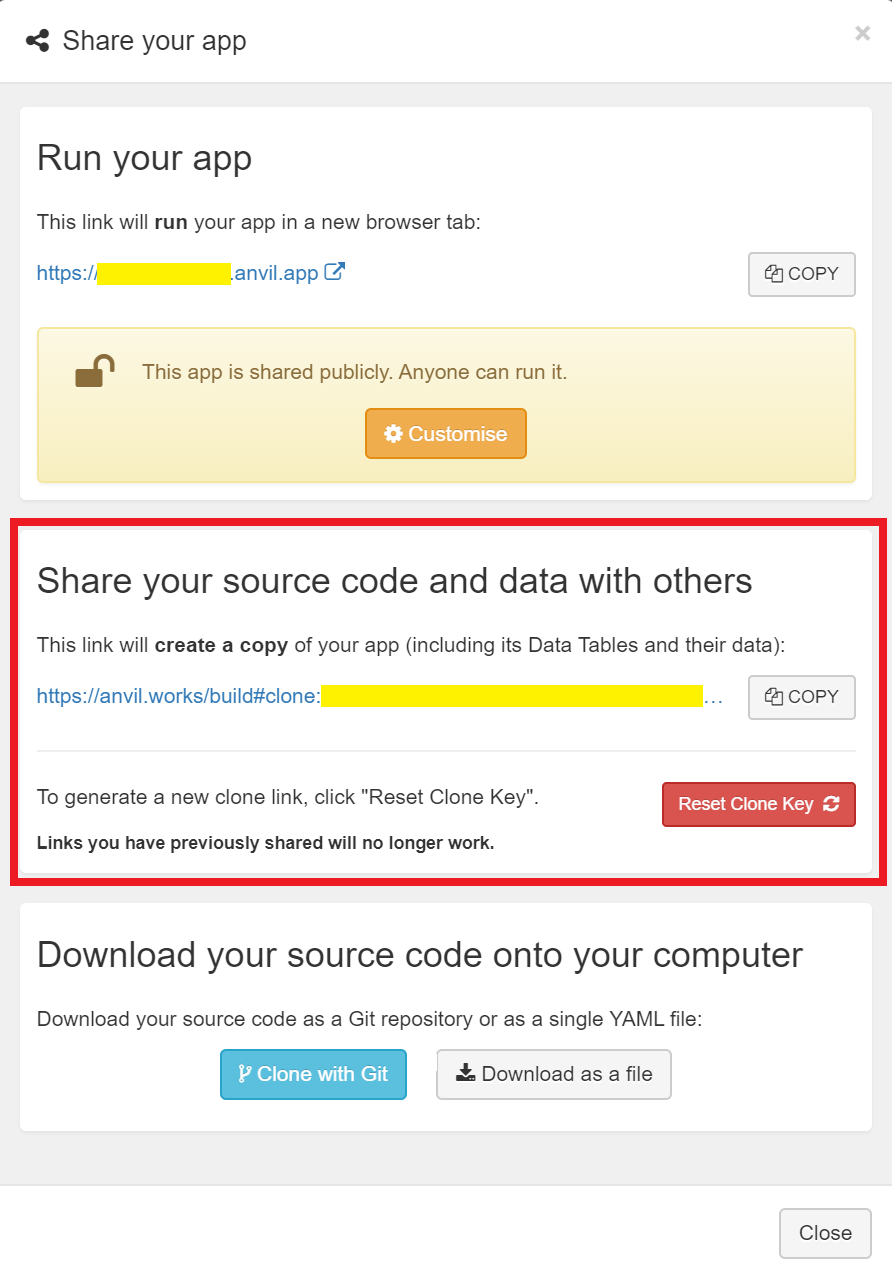
For all these reasons you might like to think about creating three separate versions of your app (e.g. MyApp-DEV , MyApp-TEST , MyApp-PROD ) which you can manage and control access to individually and with more precision. To do so, simply rename your original app to MyApp-PROD or similar, then Share your app...
Copy the link and paste it into a new browser Window to create “Clone of MyApp-PROD” and rename that to “MyApp-DEV”. Repeat for
MyApp-TEST .
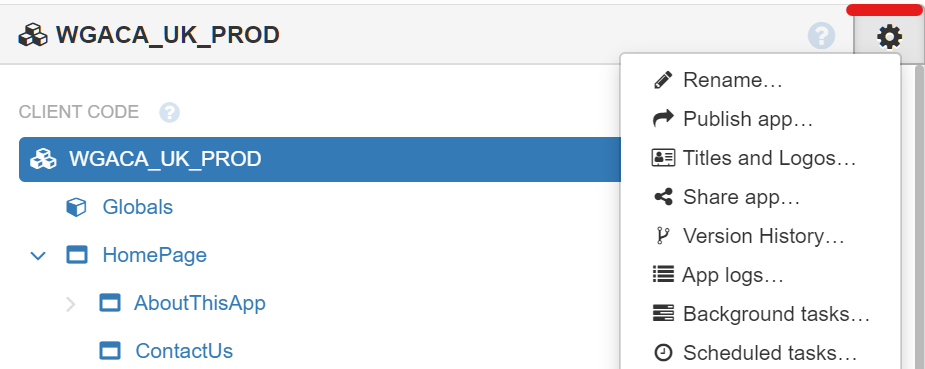
Footnote: I just noticed you have to rename your cloned app TWICE actually:
Once at the very top of the App Browser menu…
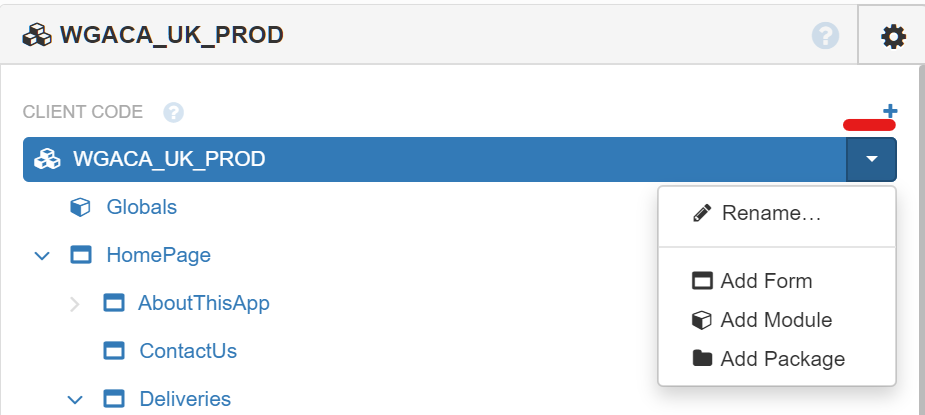
And once under Client Code / Server Code:
LEVEL 4: Do you really need three copies of the app?
Because of Anvil’s nice Publish feature, each copy of your app can effectively be managed as if it were two environments - one ‘master’ branch and one ‘development’ branch.
You could therefore just create just two versions of the app in Anvil to cover the different uses of DEV, TEST and PROD:
App1: MyApp-DEV-TEST
App2: MyApp-PROD
The main question here though is whether you’re happy for the same data to be shared between DEV and TEST. If you’re a one-man or one-woman band and doing most of the testing yourself, and for consistency you want to always be working off the same data, then this slimline approach might be ideal.
N.B. Sharing data between TEST and PROD would be crazy so don’t even think about a combined TEST-PROD environment!
LEVEL 5: Sharing with other developers/testers using Anvil
Regardless of whether you now have 2 or 3 instances of your app in Anvil, if you want to share one of them (code and data), just open the App Menu then Share App... as follows:
Alternatively,
Download as a file from the same menu (above), share that file outside of Anvil, and have your co-developers Import rather than Create a new project. [Ed. I’m not sure if this also copies the data tables… could someone confirm please?]
LEVEL 6: Syncing between your local computer and Anvil using GIT
So if you’ve never heard of Git before (https://git-scm.com/) it’s basically a “free and open source distributed version control system designed to handle everything from small to very large projects with speed and efficiency.” Basically if you want to work on a local copy of your Anvil/Python code and sync any changes automatically with Anvil and (best of all) compare line by line what’s changed between versions, perhaps using a fancy IDE like VS Code or PyCharm (there are numerous alternatives) just follow these steps:
- install Git
- Get yourself an
SSH Key(see Level 7 below…). Despite suggestions it should be possible, I was unable to make Git work with Anvil using user id and password (or Github Desktop - see later), and so using SSH was the only solution for me. As it turns out, SSH is a handy thing to know about anyway. -
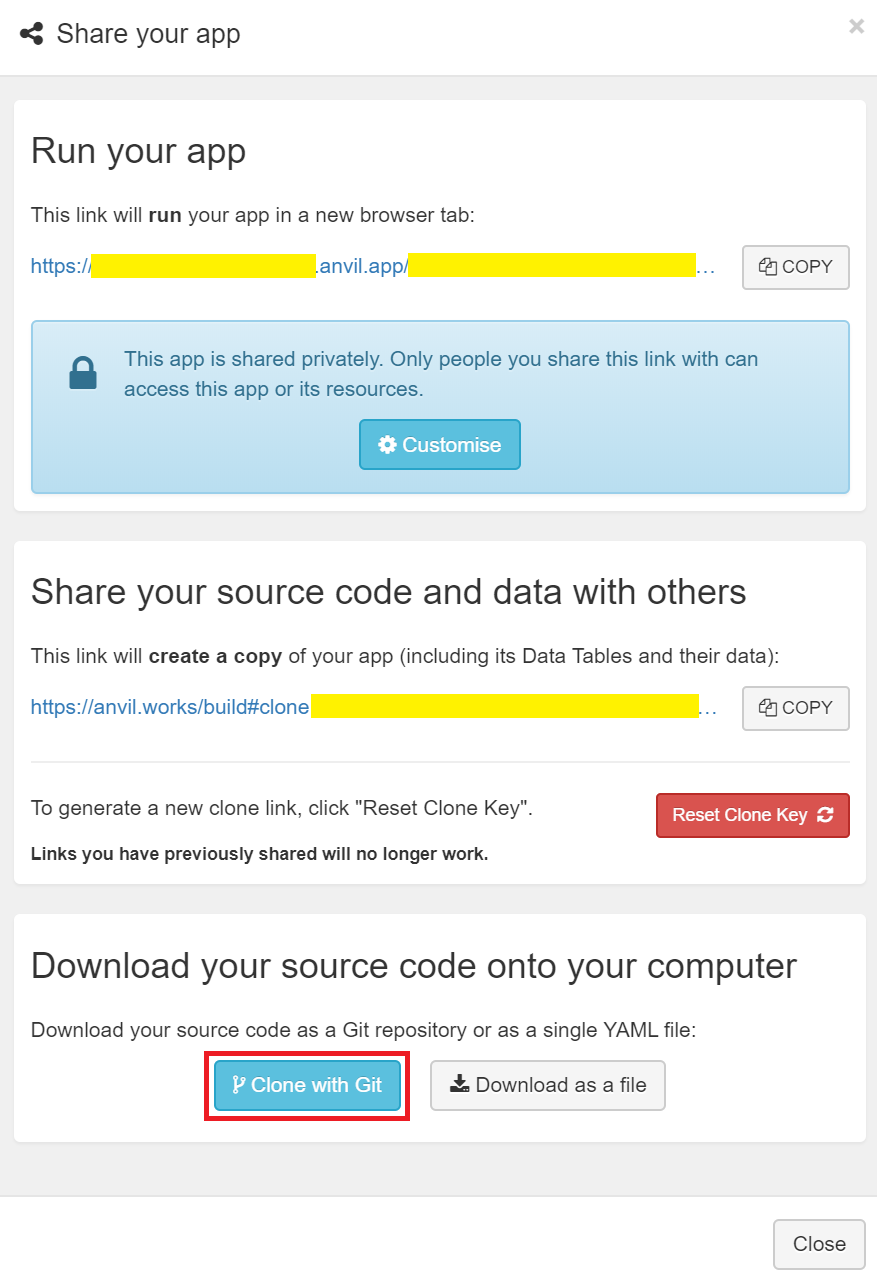
Share your app(now renamed ‘MyApp-DEV’) thenClone with Git
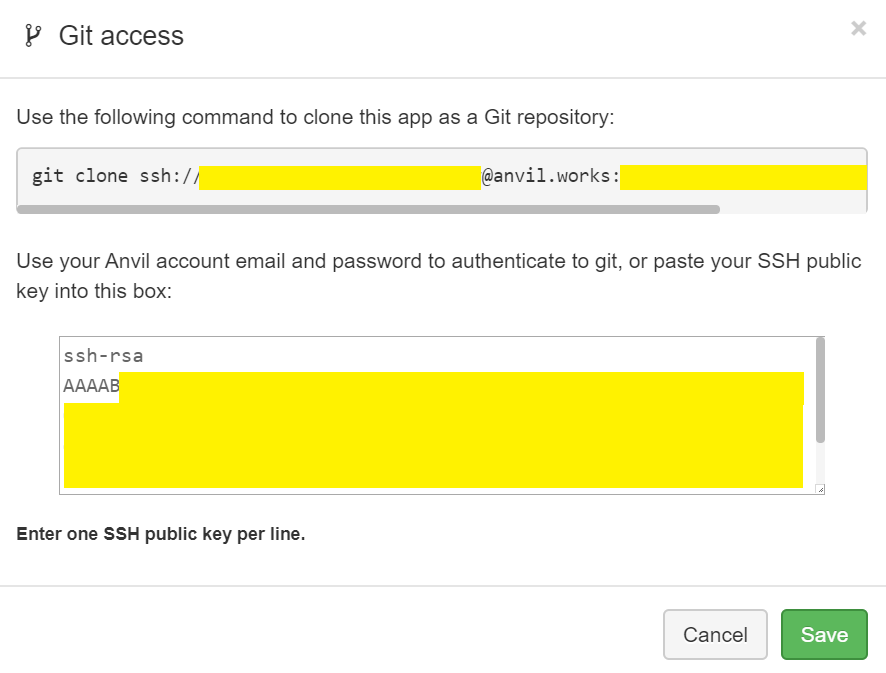
- Paste your (long) SSH Key into the big box, copy the
git clone ssh://incantation from the small box, and clickSave.
- Open up a Command Prompt, navigate to your usual Python projects folder, paste the
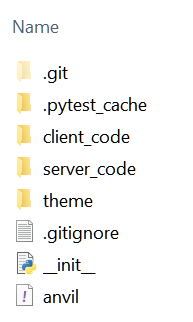
git clone ssh://incantation and follow prompts. You should now see a new folder (the “origin”) with your app name and the following subfolders [Ed… maybe not pytest initially?]:
- Go back to your Command prompt, navigate to the root of your new local ‘origin’ folder and enter:
git remote add Anvil_MyApp-DEV ssh://...git wheressh://...gitis the final part of the command you copied from the small box in Step 4 above (but without the app nameMyApp-DEVat the end, and optionally prefixing your remote name with “Anvil_” to distinguish it from any other remotes - see later).
You should now be set up to automatically see and sync changes you make on Anvil (the ‘remote’) and your newly cloned local folder (the ‘origin’). You can pull changes from Anvil to your local folder, and push changes from your local folder to Anvil, where it will register as a new line in your Version History. Crucially you can also now use Git (and other tools) to view the ‘diffs’… line by line comparisons of the different versions of every file. There are some really nice colour-coded GUIs that show this information graphically… for example VS Code which I’ve already mentioned and Github Desktop (see Level 9 below). Welcome to whole new world of version control!
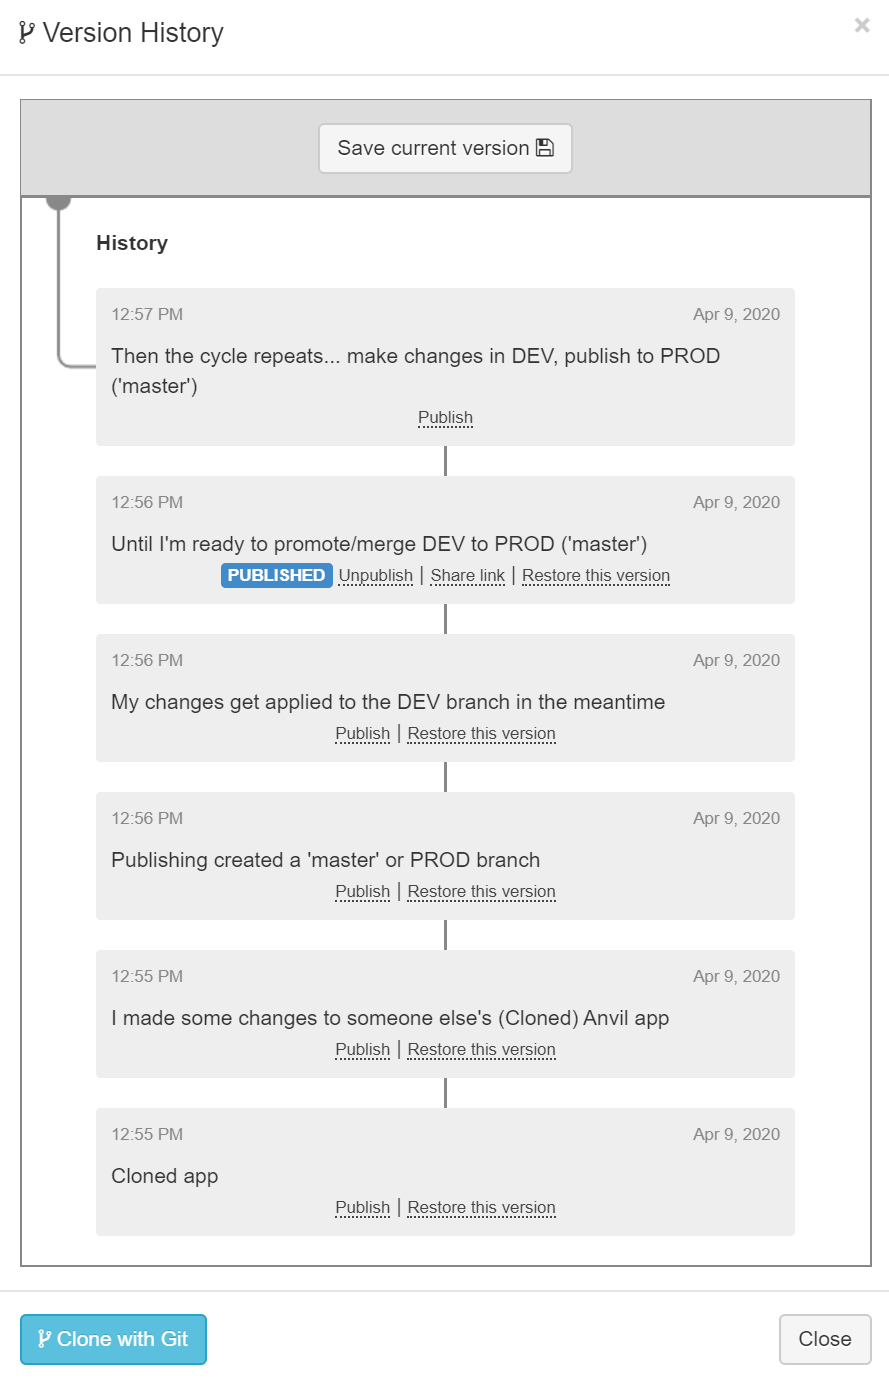
And here’s how Git integration looks in Anvil’s Version History:
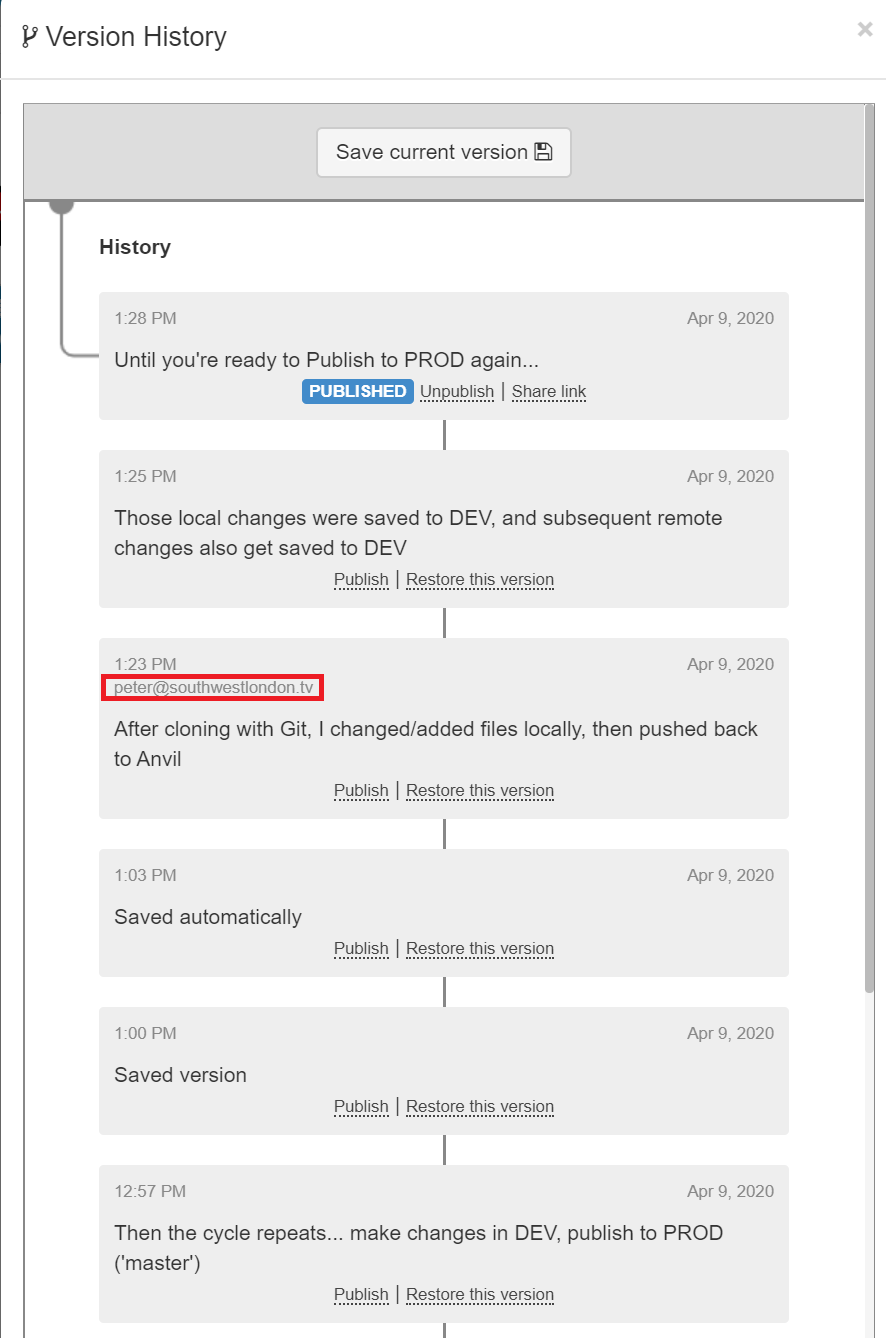
Footnote: Any files you add to the root of your new, local, origin directory won’t show up in the Anvil IDE - they might still be there on the Anvil remote server and accessible with os and pathlib Python commands, just not visible in the Anvil IDE which basically just exposes client_code, server_code, and theme. I only mention this because it’s common practice to put a readme file and license file in the root of the origin - which you can still do, you just won’t see it on Anvil (unless my feature request is actioned  ).
).
LEVEL 7: Secure Shell (SSH)
SSH is a protocol for logging in to servers (or services such as Anvil/Github/Digital Ocean etc.) without using passwords. You create a public and private key which are saved to your HOME (or USER) directory and then you just need to give the public key to the relevant server/service.
- Windows 10 has SSH pre-installed, likewise MacOS and Linux I believe.
- Open the Command Prompt and type
ssh-keygen -t rsa - Use a text editor to navigate to your
HOMEorUSERfolder then the newly created.sshdirectory. - Open
id_ras.puband copy the text which should start with "ssh-rsa " and runs on for several lines. On Windows 10 you can just entermore %userprofile%\.ssh\id_rsa.pub | clipon the command line (from any directory) and the text will be copied to your clipboard.
You can use one SSH key for everything, or if you’re concerned about security create a key for Anvil and additional keys for additional services, or even a new key for every single app on Anvil. To make a new key for Anvil you just type ssh-add /home/brad/.ssh/id_rsa_anvil for example.
Not essential for Anvil, but you can find more information on SSH by watching this hour long video  or scanning through the associated command snippets (‘gist’) here.
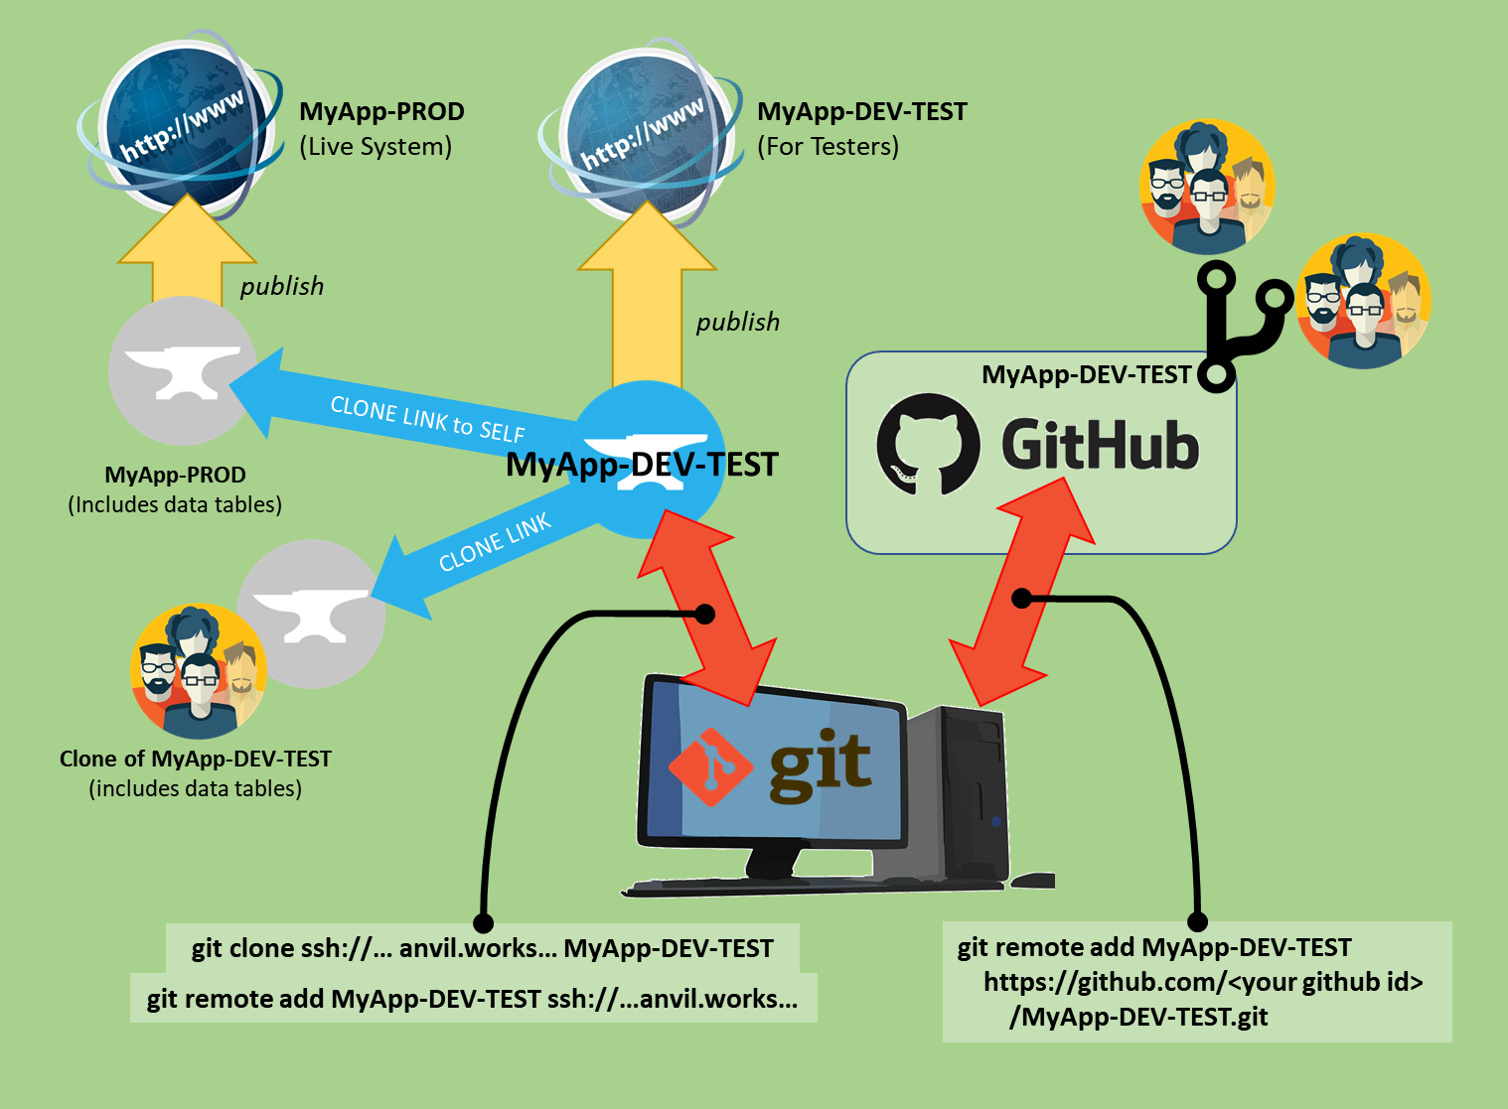
LEVEL 8: Pulling it all together...
At Level 3 you created three separate Anvil apps for DEV, TEST, and PROD and at Level 4 you paused to consider the alternative of creating just two separate apps, DEV+TEST, and PROD. At Level 6 you set up Git synchronisation between files and directories on your local computer (the ‘origin’) and Anvil (the ‘remote’).
So if it didn’t already occur to you already, the next step is just to repeat Level 6 for your remaining DEV, TEST or DEV+TEST environment(s). Once you’ve set up Git synchronisation for all 3 (or 2) of your Anvil apps, you can make changes either directly on Anvil, or locally, and you’ll be able to see what has changed line by line, all the while maintaining a perfect Version History you can restore from.
Then, when it comes time to ‘promote’ your latest changes from DEV to TEST just make sure your remote and origin for DEV are up to date and in sync, replace your local TEST folders and files with a copy from DEV, and then push those changes from local TEST to Anvil TEST. Likewise when you’re ready to promote TEST to PROD.
Footnote: I don’t think this will automatically copy, reset, or repair your data tables, so you might need to do that manually or by running a helper function. Also I haven’t read up on how Anvil backs up and restores data tables yet, so that might be something you need to consider managing yourself too.
LEVEL 9: Joining the Github community
Level 6 is fine if you’re mainly working on your own, but what if you want to open up development to the wider community in a structured way? If you don’t already know about Github, it’s a massive online repository for developing and sharing code: “The world’s leading software development platform” with loads of collaborative and issue management tools , discussion, and documentation tools built in.
It allows you to collaborate with other coders, creating branches (or forks) and then merging them back with the master version using ‘pull requests’. There’s also a snazzy client tool, the Github Desktop which I’m a fan of and integrations with editors/IDEs like VS Code. Click here to sign-up for a free Github account.
If you had created a Github account and downloaded the Github Desktop earlier and prefer to avoid Git incantations you could replace Level 6: Steps 6-7 with the following:
- Log in to https://github.com/, click on your profile photo (top right),
Settings,SSH and GPG Keys,New SSH Key, put your app name in the small box and copy the (long) SSH key from Level 7 into the big box, then finally click onAdd SSH Key. - Open up Github Desktop,
File,Accounts,Sign Inusing your new Github account name/email and password.File,Add Local Repository,Browseto your new local app folder and select it.
LEVEL 10: Creating additional remote copies of your local app
Using Git you can sync your local files not just with Anvil but also to a new ‘remote’ repository on Github (and elsewhere). Unfortunately the Github Desktop client doesn’t have the ability to create multiple ‘remotes’, but VS Code does…
- Create a new empty repository on Github: Click on your profile photo (top right),
Your Repositories,New,Create Repository. To avoid errors, do not initialize the new repository with README , license, orgitignorefiles. You can add these files after your project has been pushed to GitHub. - Copy the link
https://github.com/<your account name>/<empty repository name>.git - In VS Code go to
Source Control(ctrl+shift+g), click on the three dots:More Actions,Push To...,Add a new remote..., give it a name*, copy the link from Step 2.
* You might like to prefix the name with “GitHub_” to avoid any confusion with the “Anvil_” remote you set up earlier.
If you don’t have VS Code or another editor that has this functionality for Step 3, or if you just prefer it, you can use a single Git incantation to set this up… From the Command Prompt, navigate to the root of your new local ‘ origin ’ folder (important!) and enter:
git remote add GitHub_MyApp-DEV https://github.com/<your github id>/MyApp-DEV.git
[Ed… is there also a git command to create the new remote repository (before adding it) instead of Steps 1 and 2 above?]
There’s probably no point in setting up a local copy of Production (unless you’re doing something clever with data configuration) and if you like me you’ve opted for a combined DEV-TEST environment then you only need to set up one local copy of DEV-TEST and just one additional remote repository on Github.
Here’s the sort of workflow you can now take advantage of:
- Make edits in the Anvil IDE or your local IDE (VS-Code, PyCharm or whatever) in the MyApp-DEV-TEST app.
- Use Git incantations, VS-Code, or Git Desktop to ‘pull’ edits to your local machine from Anvil (MyApp-DEV).
- Use Git incantations, VS-Code, or Git Desktop to ‘push’ from your local copy to Anvil and/or Github (where other developers can now contribute to your project using branch, fork, discuss, raise issues, collaborate on documentation in the normal Github way) *
- When it’s time to promote changes from DEV-TEST to PROD, just push all your local changes to Anvil TEST-DEV,
PublishAnvil TEST-DEV to merge it with any unpublished DEV changes there, and then create a clone of TEST-DEV (see Level 3), renaming it as PROD (with a nice Release or Version Number schema if you don’t want to over-write your previous PROD) andPublishthat to your fully public URL. [Ed… If you want to keep the previous version of PROD I think you might have to disable it e.g. by setting a dummy URL, but there might be a better way?]
( * ) If you experience problems pushing to Anvil, it might be because you’ve opened it in the browser at the same time as pushing, and it’s saved automatically. In that case you can go to Version History , restore to the version immediately before saved automatically and then push again.
There are other workflow suggestions dotted through the Forum, but if you’re a relative newcomer reading this Tutorial, rather than spending time theorising about the best way of working I suggest you just try this workflow for a while first and see if it works for you, then adjust your approach as required.
LEVEL 11: Pushing multiple branches from local machine to Anvil
What I stumbled on but haven’t seen documented anywhere is that from your local machine, you can also use Git (or in my case VS-Code) to create and push multiple branches (e.g. DEV1, DEV2, TEST1, TEST2) back to Anvil, which is brilliant!
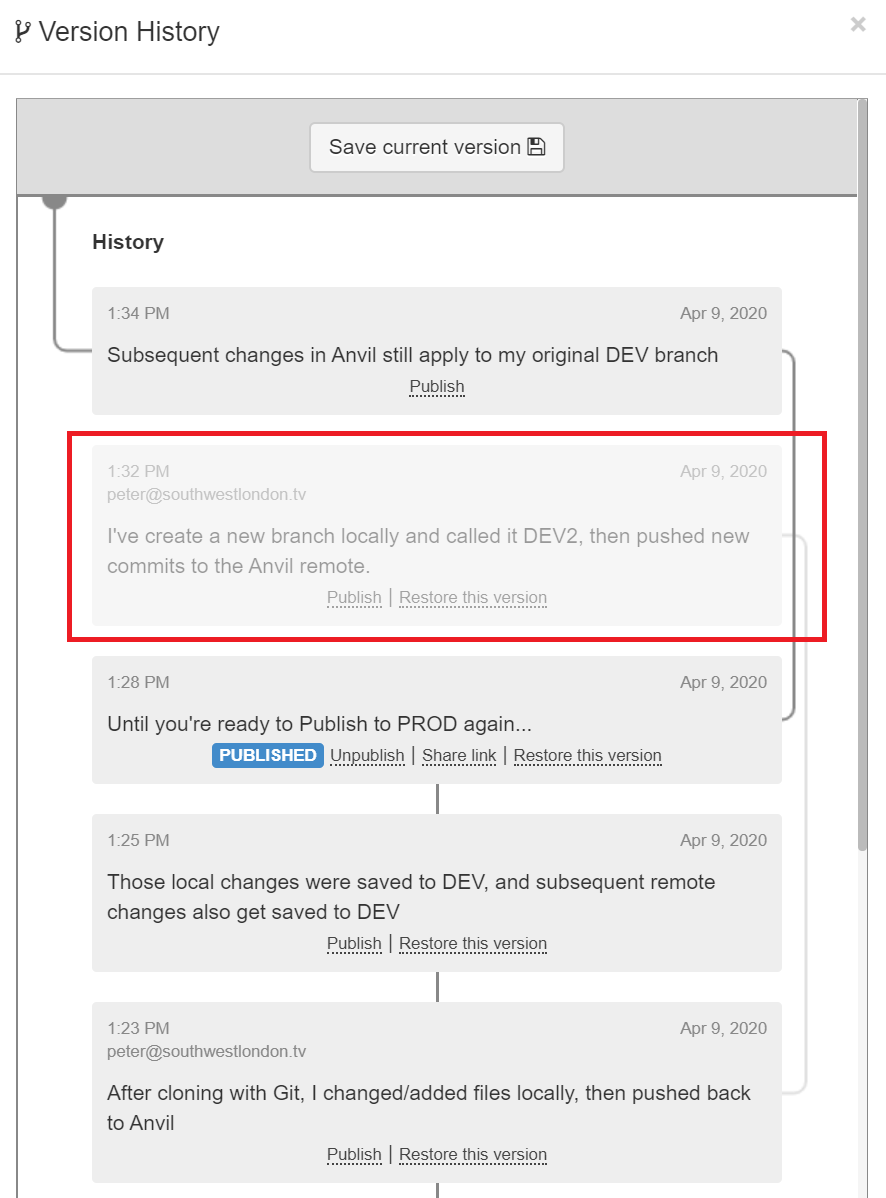
Notice there’s even a helpful (but not very prominent) line linking DEV2 back to the Git Clone it was branched from…
And here’s how it looks when you merge DEV2 with ‘master’ locally using Git or Github Desktop etc and push back to the Anvil remote:
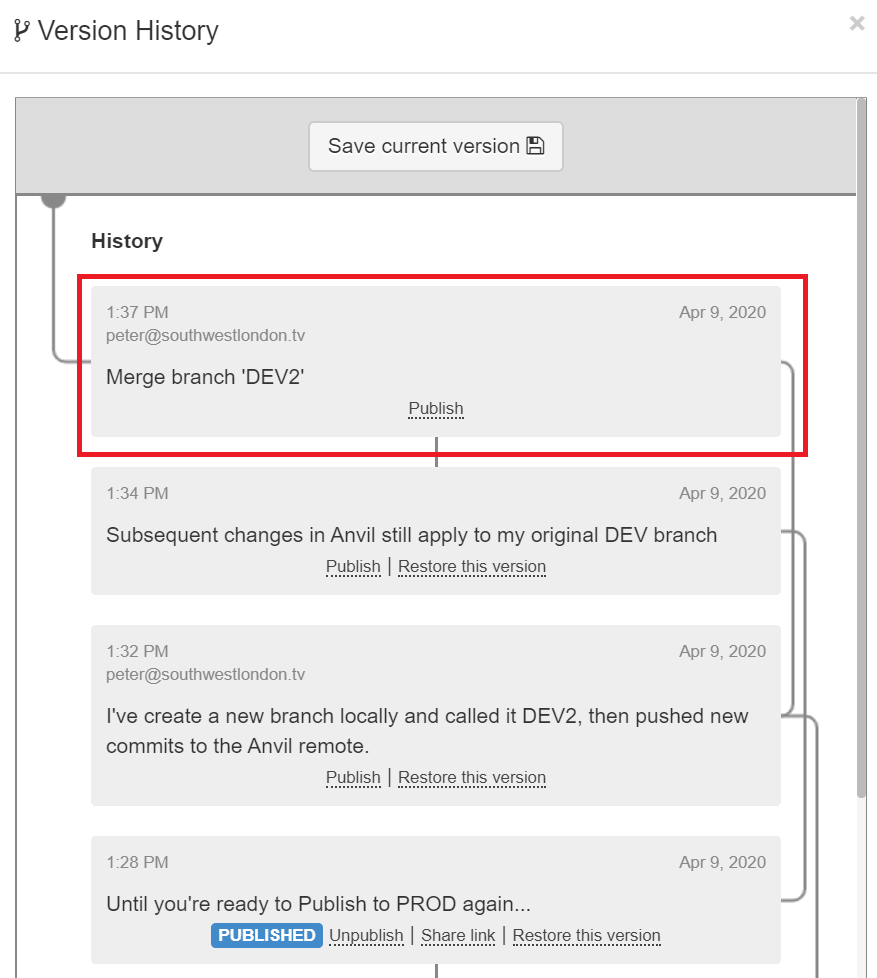
Notice again there’s a helpful (but not very prominent) line showing DEV2 has been merged into the Anvil remote (DEV). What’s not so clear perhaps is that the changes made in the Anvil IDE at 1:34pm have also incorporated in the 1:37pm version (I think).
I haven’t tested it myself but thanks to @owen.campbell for suggesting an additional step which, if I’ve understood his post avoids all instances using/overwriting the same data tables on Anvil… A problem I haven’t (knowingly) run into yet but might well do! Here’s the simple extra Git command:
git update-index --skip-worktree anvil.yaml
If you’re likely to use multiple branches like this, please read and support my Feature Request to make the View History a bit more explicit.
Phew - well done for getting all the way down to Level 11. As you can see it takes quite a few words to explain not just how and what to do, but why. I hope people find this Tutorial useful, especially newcomers, and that comments from more experienced developers will bear in mind the target audience and the need to be helpfully ‘opinionated’ about how do things, at least initially, rather than expect newbies to go through the same time-consuming learning curve and experiment with choices without really understanding the basics as I did.
One of the most amazing things about Anvil is how quickly even inexperienced coders can bash out a working prototype (many examples on the site justifiably claim to take < 3 hours), so if you’ll indulge me a whimsical closing thought, I do think it’s a shame it takes so long (relatively speaking) to set up and settle on good working practices for version control and collaboration, and that although Git/Github integration is supported in Anvil, it doesn’t just ‘work’ right out of the box.
I look forward to hearing people’s feedback!
All the best,
Peter
PS is there a prize for longest forum post ever?

